
Hi there! I’m the Technical Lead Animator at Treehouse and I’ve been experimenting with VR and real-time game design. Welcome to part 2 of my tutorial on creating high-resolution assets for VR applications. If you haven’t had the chance yet, go ahead and check out Part 1 first.
In this article, we’ll make our way through the rest of the asset workflow and add it into the DirectX engine to see the final asset.
Texture Baking
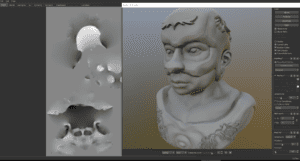
This is the process of taking the high poly model and sending its detail to the low poly real-time ready game model. You need to do this in a specialized program that is suited for this purpose. A lot of 3D programs do it, but they tend to be slow and not very reliable. I like to use Substance Designer, but for this post, we’ll use a program call Knald that is gaining a lot of industry traction. Its a small tool-set that is only used to bake and very user friendly.
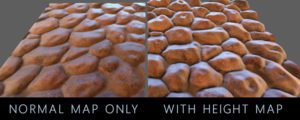
The important thing that makes creating VR assets different from creating a regular game asset is that you have to have a Height Map. In contrast, most non-VR game assets get away with a Normal map only.
A Normal Map is an image that stores a direction at each pixel. It basically tells the game engine how light interacts with the surface vertices of the polygon. It displays a flat detail so that in a regular game without depth perception, it looks like there are depth and detail. However, in VR and through a headset a Normal Map looks like a fake facade when you get up close. That’s why the Height Map is essential to give the engine surface elevation data.
Next, we’ll need to bake out an Ambient occlusion map to approximate how bright light should be shining on any specific part of a model, based on the light and it’s environment. Then create a Curve map that uses greyscale or RGB values to help the engine smooth the model in sections of a certain degree or slope.
Here’s a video going over the workflow we’ve covered so far.
With the texture baking complete, here are the maps we’ve ended up with.
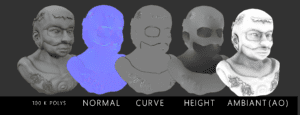
As you’ll notice, at this stage we’ve got back some of the detail too.

If you want to really get technical and in-depth on texture baking, Polycount, a leading game forum, has extensive technical articles on the subject.
Scale
As explained in my article Size Matters. Scale Relationships in VR, now that we have the maps we need to check the size of our model before we finish the process. You can do this in Engine, but I also recommend double checking it at this point in Maya, or any general 3D program.
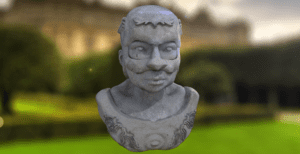
Now that we’ve confirmed it looks good and is about 3 feet tall, it’s perfect for a garden sculpture in our game.

Texturing
At this point, we’ll need to load all of the maps into Substance designer. If you like working with nodes in a procedural workflow, this is a great program used by a lot of artists). If you’re more of a Photoshop artist and like to work in the more traditional style, I’d recommend using dDo. It hooks into Photoshop nicely and has a variety of tool-sets for texturing and painting/filling along UVs.
After loading in the low poly model, I mapped in the baked textures in Substance using a PBR material setup. It is a ts a huge program so I’m not going to get into the specifics of that process in this article.
Loading into a DirectX Engine
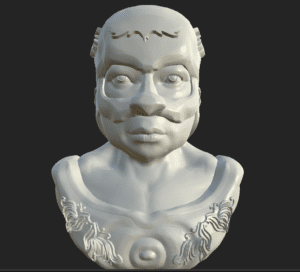
Now as you can see, we’re almost done, so it’s time load the asset into DirectX to view. I’d also recommend checking it out in Unity 3D or Unreal Engine. But if you just want to take a look without the complexity of a full game engine, there is a rather robust viewer called Toolbag.
Just for fun, I also added a procedural concrete texture to the head bust in Substance Designer and dropped in my garden light map to see the end result.
Have questions? Follow me on Twitter at @randomjake or share them in the comments below.


Very cool! Great article. 🙂