
Last Updated on November 14, 2022 by Laura Coronel
As developers, we often need to create widgets for interfaces that make it easier to accomplish certain tasks. These might be sliders for controlling video playback, calendar pickers for selecting dates or any other number of other useful widgets. The problem that we face when creating these widgets is how to manage encapsulation.
The widgets that we write are often reused on a number of other pages, but how do we make sure that none of the code on those pages will interfere with code used to build the widget itself. This problem of creating a boundary between the widgtet code you wrote and the code that will consume your widget is something that Web Components aims to solve.
Note: The traditional way of fixing the encapsulation problem is to use iframes. However this is far from an ideal solution and can often cause problems.
In this blog post you are going to look at Shadow DOM, one of the four key building blocks that make up Web Components.
Contents
A Brief Introduction to Shadow DOM
Shadow DOM allows the browser to inject a subtree of DOM elements into the rendered document that is displayed on the screen. This has no effect on the DOM tree in your main document, the browser handles Shadow DOM on-the-fly as it renders a page. Confused? Let me explain using an example.
Browser makers have actually been using Shadow DOM for quite awhile now to build interface widgets like those lovely range inputs and datepickers that came about in HTML5. These widgets are actually built using HTML and CSS. You cannot see the individual elements that make up these widgets in the dev tools because they use Shadow DOM, but trust me, they are there.
If you turn on support for Shadow DOM in Chrome Dev Tools you can dig down and see the elements that make up these widgets. To Enable this follow these steps:
- Open the Chrome Dev Tools.
- Open the settings pane by clicking the cog icon in the lower right corner.
- In the ‘General’ tab enable ‘Show Shadow DOM’.
Now if you inspect a widget such as a range input you should be able to look into the Shadow DOM by clicking the little grey arrow to the left of the element. The figure below shows the elements that make up a range input in Chrome.

Inspecting the Shadow DOM for a ‘range’ input
Browser Support: Shadow DOM is only currently supported in Chrome and Opera 15.
Can I use… Shadow DOM
How Shadow DOM Works
Shadow DOM introduces a new kind of node that can be associated with elements, this is called a shadow root. An element that has a shadow root associated with it is known as a shadow host. When an element is a shadow host, the content of the shadow root is rendered instead of the content of the host element. Lets take a look at a simple example.
<div>Hello, World!</div>
<script>
  var host = document.querySelector(‘div’);
  var root = host.webkitCreateShadowRoot();
  root.textContent = ‘Hello, Treehouse!’;
</script>
Here we first create a <div> element that will become our shadow host. We then use JavaScript to create a shadow root on our host element using the webkitCreateShadowRoot method. Finally we change the textContent on the shadow root to be ‘Hello, Treehouse!’.
Note: You should not really put content in the Shadow DOM as it’s not accessible by search engines or screen readers. However, for the purposes of this simple example we will make an exception.
The figure below shows how this is rendered by the browser. Notice how the original ‘Hello, World!’ text node is still there, just not being rendered on the screen.

Inspecting the Shadow DOM
Now that you understand the basics of how Shadow DOM works, lets take a look at a more complex example.
Related Reading: JavaScript Loops 101
Creating Reusable Widgets Using Shadow DOM
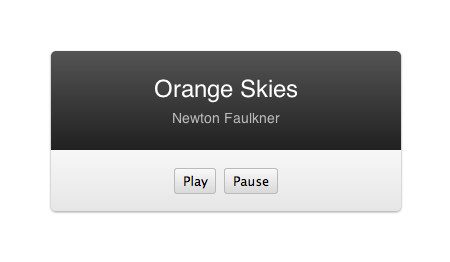
In this section you are going to learn how to build a simple music player widget that makes use of Shadow DOW and HTML templates. The widget you are going to build is pictured below.
Note: In order to keep this example relatively simple we are not going to worry about building a widget that actually plays music. We are just going to focus on the bit that involves Shadow DOM.
Using Shadow DOM you are going to split the presentation layer of the widget (the playback controls and styling) from the widget content (song name and artist). This practice of splitting content and presentation is key to build widgets that are reusable.
Creating the Template
To start we are going to create a HTML template for our widget. This will be responsible for the playback controls and overall style of the music player.
<template id="musicPlayerTemplate">
  <style>
    .outer {
      width: 350px;
      font-family: Helvetica, Arial, sans-serif;
      -webkit-font-smoothing: antialiased;
      border-radius: 5px;
      overflow: hidden;
      box-shadow: 0 1px 3px rgba(0,0,0,0.4);
    }

    .info {
      background: #545454;
      background: -webkit-gradient(linear, left top, left bottom, color-stop(0%,#545454), color-stop(100%,#212121));
      background: -webkit-linear-gradient(top,  #545454 0%,#212121 100%);
      background: linear-gradient(to bottom,  #545454 0%,#212121 100%);
      padding: 1.5em;
      text-align: center;
    }

    .song {
      color: #FFFFFF;
      font-size: 1.5em;
    }

    .artist {
      margin-top: 0.5em;
      color: #BABABA;
      font-size: 0.9em;
    }

    .controls {
      padding: 1em;
      text-align: center;
      background: #f7f7f7;
      background: -webkit-gradient(linear, left top, left bottom, color-stop(0%,#f7f7f7), color-stop(100%,#e6e6e6));
      background: -webkit-linear-gradient(top,  #f7f7f7 0%,#e6e6e6 100%);
      background: linear-gradient(to bottom,  #f7f7f7 0%,#e6e6e6 100%);
    }

    button {
      background: #f9f9f9;
      background: -webkit-gradient(linear, left top, left bottom, color-stop(0%,#f9f9f9), color-stop(100%,#d9d9d9));
      background: -webkit-linear-gradient(top,  #f9f9f9 0%,#d9d9d9 100%);
      background: linear-gradient(to bottom,  #f9f9f9 0%,#d9d9d9 100%);
      border: 1px solid #BABABA;
      border-radius: 3px;
      font-size: 0.8em;
      padding: 0.3em 0.6em;
      cursor: pointer;
    }
  </style>

  <div class="outer">
    <div class="info">
      <div class="song">
        <content select=".song"></content>
      </div>
      <div class="artist">
        <content select=".artist"></content>
      </div>
    </div>
    <div class="controls">
      <button class="play">Play</button>
      <button class="pause">Pause</button>
    </div>
  </div>
</template>
Now that we’ve got our presentation code sorted we need to write the code that will make use of our widget.
Projecting the Content
To put our widget to work we first need to create the element that will become our shadow host. This should contain the content that our widget needs (the song name and artist).
<div id="musicPlayer">
  <span class="song">Orange Skies</span>
  <span class="artist">Newton Faulkner</span>
</div>
Note that we’ve given the two <span> elements classes. Our widget needs to display the song that is playing along with the artist. In order to do this we project this content into place using <content> elements.
By default all of the content from the shadow host will be projected into the template at the location of the <content> element. However, we have two separate pieces of content that need to be displayed in different positions within our widget. Fortunately the <content> element has a select attribute that allows you to specify which element in your shadow host the content should be projected from. If you look back at your template code you should notice two <content> elements like the ones below.
<div class="song">
  <content select=".song"></content>
</div>
<div class="artist">
  <content select=".artist"></content>
</div>
Here we use the select attribute to specify the class of the element which the projected content should come from.
The last thing we need to do is write some JavaScript code that will create a new shadow root and load the HTML template for our widget.
<script>
  var host = document.querySelector('#musicPlayer');
  var shadow = host.webkitCreateShadowRoot();
  var template = document.querySelector('#musicPlayerTemplate');
  shadow.appendChild(template.content);
  template.remove();
</script>
Here we first get a reference to the shadow host (a <div> with the ID musicPlayer) and create a new shadow root as we did before. We then get a reference to the template that we created for our widget. Finally we add the template content to the shadow root and remove the original template from the main document DOM. As we used <content> elements the browser will take care of projecting the content into the correct places in our widget.
That’s everything you need to know to start building your own widgets using Shadow DOM!
Final Thoughts
Hopefully this article has showed you how useful Shadow DOM can be when it comes to creating reusable widgets for your interfaces.
Browser support for Shadow DOM is currently confined to Chrome and Opera 15 which means that it’s not quite ready for prime-time yet. However, I think that it has great potential and could really revolutionize how we build websites.
I’m interested to hear your thoughts on Shadow DOM. How would you use it in your projects?
To learn more coding tips, try out the 7-day free trial with Treehouse.


It’s amazing to pay a visit this site and reading the views of all colleagues regarding this post, while I am also eager of getting knowledge.
The problem with Shadow DOM is that it doesn’t actually solve the problem it was designed for. The only stuff that’s encapsulated is the content of the shadow DOM, but since you can’t actually put content in there, you’ve solved nothing. The real content of the widget is still affected by other CSS on the page, and is still vulnerable to naming conflicts.
Thanks for the great article.
There is a small typo in the “Hello world” example: should be var root = host.webkitCreateShadowRoot(); instead of var root = host.wekbitCreateShadowRoot();
Nice catch! Thanks Nikolai 🙂
At first when I read this I thought that this is just some other way of applying templating, then I came across this, and it blew my mind:
http://www.w3.org/TR/shadow-dom/
Such a well explained article that too on a tech. Awesome, enjoyed reading about the shadowhost and I should try to implement in my projects. Sadly, Firefox is not in the club. IE doesn’t matter much to me.
Thanks Altaf 🙂
Interesting! 🙂
instead of using host.webkitCreateShadowRoot() could you just use document.createDocumentFragment() which would be vendor independent? or is there something about shadow dom that makes it better because it looks like it essentially creates a document fragment.
The main difference is that content in ShadowDOM is encapsulated.
For example, any CSS styling in the main document will not be applied to content in the ShadowDOM.
Content in a standard document fragment will however be affected by the CSS in the main document.
Document fragments are virtual constructs — you can’t add one to a page. All that gets added is the content of the fragment.
Great round up Matt, shame that the support isnt there yet.
This is great. I didn’t know that Shadow DOM has been used a bit long time. This is the first time I heard it. Nice information. I will have it checked and applied in my website. Thanks.
______________________
physical therapy documentation
Very nice. Encapsulating the widget to protect from the page’s styling is really cool — and useful.
Here is my first try: http://codepen.io/varemenos/pen/fgquB
Not sure if I used it properly because the keyframes/animation doesn’t seem work
Bringing the keyframes css out from the template and into the page css seems to trigger it.
yes but then it can’t be part of the template
As always, nice work, Matt!
Thanks Guil 🙂
It looks great, Im getting goosebumps thinking about future usage of this – although I honestly think, that those components wont be that usable when it comes to rwd, because of missing element queries. The Post however was very good written – I just miss some use cases maybe. Thanks for your post 🙂
Thanks 🙂
Thanks for coverage. So the main thing is that styles from page’s DOM wouldn’t be applied to Shadow DOM’s elements and my widget will be the same no matter what?
Yep, you got it 🙂
This is unique, detailed coverage for this new tech. Thanks for demystifying the ‘Shadow DOM’.
Thanks Aditya 🙂
This is something I hadn’t otherwise stumbled across on the internet somewhere. This is a FANTASTIC explanation of how Shadow DOM works!
Thanks Brandon!
Glad you enjoyed it 🙂