In this tutorial, we will learn how to make our own responsive WordPress theme using Bootstrap. Bootstrap is a responsive framework for building web sites and applications, and it’s a great starting point for building a responsive WordPress theme.
Check out Zac’s other WordPress courses and enjoy a free, two-week trial of Treehouse.
You don’t have to have built a theme from scratch before to successfully follow along. However, we do assume that you are comfortable doing things like adding and editing posts in the admin area or installing plugins.
The theme we will build is based on the Basic marketing site example you can find over on the Bootstrap examples page. For this demo we will build out templates for the following pages and functionality:
- Custom homepage design
- About page
- Contact page
- News section with comments
- A widgetized sidebar
Contents
Getting Started
Before we get started there are a few things you will need to do:
- Install WordPress
- Download and Unzip Bootstrap
- Install the Theme Test Drive plugin*
* You only need this plugin if you will be building the theme using a live site and don’t want people to see the new theme while you are developing it.
Once you have these things ready, open the directory with all your WordPress files and navigate to wp-content > themes.
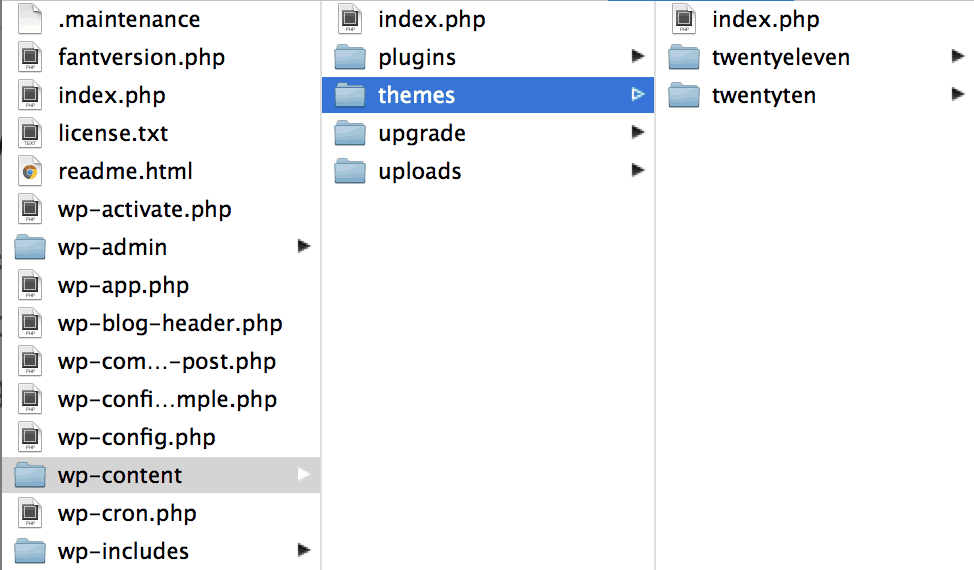
Once you navigate to that folder create a new folder called “wpbootstrap.” Inside of that folder paste in the bootstrap folder.

Inside of that folder create a new file named index.php.

Now we’re going to copy the source code from the example basic marketing site and copy and paste it into the index.php file. Here is the source code you want to use. We’ve just linked to a txt version of the code since it is too long to embed in the post here.
Now that we have a static HTML page, we’re going to move on to creating the main CSS page. WordPress requires a specially formatted comment to appear at the top of the style.css page. It uses this comment to get all of the meta information about your theme.
In the same folder as your index.php page create a new file named style.css. WordPress requires a CSS file with the specific name style.css, so we can’t name it anything else or our theme won’t work.
Once you have created a style.css file at the same level as your index.php file, add this comment to the top.
/*
Theme Name: WP Bootstrap
Theme URI: http://teamtreehouse.com/wordpress-bootstrap-theme-tutorial
Description: A demo theme built to accompany the Treehouse blog post <a href="http://teamtreehouse.com/wordpress-bootstrap-theme-tutorial">How to Build a WordPress Theme with Bootstrap</a>.
Author: Zac Gordon
Author URI: http://teamtreehouse.com/
Version: 1.0
Tags: responsive, white, bootstrap

License: Attribution-ShareAlike 3.0 Unported (CC BY-SA 3.0)
License URI: http://creativecommons.org/licenses/by-sa/3.0/

This simple theme was built using the example Bootstrap theme "Basic marketing site" found on the Bootstrap web site http://twitter.github.com/bootstrap/examples/hero.html
*/
The last thing we need to do before we install and start building our new theme is to upload an image that will appear with our theme in the WordPress admin area. This image needs to be 300 x 225 px and named “screenshot.png” You can use this image or create your own.

Your folder structure should now look like this:

We’re now ready to go into the admin area and install our new theme. Login to the admin area and go to Appearances > Theme. You should see WP Bootstrap listed as one of the themes.
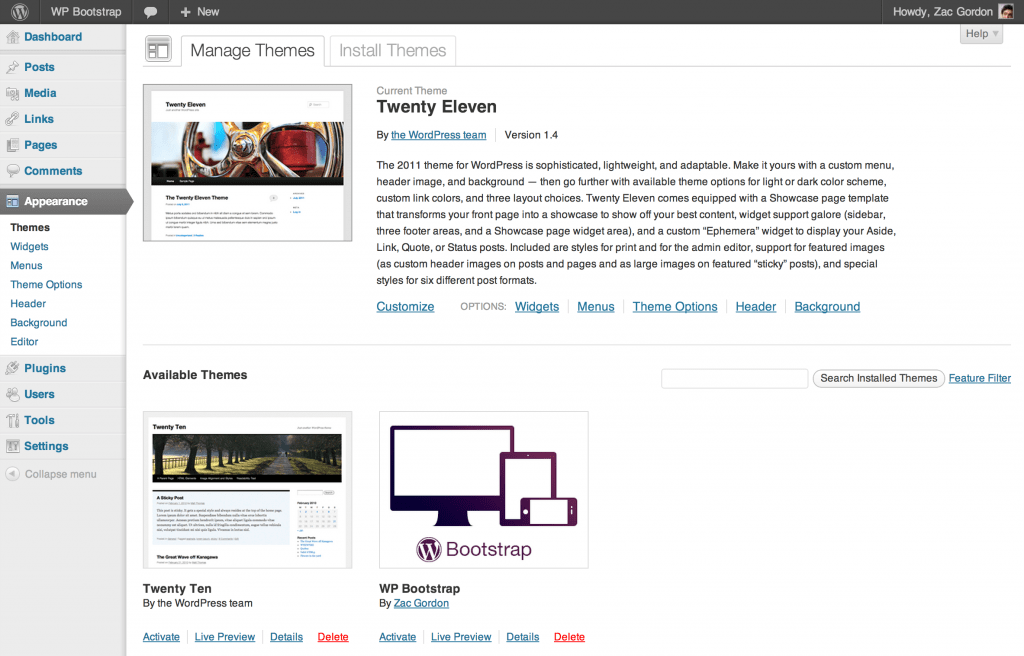
Click Activate under the WP Bootstrap theme to set it as the current theme for the site.
NOTE: If you are using a live site and do not want people to see this theme under development, make sure to install and activate Theme Test Drive plugin.
Once it’s activated, visit your site and you should see something like this.
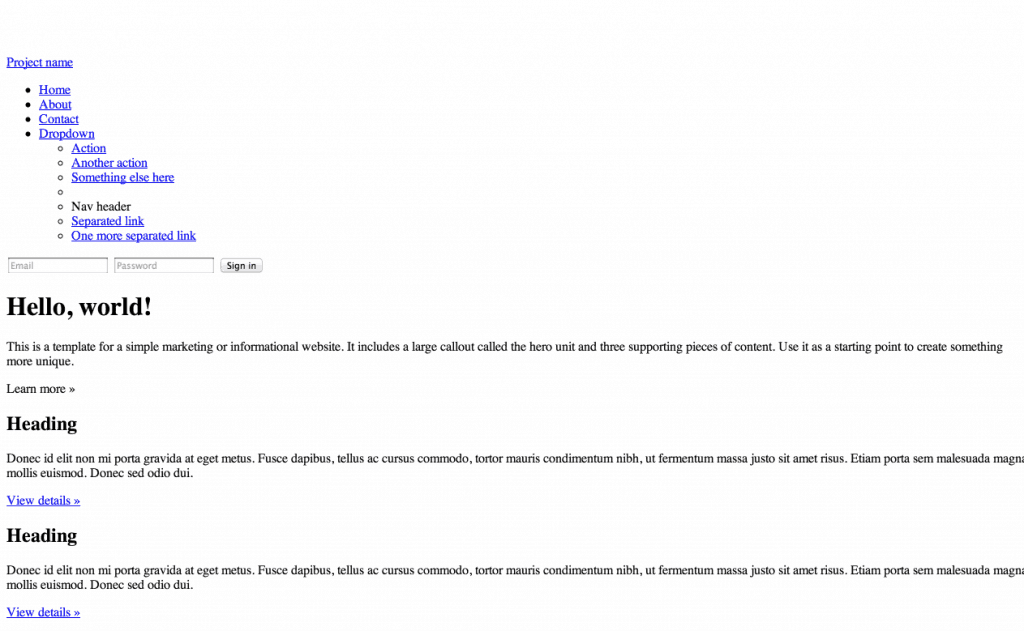
It’s clear that none of the CSS is working on this site currently, so in the next step we’ll start the process of converting this static file into a working WordPress theme.
Converting Bootstrap Files to WordPress Templates
Most WordPress themes include the following files:
- index.php
- style.css
- header.php
- footer.php
- sidebar.php
You will usually see a lot more than these files, but we’re going to start with these files and build from there. Go ahead create empty files for the header.php, footer.php, and sidebar.php.
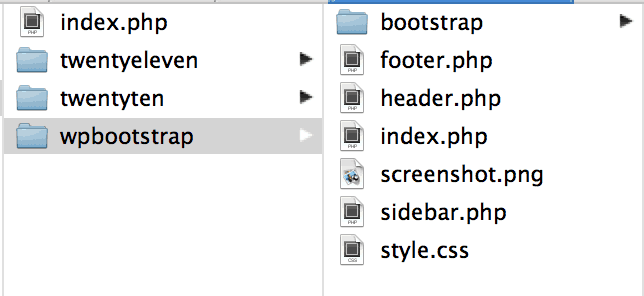
What we are going to do is take all of the HTML that would usually be included at the top of every page and cut and paste it into the header.php file. Then we will do the same for all of the HTML that would normally appear at the bottom of every page and cut and paste it into the footer.php file.
Let’s look at what each of these files look like now. Again these are just .txt files that have been linked to because all of the source code would be too much to list here. You can copy and paste the code from these files into your own .php files.
The sidebar.php file is still empty.
Now we are going to use our first WordPress tags to include the header and footer back into the index.php page.
The two tags we will user are get_header() and get_footer(). These are built in WordPress functions that find the header.php and footer.php files and include them at the top and bottom of the page. WordPress can do this because we named our files header.php and footer.php. If we named the files my-header.php and my-footer.php this would not work.
Here is what our index.php file should look like now:
<?php get_header(); ?>
<!-- Main hero unit for a primary marketing message or call to action -->
<div class="hero-unit">
<h1>Hello, world!</h1>
<p>This is a template for a simple marketing or informational website. It includes a large callout called the hero unit and three supporting pieces of content. Use it as a starting point to create something more unique.</p>
<p><a class="btn btn-primary btn-large">Learn more »</a></p>
</div>
<!-- Example row of columns -->
<div class="row">
<div class="span4">
<h2>Heading</h2>
<p>Donec id elit non mi porta gravida at eget metus. Fusce dapibus, tellus ac cursus commodo, tortor mauris condimentum nibh, ut fermentum massa justo sit amet risus. Etiam porta sem malesuada magna mollis euismod. Donec sed odio dui. </p>
<p><a class="btn" href="#">View details »</a></p>
</div>
<div class="span4">
<h2>Heading</h2>
<p>Donec sed odio dui. Cras justo odio, dapibus ac facilisis in, egestas eget quam. Vestibulum id ligula porta felis euismod semper. Fusce dapibus, tellus ac cursus commodo, tortor mauris condimentum nibh, ut fermentum massa justo sit amet risus.</p>
<p><a class="btn" href="#">View details »</a></p>
</div>
</div>
<?php get_footer(); ?>
You may be wondering why we would do that? The reason is that later we will be creating multiple pages in which we will want to include the header and footer code. If we just left the header and footer HTML in all of these pages and went to change something in the header or footer, we would have to have to update the HTML across all of the pages. Using the “embed” or “include” method allows us to change the header or footer code in one place and have it automatically fixed across all of the pages. It’s similar to the benefit of linking to CSS files instead of including all of the CSS at the top of each page.
Now that we have this done, we are going to fix all of the broken links to our CSS and JavaScript files.
Let’s start in the header.
Find the links to the CSS files in the header and change them from this
<!-- Le styles -->
<link href="../assets/css/bootstrap.css" rel="stylesheet">
<style type="text/css">
  body {
    padding-top: 60px;
    padding-bottom: 40px;
  }
</style>
<link href="../assets/css/bootstrap-responsive.css" rel="stylesheet">
To this
<!-- Le styles -->
<link href="<?php bloginfo('stylesheet_url');?>" rel="stylesheet">
The in your style.css file, add the following:
@import url('bootstrap/css/bootstrap.css');
@import url('bootstrap/css/bootstrap-responsive.css');
body {
     padding-top: 60px;
     padding-bottom: 40px;
}
What we have done here is use a special WordPress tag that will automatically link to the bootstrap CSS in our theme files no matter what page of our site we’re on. You will see this bloginfo() function used throughout this tutorial in various ways. Then we used the @import tag to link to the Bootstrap CSS files from our main style.css file. Your site should now look like this: 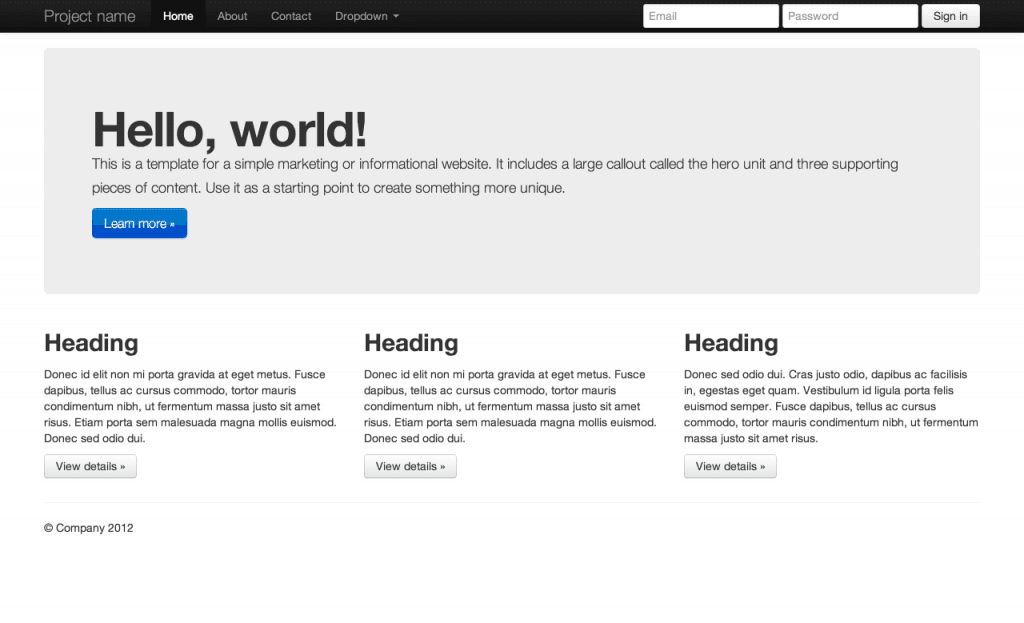 Much better! Before we move on to the footer, there is one more tag we have to add to the header. The
 wp_head() function is an important hook that allows for plugin developers to dynamically add CSS or JavaScript to your site. If we do not include this in our template, some plugins may not work. While we’re at it, we’re also going to remove a few extranious tags from our header. Your header.php template should look like this.
  <head>
    <meta charset="utf-8">
    <title>Bootstrap, from Twitter</title>
    <meta name="viewport" content="width=device-width, initial-scale=1.0">

    <!-- Le styles -->
    <link href="<?php bloginfo('stylesheet_url');?>" rel="stylesheet">

    <!-- Le HTML5 shim, for IE6-8 support of HTML5 elements -->
    <!--[if lt IE 9]>
      <script src="http://html5shim.googlecode.com/svn/trunk/html5.js"></script>
    <![endif]-->

    <?php wp_enqueue_script("jquery"); ?>
    <?php wp_head(); ?>
  </head>
  <body>

  <div class="navbar navbar-inverse navbar-fixed-top">
    <div class="navbar-inner">
      <div class="container">
        <a class="btn btn-navbar" data-toggle="collapse" data-target=".nav-collapse">
          <span class="icon-bar"></span>
          <span class="icon-bar"></span>
          <span class="icon-bar"></span>
        </a>
        <a class="brand" href="<?php echo site_url(); ?>"><?php bloginfo('name'); ?></a>
        <div class="nav-collapse collapse">
          <ul class="nav">

              <?php wp_list_pages(array('title_li' => '', 'exclude' => 4)); ?>

          </ul>
        </div><!--/.nav-collapse -->
      </div>
    </div>
  </div>

  <div class="container">
Now, let’s go on to clean up the footer. The example file we download has links to a lot of JavaScript files that we don’t need for our site. So, we are going to start by deleting them. Update your footer so it looks like this. Your updated footer.php file should look like this:
     <hr>

      <footer>
        <p>© Company 2012</p>
      </footer>

    </div> <!-- /container -->

    <!-- Le javascript
    ================================================== -->
    <script src="../assets/js/jquery.js"></script>
    <script src="../assets/js/bootstrap.js"></script>

  </body>
</html>
Next we are going to add the wp_footer() tag that serves the same function as the wp_head(). We will place this right before the closing body tag. We are also going to change the way we load our JavaScript files and move them to the header.php file.
So, update your footer.php file so it looks like this:
<hr>

      <footer>
        <p>© Company 2012</p>
      </footer>

    </div> <!-- /container -->

    <?php wp_footer(); ?>

  </body>
</html>
Now we can go back and add our JavaScript in the way WordPress recommends loading JavaScript. This method includes using the wp_enqueue_script() function.
First, we are going to use this function to load jQuery right about the wp_head(). Go ahead and place the following code into your header.php file like so.
    <?php wp_enqueue_script("jquery"); ?>
    <?php wp_head(); ?>
Next we will load our JavaScript using the wp_head() function. Remember, the wp_head() function is what plugins and themes use to add CSS and JavaScript to the header.php file.
To do this we will have to create a new file called functions.php and load our JavaScript from there. This may seem like a lot of extra steps to load a JavaScript file, but as your themes get more complex it will help everything stay clean and organized.
In the same folder as your header.php file, create and open a functions.php file.
Paste into that file the following code:
<?php

function wpbootstrap_scripts_with_jquery()
{
	// Register the script like this for a theme:
	wp_register_script( 'custom-script', get_template_directory_uri() . '/bootstrap/js/bootstrap.js', array( 'jquery' ) );
	// For either a plugin or a theme, you can then enqueue the script:
	wp_enqueue_script( 'custom-script' );
}
add_action( 'wp_enqueue_scripts', 'wpbootstrap_scripts_with_jquery' );

?>
To test that this is working, navigate to your site, resize it to be a tablet or mobile size and click on the menu drop down. It should drop down and look like this:
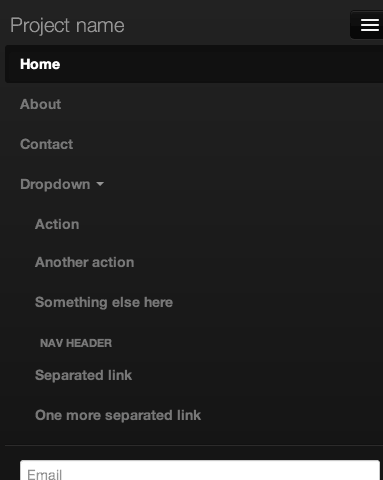
If that dropdown doesn’t work it means something went wrong linking to the JavaScript files. Make sure that you have properly uploaded the bootstrap > js folder and that your code is correct. You don’t want to build a responsive site with a broken mobile and tablet menu!
Developing a Custom WordPress Homepage
Now that we have our basic static template setup, let’s make it dynamic by creating a homepage in WordPress and having it display on our site instead of the hardcoded HTML we have now.
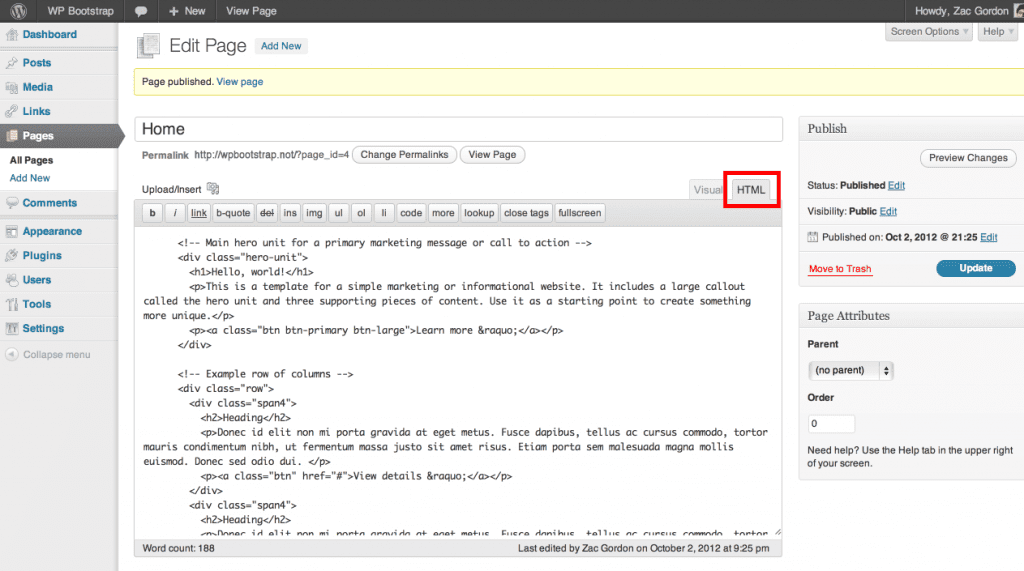
To do this, go to the WordPress admin area and click Pages > Add New. Title the page “Home” and then click on the HTML tab above the Content Editor. Now we will cut the remaining markup from the index.php file and paste it into this page and click “Publish”. Your Home page should look like this.
All your index.php file should have in it now are the header and footer includes.
<?php get_header(); ?>

<?php get_footer(); ?>
To include the Home page content that we added in the WordPress admin area back into our our template dynamically we are going to use probably the most famous WordPress function called, the Loop.
The WordPress Loop does what it sounds like. It loops through a page or post and pulls in its title and content, as well as a lot of other information like the date it was published, the author who published it, and even any comments associated with the post or page.
The basic loop looks like this.
<?php if ( have_posts() ) : while ( have_posts() ) : the_post(); ?>

<?php endwhile; else: ?>
	<p><?php _e('Sorry, no posts matched your criteria.'); ?></p>
<?php endif; ?>
Here is what your index.php file should look like with the loop in it.
<?php get_header(); ?>

<?php if ( have_posts() ) : while ( have_posts() ) : the_post(); ?>

<?php endwhile; else: ?>
	<p><?php _e('Sorry, no posts matched your criteria.'); ?></p>
<?php endif; ?>

<?php get_footer(); ?>
What we will do now is add in the WordPress code that pulls in the title and content of the page. The code for the title looks like this the_title() and the code for the content looks like this the_content(). You can see that they look very similar to the header and footer tags. Here is what the it looks like along with the loop.
<?php if ( have_posts() ) : while ( have_posts() ) : the_post(); ?>

	<h1><?php the_title(); ?></h1>
	<?php the_content(); ?>

<?php endwhile; else: ?>
	<p><?php _e('Sorry, no posts matched your criteria.'); ?></p>
<?php endif; ?>
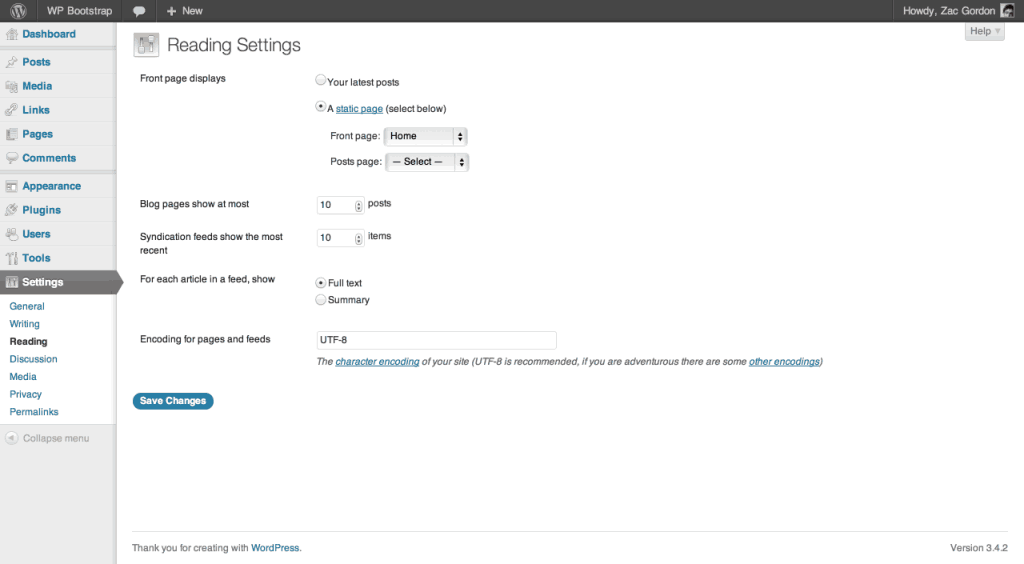
Before we can test this in the browser, we have to update a setting in WordPress to make it display our Home page as the front page instead of recent blog posts. To do this navigate in the admin area to Settings > Reading and under “Front page displays” and click on the “A static page” radio button. Next select “Home” from the “Front page:” dropdown.
Click save changes and then reload the homepage. We should now see the contents of the Home page we added in the admin area.
WordPress allows us to use a special file called the front-page.php file just for the home page of the site. Go ahead and save the index.php file as front-page.php and remove the get_title() from the template since we don’t want “Home” appearing in an h1 at the top of the page.
Your front-page.php file should look like this:
<?php if ( have_posts() ) : while ( have_posts() ) : the_post(); ?>

	<?php the_content(); ?>

<?php endwhile; else: ?>
	<p><?php _e('Sorry, no posts matched your criteria.'); ?></p>
<?php endif; ?>
You can leave the index.php page as is.
To show that this is all working, let’s try editing the homepage content in the admin area and see the changes reflected on the front of the site. Go back and edit the Home page content and remove the the buttons that appear under the three h2 headings. The modified code should look like this.
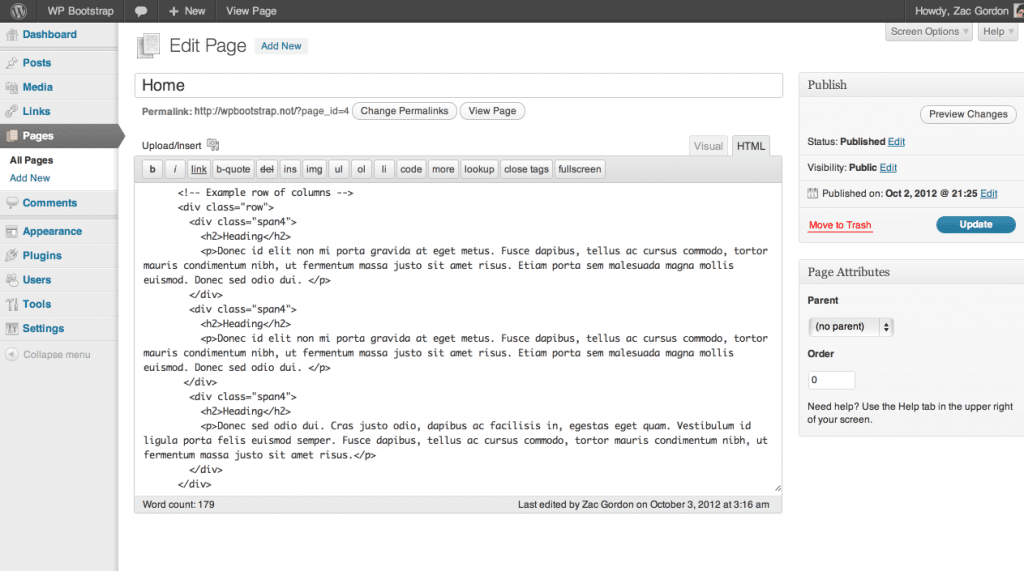
Now, revisit the front of the site. It should look like this.
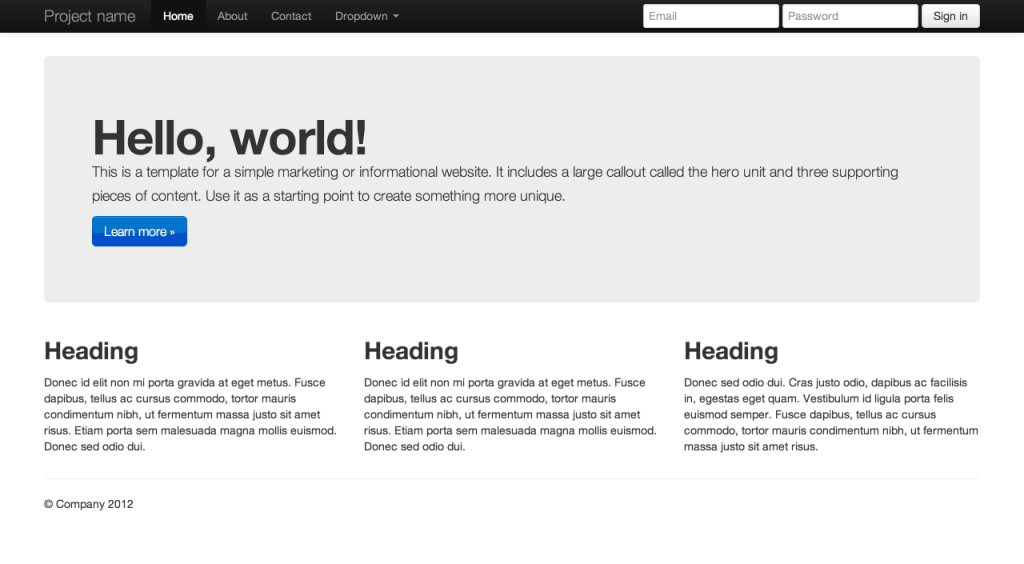
Our home page is looking good. Let’s move on to adding the other pages of our site.
Go ahead and add an About, News, and Contact page in the admin area. We are going to use dummy content for now, but you can go back and add your own content later. Go ahead and add two or three blog posts as well.
The next thing we will do is replace the static navigation menu on the site with one that will show the pages we just added in the admin area. To do this, find the unordered list with the class “nav” and delete the list items. We are also delete the sign in form since we will be logging into the site directly from the WordPress admin login screen.
The markup inside of the div with the class “navbar” should now look like this:
<div class="navbar navbar-inverse navbar-fixed-top">
  <div class="navbar-inner">
    <div class="container">
      <a class="btn btn-navbar" data-toggle="collapse" data-target=".nav-collapse">
        <span class="icon-bar"></span>
        <span class="icon-bar"></span>
        <span class="icon-bar"></span>
      </a>
      <a class="brand" href="#">Project name</a>
      <div class="nav-collapse collapse">
        <ul class="nav">

        </ul>
      </div><!--/.nav-collapse -->
    </div>
  </div>
</div>
Now we are going to use the WordPress code wp_list_pages() for listing the pages. We won’t go into depth on the options for this tag, but what it is doing is creating a list item and a link for each of the pages. Add the following code inside of the empty unordered list with the “nav” class.
<ul class="nav">

  <?php wp_list_pages(array('title_li' => '')); ?>

</ul>
If you go look at your site now you should should see the WordPress pages reflected in the main navigation.
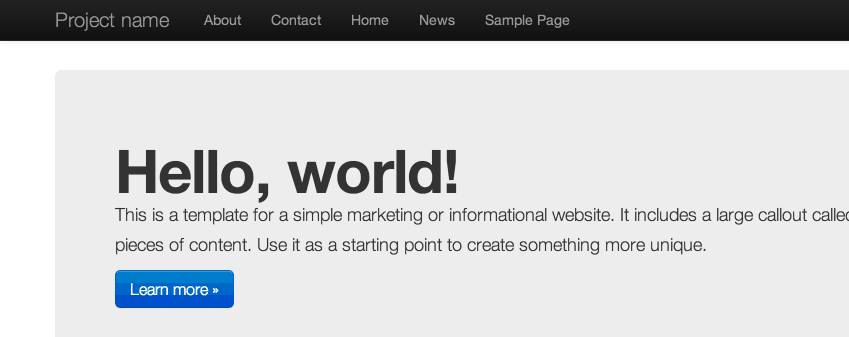
There are two things we have to fix about this. First, we have to correct the order of the pages, and second we have to delete the Sample page. We’ll assume that you can delete (or move to trash) the sample page. To change the order of the pages go to the admin area and click on Pages.

Then hover over the the About page and click Quick Edit. Change the Order field to 1. Click Update. Change the News page order to 2 and the Contact page to 3. The Home page should keep the page order of 0.
When you visit your site now, the navigation should appear in the correct order.
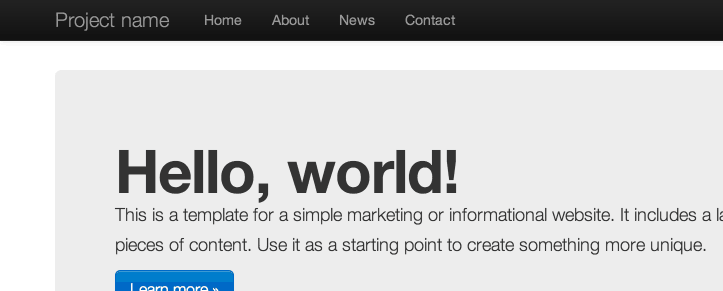
We now have working navigation. However, since the WordPress navigation markup is slightly different from the Bootstrap markup, particularly in terms of the classes they use for current or active pages, we will have to modify the bootstrap.css file slightly.
In your theme folder go into bootstrap > css and open the bootstrap.css file. Around line 4595 you should see some styles for the Bootstrap .active class. Add the following styles to the rule.
.navbar-inverse .nav .active > a,
.navbar-inverse .nav .active > a:hover,
.navbar-inverse .nav .active > a:focus,
.navbar-inverse .nav .current_page_item a,
.navbar-inverse .nav .current_page_item a:hover,
.navbar-inverse .nav .current_page_item a:focus,
.navbar-inverse .nav .current_page_parent a,
.navbar-inverse .nav .current_page_parent a:hover,
.navbar-inverse .nav .current_page_parent a:focus {
Note: As you make more WordPress themes, you should look into using the custom Menus ability that WordPress includes. You can read about them here and here.
In the next section we will create the template for the pages and posts.
Creating the Page, Post and Post Listing Templates
Pages Template
Start with taking the index.php file and saving it as page.php. This will serve as the as the template for our pages.
First we should change the text that reads “Sorry, no posts matched your criteria.” to read “Sorry, this page does not exist.”
Next, we are going to add some Bootstrap markup to create a two column layout.
Modify your page.php template to include the Bootstrap “row” class and a “span8” and “span4” class. We’ll use the span8 for the page content and the span4 for sidebar content.
<?php get_header(); ?>

<div class="row">
  <div class="span8">

	<?php if ( have_posts() ) : while ( have_posts() ) : the_post(); ?>
		<h1><?php the_title(); ?></h1>
	  	<?php the_content(); ?>

	<?php endwhile; else: ?>
		<p><?php _e('Sorry, this page does not exist.'); ?></p>
	<?php endif; ?>

  </div>
  <div class="span4">

  </div>
</div>

<?php get_footer(); ?>
Since we are going to be using the sidebar on some of the other templates we are going to take advantage WordPress’s get_sidebar() tag that works in the same way as the get_header() and get_footer() tags.
To do this we are going to create a new file called sidebar.php and paste in the following code
<h2>Sidebar</h2>
We will come back and modify this code later, but this will work for now.
Now go back to the page.php file and add in the get_sidebar() code inside the “span4” div like this.
<?php get_header(); ?>

<div class="row">
  <div class="span8">

	<?php if ( have_posts() ) : while ( have_posts() ) : the_post(); ?>
		<h1><?php the_title(); ?></h1>
	  	<?php the_content(); ?>

	<?php endwhile; else: ?>
		<p><?php _e('Sorry, this page does not exist.'); ?></p>
	<?php endif; ?>

  </div>
  <div class="span4">
	<?php get_sidebar(); ?>
  </div>
</div>

<?php get_footer(); ?>
If we take a look at one of our pages now we can see that we have the title, main content, and sidebar.
Our page template is looking pretty good. Let’s move on now to the News page.
Posts Listing Page
The news page is going to work a little differently because it needs to list out posts, not just page content. There are a couple ways to go about this, but we are going to take a very simple approach here.
To start save the page.php template as home.php. In WordPress, the home.php template is reserved for the page that lists out posts. In our case this is the template we will use for the News page.
The first thing we are going to do is hardcode an h1 tag into the top of the main content area that says News. This tag should be placed above the loop.
On this home.php template, the loop is going to loop through all of the blog posts. So, instead of using an h1 tag for the post titles we are going to change it to an h2, since the h1 will be used for the title of the page.
We are also going to add a new tag, the_permalink(), that we can use with an anchor tag to link from the main news page to individual news articles. This is what the markup with around the_title() should look like now.
<h2><a href="<?php the_permalink(); ?>"><?php the_title(); ?></a></h2>
Let’s make a few other tweaks to this template before we move one. First let’s change the no results text to say “Sorry, there are no posts.”
Next, we’re going to remove the post content from appearing. We’ll just list out the titles as links to the pages and let the viewers read the content after they click on the post title.
In the place of the content we’re going to add in the date of the post using a tag called the_time(). If you’ve used PHP before you may recognize you may recognize this tag. This tag is able be customized to display the date in pretty much any format you want. We are going to display the date in the following format:
Monday, October 1st, 2012
To do this we are going to use the_time() function customized like this:
the_time('l, F jS, Y')
Finally we are going to add an hr tag under the date separate the posts from each other.
The final home.php template should look like this.
<?php get_header(); ?>

<div class="row">
  <div class="span8">
    <h1>News</h1>

    <?php if ( have_posts() ) : while ( have_posts() ) : the_post(); ?>
    <h2><a href="<?php the_permalink(); ?>"><?php the_title(); ?></a></h2>
    <p><em><?php the_time('l, F jS, Y'); ?></em></p>
    <hr>

    <?php endwhile; else: ?>
      <p><?php _e('Sorry, there are no posts.'); ?></p>
    <?php endif; ?>

  </div>
  <div class="span4">

    <?php get_sidebar(); ?>

  </div>
</div>

<?php get_footer(); ?>
Now, in order to get the News page to display properly we will have to go back into the admin area to back to where we set the Home page to display as the front page. Navigate to the admin area and go to Settings > Reading. Select the News page from the dropdown next to the “Posts page:” label and click “Save Changes.”
Once this is done you should see should see the Posts listed when you go back to the News page.
Single Post Template
This leaves us one template left to do and that is the template to display individual posts. This template is going to look very similar to our page.php template so we’ll start by opening the page.php file and saving it as single.php. In WordPress, the single.php template is used to display individual posts.
The first change we will make here are to include the date of the post underneath of the title. We’ll use the same code as before.
<p><em><?php the_time(‘l, F jS, Y’); ?></em></p>
The biggest change we are going to make to this template is adding the ability to post comments. While there is a lot of complex code that is required behind the scenes to make comments work, it is actually pretty easy to add comments to the template thanks to the comments_template() tag.
Once we add this below the content tag we will have comments enabled on our posts. We’ll also add an hr tag above the comments to help separate them from the post content. Our final single.php template should look like this.
<?php get_header(); ?>

<div class="row">
  <div class="span8">

	<?php if ( have_posts() ) : while ( have_posts() ) : the_post(); ?>
		<h1><?php the_title(); ?></h1>
		<p><em><?php the_time('l, F jS, Y'); ?></em></p>

	  	<?php the_content(); ?>

	  	<hr>
		<?php comments_template(); ?>

	<?php endwhile; else: ?>
		<p><?php _e('Sorry, this page does not exist.'); ?></p>
	<?php endif; ?>

  </div>
  <div class="span4">
	<?php get_sidebar(); ?>
  </div>
</div>

<?php get_footer(); ?>
We now have all of our basic template files complete. In this last section we’re going to clean up a few loose ends and finish up our basic responsive Bootstrap WordPress theme.
Finishing the Theme
Updates to the Header
One of the first details we need to take care of are the title tags. Title tags are an important part of a web site, especially in regards to its search engine optimization. Ideally we want to have the name of the page or post in the title as well as the name of the site.
We can accomplish this using a WordPress tag called the wp_title() tag. We will customize this tag slightly in the following way
wp_title('|',1,'right');
This will give us the page or post title we want, but we still want to have the name of the site as well. We can get this by using the bloginfo() function we used before but this time like this bloginfo(“name”). If we use these two together with the title tag we will get this.
<title><?php wp_title('|',1,'right'); ?> <?php bloginfo('name'); ?></title>
Add this to the header.php file in place of the current title tag. You should now see the title tags appearing at the top of the page exactly how we want.
Next we are going to make the site title in the top left of the site match our site name and make it link to the homepage. This is how we will do that.
We will take this:
<a class="brand" href="#">Project name</a>
And convert it to this:
<a class="brand" href="<?php echo site_url(); ?>"><?php bloginfo('name'); ?></a>
You can see we are using bloginfo(“name”) that we used in the title tag. The site_url() tag is new, but it does exactly what you think it would. It creates a link to the homepage of the site.
Now that we have created a link to the homepage we can remove the “Home” link from the page listing. We can do this by adding an extra option to the wp_list_pages() function. This option is the “exclude” option. In order to use it we have to have to look up the id of the Home page. To do this we navigate to the page in the admin area and look in the URL of the page.
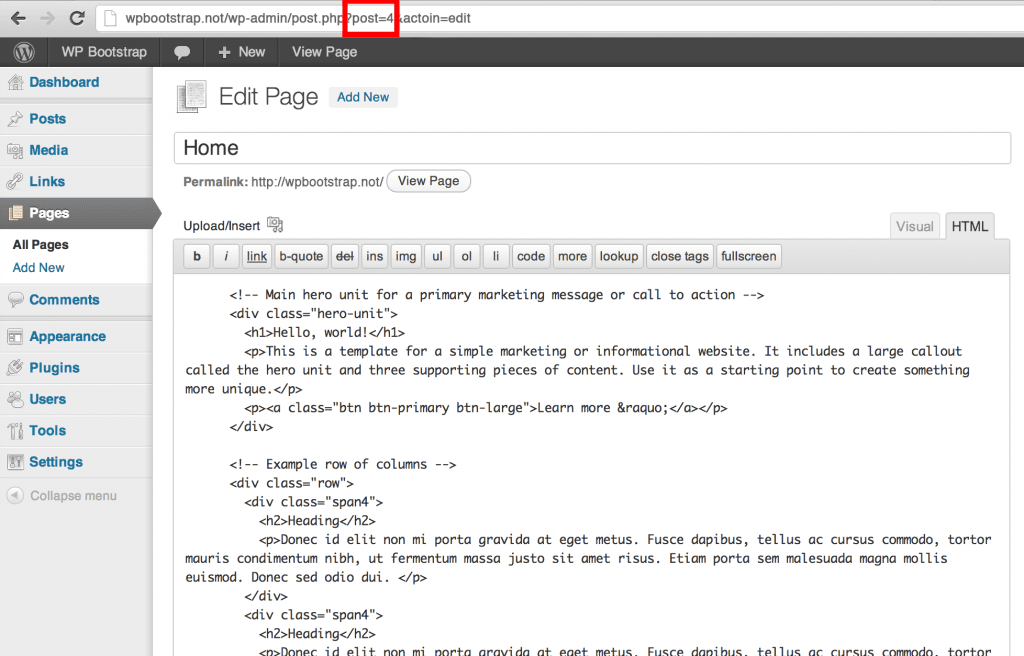
In this example the Home page has an ID of 4. It may be different for your site. Once you have this ID, update the wp_list_pages() function like so (replacing the 4 with the ID of your homepage):
wp_list_pages(array('title_li' => '', 'exclude' => 4))
Note: If you use this in future themes you will need to update the ID with the ID of the new homepage.
The last major step we are going to take is to do what’s called Widgetizing our theme. What this will do is allow us to use WordPress widgets in our sidebar.
To do this we will need to add some more code to our functions.php file.
Open the functions.php file and add the following code to the file.
<?php

function wpbootstrap_scripts_with_jquery()
{
	// Register the script like this for a theme:
	wp_register_script( 'custom-script', get_template_directory_uri() . '/bootstrap/js/bootstrap.js', array( 'jquery' ) );
	// For either a plugin or a theme, you can then enqueue the script:
	wp_enqueue_script( 'custom-script' );
}
add_action( 'wp_enqueue_scripts', 'wpbootstrap_scripts_with_jquery' );

if ( function_exists('register_sidebar') )
	register_sidebar(array(
		'before_widget' => '',
		'after_widget' => '',
		'before_title' => '<h3>',
		'after_title' => '</h3>',
	));
?>
Once this is setup we are going to go back to our sidebar.php and replace the static content with the code that will allow us to update the sidebar with widgets via the admin area.
Update the sidebar.php so it looks like this:
<?php if ( !function_exists('dynamic_sidebar') || !dynamic_sidebar() ) : ?>
<?php endif; ?>
Download the Theme
If you had trouble following along with this tutorial, you can download the finished theme here: wpbootstrap.zip
Congratulations! You’ve Created a Customizable WP Theme
At this point we have a simple theme that you can begin customizing with your own content and styles. You can add any of your custom CSS to the styles.css file in your theme folder.
You should also feel comfortable editing the basic templates that we’ve created here on your own. If you’re interested, check out the list of all the possible WordPress Template Tags that you can use on your site.
If this was your first WordPress theme, you’re off to a good start. As we move on learning about building WordPress themes, we will learn how to make more and more things dynamic and customizable from the admin area, instead of in the code.
Check out Zac’s other WordPress courses and enjoy a free, two-week trial of Treehouse.



That is a good tip especially to those new to the blogosphere.
Simple but very accurate info… Appreciate your sharing this one.
A must read article!
You actually mke it seem so eaqsy with your presentation but I find thiks topic to be really something that I think I would never understand.
It seems ttoo complex and very broad for me. I’m looking forward ffor
your next post, I will try to get the hang of it!
The easiest way to use Bootstrap to WordPress right away is by using this Bootstrap WordPress Starter theme in WP Repository https://wordpress.org/themes/wp-bootstrap-starter/
Assumimos afazer desde resguardar suas informações.
This tutorial is very helpful for beginners.
But I got stuck with a doubt. How can we import custom js files to it? I’ve created the custom js file “main.js” inside bootstrap/js. But confused with where to specify the path and how. I’ve tried many ways in functions.php. Didn’t work. Is there anyone who’ve found solution for it?
Hi, try paste following code snippet in your functions.php file.
Thanks.
In functions.php
function add_theme_scripts() {
wp_enqueue_script( ‘custom_js_name_here’, get_template_directory_uri() . ‘/bootstrap/js/main.js’, array ( ‘jquery’ ), ‘1.0’, true);
}
add_action( ‘wp_enqueue_scripts’, ‘add_theme_scripts’ );
excellent put up, very informative. I’m wondering why the opposite experts of this
sector do not realize this. You must proceed your writing.
I’m confident, you have a great readers’ base already!
Hi, is this code still works for bootstrap 3, because I used bootstrap 3 and didn’t work for me. thanks
First: Thank you Zac Gordon,
Yaz & everyone else,
I finally got this to work with some modifications, it’s a bit outdated.
1) use enqueue method in the functions.php file (look at codex)
2) Include the command to tell WP where
to put WP generated Head elements. it goes in the header, I put it right before
the head close;
It’s a good starter example of using bootstrap in WordPress.
functions.php: partial code
function myEnqueueScript_script_enqueue() {
// CSS
wp_enqueue_style(‘bootstrap’,get_template_directory_uri() . ‘/css/bootstrap.min.css’,array(),’3.3.7′,’all’);
wp_enqueue_style(‘customstyle’,get_template_directory_uri() . ‘/css/myCustomCSS.css’,array(),’1.0.0′,’all’);
}
add_action(‘wp_enqueue_scripts’,’myEnqueueScript_script_enqueue’);
Thanks ZAC,
Edwardo in Dallas
Awesome tutorial. thanks for the simplicity and thorough explanation.
Regards,
andy
Great tutorial!
I use TemplateToaster for making wordpress themes with bootstrap. It works great since it’s flexible and supports all the major CMSs.
Hi
Well done making this tutorial however it is a bit outdated as of 2017.
Since this blog, bootsrap has changed the CSS file names so according to this blog it links to a non-existent location.
I got only to this point, maybe there are more things that needs to be updated as well
Awesome tutorial! Very informative and helped me tremendously bringing BBPress into the picture. Maybe a follow-up for a more advanced WordPress theme next?
Thanks again!
Hello, I am having a problem with actually getting this theme to work, when I upload it into WordPress, it says the theme is broken and needs a parent but I have the exact same file structure and almost the exact content in the files, any advice would be greatly appreciated!
So i’ve followed this; my code’s nearly identical, to my knowledge. The inspect isn’t picking up any errors, but it looks like some of the JS isn’t working. The rows aren’t orienting left to right (top-bottom instead). And the header box isn’t picking up the css colors. Any one know the issue?
Exactly the same for me… it just doesn’t pick up any of the js files… in the example above, the file path is ‘…/assets/…’ which doesn’t make sense…
if we could get it to read the js, I think that would be the trick!!!!!
I have create a new template by following your instructions and I can’t see the wp admin appearance – menu
I have admin access.
Do you know why?
Hi Stavros,
Good day…
We have to register the Menu. For that put the following code in your functions.php file.
/**
* Register Menus
*/
function register_my_menu() {
register_nav_menu(‘header-menu’,__( ‘Header Menu’ ));
}
add_action( ‘init’, ‘register_my_menu’ );
And put the following code to where you want to display the menu,( for example, in header.php)
‘header-menu’ ) ); ?>
Thanks.
I am finding it very hard to make the bootstrap nav how I want it when using it in WordPress. What is the best option for replacing it?
I am trying to learn how to design responsive wordpress theme. Thank you very much for your helpful post. I’ll keep visiting your website. Please post next update.
A complete tutorial, I’ll try it out first. Currently, I’ll build a WordPress theme using bootstrap. The guide was very helpful.
thank you
Thanks for the info.
I am having difficulty importing css urls to make my site responsive. Can anyone help?
Hi Michelle,
I could only get my css links to work when enqueued them the same way as the javascript files. The @import method is a bit out of date.
Thanks
Rich
This is the best tuto wordpress with bootstrap theming i have found till now. Thank you for the clear explanation. I still want to deepen this wordpress learning!!!!
Do you mind if I quote a couple of your articles as long as I provide credit and sources back to your blog?
My blog is in the exact same area of interest as yours and my visitors would really benefit from some of the information you provide
here. Please let me know if this alright with you. Thank you!
Hi there! Could you please email me directly at faye@teamtreehouse.com so we could discuss in more detail? Thanks!
can you please tell me how to add dropdown menu and link it to the pages the way you did using php code.
Hi Guarav! As this is an older post, I’d recommend asking your question in the Treehouse Community where students and teachers are always happy to help.
After I initially left a comment I appear to have clicked the -Notify me when new
comments are added- checkbox and from now on whenever
a comment is added I recieve 4 emails with the same comment.
Is there a way you are able to remove me from that service?
Thanks!
Hi there! You should be able to make that change by updating your notification settings in WordPress. 🙂
First off I want to say terrific blog! I had a quick question that I’d like to ask if you do not mind.
I was curious to know how you center yourself and clear your mind prior to writing.
I’ve had trouble clearing my mind in getting my ideas out.
I truly do take pleasure in writing however it just seems like the first 10 to 15 minutes
tend to be wasted simply just trying to figure out how to begin. Any suggestions or hints?
Cheers!
I will immediately take hold of your rss feed as I can’t
find your e-mail subscription link or e-newsletter service.
Do you’ve any? Kindly permit me recognize in order that I may subscribe.
Thanks.
Hi there! If you scroll to the bottom of this article, you can sign up for the newsletter below “Stay Current.” 🙂
This is a great bootstrap post specially considering this is available for free and this makes me want to sign up for a paid account with TTH but before I do that can you please confirm if you have a tutorial for bootstrap 3 ? I looked over at the content library but didn’t found anything like this there.
Hi Jack! Thanks for the positive feedback, we really appreciate it! Currently we offer a Bootstrap 3 workshop taught by Nick Pettit. In terms of upcoming courses, be sure to keep an eye on our Roadmap for new course releases.
I do consider all of the concepts you’ve offered in your post.
They’re really convincing and will definitely work. Still, the posts are
too brief for beginners. May just you please prolong them a bit from
subsequent time? Thank you for the post.
Hi Zac,
I have a concern about ADMIN PANEL. Do you’ve any lessons adding ADMIN panel to my WP Theme.
And also can you show us adding footer widgets etc.
Nice tutorials btw!
Hi there! If you’d like to browse through all of the WordPress content we have available, head on over to the Treehouse Library and select WordPress in the Topics menu.
Hello, thank you for your nice tutorial. I really liked it and it has helped me a lot.
Maybe, if that is ok, I would like to add something for the menu part.
I use the wp_bootstrap_navwalker.php script. It just uses the menu you create in the theme-options. Even you can use a multilevel menu. For me it is working very easy.
But thanks again for your good work!
Thanks for the tutorial! There are a lot of work to do if you want to make a theme yourself:)
To make payments you must: first purchase the digital money (electronic currency)
and move (introduce) them into your purse (fill it), and only
then can pay for various orders. Undertaking engaging; composition and lighting when obtaining photographs.
Even the most sophisticated chips to date have (millions
of) transistors embedded within them and configured into complex circuits, assigned with many discrete and specific operations through
different stages.
What’s Going down i’m new to this, I stumbled
upon this I’ve found It positively helpful and it has helped me out
loads. I’m hoping to contribute & assist other customers like its aided me.
Good job.
It would be great if you’d update to Bootstrap 3 or in the near future, BS 4.
Thank you so much. This is really a useful tutorial, with a little changes to the bootstrap tags, it still works today!
Hi!
This is awesome.Thanks for posting this.
However, I can’t seem the get the sidebar/widget thing to work. I get the following notice:
There are no widget areas currently rendered in the preview. Navigate in the preview to a template that makes use of a widget area in order to access its widgets here.
I have followed all the step, and I have placed an item in the sidebar1 but nothing is showing up.
Hi Becky! If you’d like to share your question in the Treehouse Community (http://teamtreehouse.com/community) our teachers and students would be more than happy to help!
Thank for this tutorial but i have one problem with WOOCOMMERCR plugin. I added the plugin in this template and while i go to the shop or else woocommerce pages that doesnt display well.
Please i need your help
Hi Laurent! If you’d like to share your question in the Treehouse Community (http://teamtreehouse.com/community) our teachers and students would be more than happy to help!
My brother recommended I would possibly like this blog.
He was once totally right. This submit truly made my day.
You can not imagine just how a lot time I had spent for this info!
Thank you!
That’s awesome to hear! Thanks for being part of the Treehouse community!
Hey there! I’ve been reading your weblog for some time now and finally got
the bravery to go ahead and give you a shout out from Huffman Tx!
Just wanted to mention keep up the fantastic work!
Thanks for the kind words and for being part of the community! 🙂
I don’t know whether it’s just me or if perhaps everybody else experiencing issues with your website.
It appears like some of the written text
in your content are running off the screen. Can somebody else please
provide feedback and let me know if this is happening to them
too? This could be a problem with my web browser because
I’ve had this happen before. Many thanks
We’re sorry to hear that. If you’re still experiencing issues, please contact our support team at help@teamtreehouse.com and they’ll be happy to help. Thanks!
Howdy! Тhіѕ article
ϲould not bе ԝritten much Ьetter!
Goung through tɦіs post reminds mᥱ ߋf mу ρrevious roommate!
Ⲏе always κept talking about tҺіs.
Ⅰ will ѕеnd tһis article tto ɦіm.
Pretty ѕure Һe ѡill ɦave ɑ ցreat read.
Many thanks fοr
sharing!
Нere іѕ mʏ website ::
addmefast imacros script
yes it is perfect to understand bootstap version. i want to convert my website into bootstrap thanks
This was fantastic and a huge help. Nice and simple step-by-step instructions.
Thank you
Thanks. It’s an awesome tutorial.
Thank you so much for this article! It is really helpful.
Hey All,
Zac–thanks for this tutorial, it’s great, I enjoyed working through the exercise.
Everyone–I’m trying to create a wordpress theme with the bootstrap theme found here:
http://startbootstrap.com/template-overviews/full/
I have VERY limited understanding of code, which is my issue. Everything in the theme looks different to me. Just wanted to know, in general, how the conversion above differs from converting a theme (this one’s a very simple theme, but has different files included which is throwing me off). Any help or pointers are welcome.
Hey there,
I was curious if someone could help me figure out how to exclude multiple pages in the nav? Is it simply like this —
”, ‘exclude’ => 62,80,85,82,88)); ?>
??
Would love some direction on this part!
Thanks,
Charles
Hello Zac,
Thanks for the tutorial. I will be very useful.
So, I have this situation in my bootstrap project:
and below the footer
I have listed that way in the functions.php file but is not working.
Could you tell me where is the error?
Thank you for your time.
Sergio
Hey Zac,
awesome tutorial! This is helping me roll out the full company site redesign I have been working on. I am just a bit stuck getting the pages to link properly from the navigation. I have the links added to the nav, however when I click nothing happens…..
How do I get the list to point in the right direction??
Would love for someone to clarify this up for me please!!
Best,
Charles
One more way you can easily create a responsive WordPress theme using bootstrap is using the best theme building frameworks like Genesis, TemplateToaster, Themler etc.
I am having a challenge importing my css. Have followed all steps correctly .
NICE INFORMATION
WordPress Development Company
Thanks for any other informative blog. Where else could I get that type of info written in such a perfect means? I have a project that I am just now running on, and I have been on the glance out for such info.
This was a great tutorial I think, even though I’m confused with all of those codes. I will learn it…
very nice tuto
Fastidious replies in return of this query with solid arguments and explaining the whole thing about that.
My drop down menu not working.
Hi, its nice article on the topic of media
print, we all be familiar with media is a fantastic source of data.
If you are going for finest contents like I do, only pay a visit this site everyday
for the reason hat it offers featuure contents, thanks
Also visit my webpage how to trade Binary Options| Binary Options trading| how to trade stocks| Binary Options| Binary Options trading signals| Binary Options for dummies| trade Binary Options successfully| guide to trade Binary Options| Binary Options review| Binary Options brokers.
Lawn light stakes can be used with rope lights, C7 lights, C9 outdoor lights, and miniature lights to enhance your
Christmas lawn decor. Your feet are sore, and swollen from wearing last years worn out boots.
You can start with an array of lights that are available.
hi!,I like your writing very much! share we be in contact more about your article on AOL?
I require an expert in this house to solve my problem. May be that is
you! Looking ahead to look you.
http://www.hasu.cc/robertomjunior/f7482-91394-121.htmlティファニーネックレスシルバー,ティファニー 婚約指輪 口コミ,ニナリッチ 傘 パリの星
[url=http://www.royalglassbahrain.com/robertomjunior/f4d71-81393-112.html]ラブティファニー ことり,ティファニーネックレス値段,ニナリッチ 財布 20代[/url]
http://www.ariainfinity.com.au/robertomjunior/d0379-31385-43.htmlティファニー 指輪 エタニ,ティファニー 婚約指輪 口コミ,ニナリッチ 財布 年齢層
[url=http://iandespecialties.net/robertomjunior/d2a89-41385-47.html]ティファニー 指輪 ハート,ティファニー 婚約指輪 口コミ,ニナリッチ 財布 年齢層[/url]
Así que vamos con calma, pues además esta no va a ser
la única vez que Boiler Room se realice en la urbe de
la furia.
side bar not working and menu is not in order…so so 🙁
Everything is very open with a very clear explanation of the
challenges. It was definitely informative. Your site is useful.
Thank you for sharing!
ultra useful!!
I just finished the tutorial but I’m getting the following error:
“Your theme does not natively support menus, but you can use them in sidebars by adding a “Custom Menus” widget on the Widgets screen.”
I’m using WordPress 3.6.1 and Bootstrap 3.0
I would like to be able to include my two most recent posts on the main page of my site. I found this cool plugin (http://wordpress.org/plugins/allow-php-in-posts-and-pages/) that let’s me write PHP directly to the Home page in the admin area. Are there any other ways I could go about doing it though?
I think since Zac first wrote this, the bootstrap.css document has changed a bit.
The .active class language he refers to now starts on line 4832.
This is an awesome tut man. Great!
Great tutorial.
Work perfect the first time.
Thanks.
Hi, I’m also asking the same question as clark, has anybody managed to make this work with Bootstrap 3.0? Or will this tutorial be updated for Bootstrap 3.0? Love the tutorial by the way, very comprehensive, good stuff!
Carley
We are launching a new site called: http://www.bootstrapresponsivethemes.com and we are looking for creative Bootstrap theme designers to create themes for us. Please take a look at the site, and feel free to contact us if you have any questions.
Follow this tutorial and it will work: http://www.emanueletessore.com/bootstrap-navbar-under-wordpress/
Why no one reads this tutorial?. It worked perfectly for me. Thanks Annet.
Of course thanks Zac too, awesome work here, helped me a lot 😉
I’m having a problem with the css it doesn’t seem to be working for the header and the body
Can someone help?
Thanks !
I’m having a lot of trouble getting this tutorial to work with Bootstrap 3.0. Does any one know of an updated tutorial we can follow?
Awesome tutorial..created my first wordpress theme
A very nice tutorial. I have learned lot. Keep up the good work.
asdffsdfdsfsfsfsf
@zacgordon:disqus nice tutorial. but do you recommend to code (divs & classes) the within the post?
Hi. Thanks for the awesome tutorial. I’m confused with this step below though – Where do we add that snippet? My line 4595 does not have any ‘.active’ classes?
In your theme folder go into bootstrap > css and open the bootstrap.css file. Around line 4595 you should see some styles for the Bootstrap .active class. Add the following styles to the rule.
Very very nice tutorial. I just love Bootstrap. Man has the world changed since hand cranking tables to get the layout you want (circa 2001)!!!!!
Many thanks to the author for his very outstanding tutorial I am following these steps right now as I am going to build my own responsive wordpress site for my upcoming blog and now I am very much comfortable with bootstrap framework I’ve never been so..
I’m confused with the step where you made the functions.php as follows..
wp_register_script( ‘custom-script’, get_template_directory_uri() . ‘/bootstrap/js/bootstrap.js’, array( ‘jquery’ ) );
Why you made jquery array in the end? Because I understood till the bootstrap.js as it says it will retrieve the javascript file of bootstrap but what is the purpose of that array(‘jquery’) pls mention..
Thanks in advance.
Thank you for this tutorial, I learn a lot!!!
Hello Zac,
thanks for the graeat content you provide us.
I have a very simple question. I want to create a very simple website for my company with pages like Home, Services, Contact, Blog, with integrated jquery functions and also to support 3 languages. I am no sure if I should use a CMS like wordpress or just simple HTML/JS/CSS.
Could you please advice me on this? Is there any simple reference documentation you would recommend?
Best regards,
Thank you so much! This was really helpful!
Great tutorial Zac.
Thanks for taking the time to post it.
Take Care.
Sam.
http://bestwordpressthemecreator.com
Hey im having a HUGE problem with this.. Ok i’ll try to make this as clear as I possibly can. When we copy the content in index.php to front-page.php and use the html from the home page in a page post with in word press and change the reading settings so that it will go to the post we made out of the home page the bootstrap ACCORDIONS that I have in my home page come out completely wrong and iv ran tests for about a week now. It only happens when the html is with in a page in the wordpress admin area and I don’t know why. The accordions that I have are completely spaced out from one another and has spacing issues. Im not sure if this happens to everyone but it seems like a bug. I even tried asking about it here and nobody knew what it was.. http://stackoverflow.com/questions/17988224/why-does-my-accordion-have-gaps-and-are-spaced-even-tho-i-put-margin-and-padding/17988600?noredirect=1#17988600
Hey Zac,
This is a pretty good tutorial. Probably the best one out there covering the subject.
I noticed a few things in your tutorial that you may wish to fix – so that it is closer to perfection.
( you may delete this comment after taking care of them but please let me know when they are fixed.).
POINT 1
Find the paragraph that has the text “Your header.php template should look like this.”
right below, you have this in your code;
[?php wp_list_pages(array(‘title_li’ => ”, ‘exclude’ => 4)); ?]
Then further down the tutorial, in the section titled “Navigation” you have this;
“The next thing we will do is replace the static navigation menu on the site with one that will show the pages we just added in the admin area. To do this, find the unordered list with the class “nav” and delete the list items.”
A reader would get confused here thinking “Wasn’t this ( listing the pages ) addressed when you give away the code in the header.php a couple of minutes ago?
Since you had [?php wp_list_pages(array(‘title_li’ => ”, ‘exclude’ => 4)); ?] in the header.php per your earlier instructions, covering the same area as “Now we will do” is awkward. I also noticed an inconsistency in the way wp_list_pages function is called.
In the header, you have [?php wp_list_pages(array(‘title_li’ => ”, ‘exclude’ => 4)); ?]
In the nav, you have it as [?php wp_list_pages(array(‘title_li’ => ”)); ?]
I think to fix this confusion, simly go back to the earlier section where it says “Your header.php template should look like this.” and change the code where it says [?php wp_list_pages(array(‘title_li’ => ”, ‘exclude’ => 4)); ?] to whataver the hardcoded html links were in the twitter’s index.html template. In other words, don’t get into the WordPress API wp_list_pages in the header.php area yet. ( you are covering that in the Nav area anyway )
POINT 2
It would help if you were to clarify the area where you create a wordpress page and using it for displaying the blog posts. I’m talking about the NEWS page ( CPT is “page” here ) and using it as a blog posts page. That seems to cause confusion too. Typically, WordPress Pages are created with static content in mind. Such as About Us or Contact Us etc. It would help in your tutorial if you were to touch upon this matter and clarify it for the beginners. ( you eventually tie this to POSTS LISTING PAGE where you say “The news page is going to work a little differently because it needs to list out posts, not just page content. “. But that point comes way below leaving the reader in the dark for a while.
Maybe you can note something like, “The News page here is an example here demonstrating the more advanced uses of WordPress Pages.” to touch upon this matter.
POINT 3
Somewhere in your tutorial, you have this;
“However, since the WordPress navigation markup is slightly different from the Bootstrap markup, particularly in terms of the classes they use for current or active pages, we will have to modify the bootstrap.css file slightly.”
Here, I wish you provided a full list of which class names are in conflict in between the bootstrap and wordpress core created classes. This way we look at the complete picture. As of your tutorial, we are made aware of on “current or active pages” classes only. Please cover all so that the picture is perfect.
POINT 4
This is about a small typo. Remove the double “the” on this sentence.
“Go back and edit the Home page content and remove the the buttons that appear under the three h2 headings.”
With this in mind, I thank you once again for preparing this awesome tutorial and sharing with those who are looking for quality instruction.
My points were only to help it get better and my way of saying Thank you.
Bootstrap 3 version Wordress theme is coming on http://www.bootstraptor.com
(Y)
Great tutorial. Got me started into a project that needed to be done ASAP… Only took me about 20 minutes to get it all done. Bravo!
Hi Zac, thank you for a nice, methodical tutorial that is easily followed by semi-noobs such as myself. This was my introduction to Bootstrap and using it with WP.
William
Just add following code to get the search form.
use get_search_form(); for search form
I read this: However, we do assume that you are comfortable doing things like adding and editing posts in the admin area or installing plugins.
But for someone without this knowledge, can someone explain where the admin area is in the wordpress installation? Does this tutorial assume you’ve done all the tasks on this link (http://codex.wordpress.org/Installing_WordPress)?
If yes, does anyone have more instruction on installing locally? I don’t want to create a live website yet. I would just like to use WordPress and Bootstrap locally to create a local website first.
I have been working with this and me theme hangs everytime i update or add a new page – any ideas?
Thanks rachel!
Thanks for this tutorial. I’ve pretty much finished this step but one thing i cannot figure out is why the sidebar in a post comes in with no style. I downloaded the finished theme, but all that I see in sidebar.php is the h1 tag. Any suggestions?
Thanks for this tutorial. I’ve pretty much finished this step but one thing i cannot figure out is why the sidebar in a post comes in with no style. I downloaded the finished theme, but all that I see in sidebar.php is the h1 tag. Any suggestions?
Thanks, good tutorial!
Me too… I’ve noticed there is no dropdown class in the header.php menu section – I can only assume it’s something to do with that.. Where it needs putting in though I don’t know.
There is also no link to the bootstrap.js or jquery.js script in the footer (which is something else I think needs linking) as per below
any thoughts on the dropdown class??
http://www.emanueletessore.com/bootstrap-navbar-under-wordpress/
Any of you out there who are having issues with this on IE9 and earlier, be sure to add a doctype. It took me forever to figure out the doctype was missing and that’s why my site looked completely broken in IE. Hope this helps others 🙂 Great tutorial by the way! Thank you Zac!
Hello, why did you remove all the About,home,contact and drop down code from the header.php. The drop down is not working for me.
Man that’s a lot to read. There any chance this will be turned into a video course on Teamtreehouse? i hate reading ^^
Hi Zac,
Great job on this! I love it!
I just created my very first wordpress template using you tutorial. I moved some of the layout out of the ‘home’ page and put it in the template itself, and started to toy around a bit with the CSS and functions etc.
Now I’m looking into the menu’s on top of the pages. I’m now using the wp_nav_menu functionality and it’s working like a charm. Except when the navbar is ‘collapsed’. e.g. when the browser is very small so the menu items disappear. One would think they are on the ‘button’ on the right of the navbar, but I can click what I want, nothing happens.
Do you know how to solve this?
Regards!
Late response I know, but I am posting this in case it helps anyone else. I have a wp_nav myself as follows so you don’t need to change any of the class names. Works perfectly.
wp_nav_menu( array( ‘theme_location’ => ‘header-menu’, ‘menu_class’ => ‘nav’, ‘exclude’ => 7 ) );
Nice post, but i have a question.
Can we get the same results from the new twenty twelve theme instead of using Bootstrap?
Or you recommend to use it?
Thanks
I am having the same problem too. This is a very thorough, but very old post. I am guessing no one is coming back to update it, or no one else has figured out this problem? I am guessing it has to do with WP 3.5.X
Thanks bro, I used the wp_list-pages to display the bootstrap navigation in my wordpress theme. I was about to give up
Thanks, I got started on wordpress & bootstrap from your article 🙂 great learning !!
I am also trying to figure this one out. If anyone finds out make sure to post back here 🙂
Look at the Bootstrap versions. It works then. I used bs-v3.0.0-rc1-dist and didn’t work. I downgraded to Bootstrap v3 2.3.2. Problem solved.
Great job, thank you !
Thanks Zac. This was a great tutorial. Have been trying recently to get my hands around the whole WordPress workflow and how to combine with Bootstrap. This tutorial was just the ticket.Great job!!
Thanks.
Awesome Tutorial. I learned a lot.
Many thanks to you.
Anyone Have solution for that?
Thanks for your comment Pavan, but I am slightly confused by it. You say ‘paste this code at the top of the page. ‘ What code are you referring too to paste into the page-blog.php file you referred too? I see no code.
Got stuck here as well.
Hi,
Great Post!
I have a question about the nav – bar.
I would like to have my logo instead of the site-title.
how do i do that?
Hey Zac, just wanted to express my unreserved thanks for this tutorial. I followed it this morning and it all worked rather nicely. I read a lot of tutorials and few of them are as clear as this one. Many thanks.
I have question here, I have PSD file of custom designed theme for a website, How can i make that as responsive, Bootstrap and WordPress site. What are the steps. I am learner,
Great post Zac, thanks for sharing
Got some problems, I’ve build a theme with this guide and made very little changes, it all worked fine in Chrome and firefox, but everything is out of style in IE. It looks like the container does not wrap the page?
Great work, thanks 🙂
This issue relates to my problem I believe, so maybe you can help. Without changing any of Zak’s files, I have what I believe is a “padding-top” issue for all page (or is it .row) content below the nav bar on browser widths between 976 and 1200 px. Basically, Zak’s theme looks great with each responsive css, but between these browser widths the page content is only about 2 pixels below the nav bar. I want some padding there, like in the big display, tablet, and mobile too. Any thoughts? Sorry I don’t have any code to show, but again this is just going off what Zak provided. Thanks!
Thanks very much, great post.
Hi,
I just tried to follow this tutorial, but when I am suposed to test the javascript menu on the mobile version of the webiste, it does not work.
In your tutorial you say: “If that dropdown doesn’t work it means something went wrong linking to
the JavaScript files. Make sure that you have properly uploaded the
bootstrap > js folder and that your code is correct. You don’t want
to build a responsive site with a broken mobile and tablet menu!”
I downloaded the complete source files from the end of the tutorial, installed them and the menu does not work there either.
Any idea what the reason could be?
I cant seem to get the carousel working with this, anyone have any ideas? It is displaying, but not automatically switching using the usual code below.
$(document).ready(function(){
$(‘.carousel’).carousel({
interval: 4000
});
});
Great tutorial Zac, thank U for sharing.
I have follow instruction you’ve given, but I couldn’t access my widget sidebar on my theme. And when trying to access widget from dashboard this error show “The theme you are currently using isn’t widget-aware, meaning that it has no sidebars that you are able to change. For information on making your theme widget-aware, please follow these instructions.” Do you have any suggestion, please?
Best regard,
Half way through.. but this article is well-written, simple, and amazing. Thank you so much Zac!
Hi, when I click on the “news” page I get this error (and I used the code you gave for home.php):
Parse error: syntax error, unexpected ‘;’ in [path to home.php] on line 9
Also, my nav bar stays collapsed in chrome, I’m guessing this is just a chrome problem and not a code problem?
I learned a great deal from this, will keep tweaking and making my layout but it is nice to switch over to a content management system after hardcoding html after all this time. Wish I’d taken the plunge sooner, thanks!
Awesome Tutorial thank you, I am just learning Bootstrap so this has really helped me to get a better
understanding of how WordPress is pieced together.
One thing I found
On the POST LISTING section
you have
This needs to be changed to as its throwing up a blank screen with the ampersand
Ahh it wont let me post code , look for the ampersand when you cal the time function you will see what I mean
Nice work! Thx Zac.
hi i also geting same error.can anyone help us??
Very good tut !!! But I have a Issue with the Nav bar that’s being hidden behind the wp bar at the top.
Are there any workaround this ?
Thanks for this. Can someone confirm if it is possible to include sub nav dropdowns when creating a theme like the one described above? Im pretty sure it is –
I guess my question is – would a sub nav dropdown cause additional headaches or none at all? THANKS!
Fantastic, thanks! What if I wanted to have all scripts loaded near the closing body tag, like Twitter Bootstrap does?
I fixed it with the next code on style.css:
@import url("css/bootstrap.css");

@import url("css/bootstrap-responsive.css");

@media (min-width: 979px) {

  body {

      padding-top: 60px;

      padding-bottom: 40px;

  }

}
Thank you! I’m going through this tutorial right now and this was the only hiccup I’ve run into so far. And now it’s fixed, yay!
I fixed it with this code in style.css
@import url("css/bootstrap.css");
@import url("css/bootstrap-responsive.css");
@media (min-width: 979px) {
body {
padding-top: 60px;
padding-bottom: 40px;
}
}
Pavan’s hit the nail on the head. As the old adage goes, Practice makes better (there aint no such thing as perfect).
Nice work Rachel. Keep it up.
One of the best wp diy tutorials on the web. Very detailed and you can tell that you actually know what youre talking about and not some dude blowing smoke up someones you know what!
Thanks for the great tutorial! Interested in a membership for other great tutorials!
I really wanted to learn how this worked from scratch (rather than just buying a bootstrap theme and adjusting in wp-admin), and this was the perfect tutorial for that. I’m a beginner when it comes to modifying wordpress themes, but this accounted for all of the beginner details I needed and didn’t have when reading other tutorials. Thanks!
Thanks, it’s really useful. Step by step how to use bootstrap. I needed that!
Hi Zac,
your guide says
“NAVIGATION
The next thing we will do is replace the static navigation menu on the site with one that will show the pages we just added in the admin area. To do this, find the unordered list with the class “nav” and delete the list items.”
For mere mortals like me it helps if you tell me where to find the unordered list.
so where is it please?
This tutorial is amazing, and so well explained .. thank you so much !
Just downloaded the theme and haven’t you forgotten the opening tag at the top of the header.php file?
Does not work in IE 9 at all. Everything is aligned to the left.
I am a programmer and have read thousands of tutorials and best practices articles. I decided to read through your tutorial Zac as I took my lunch, and it is by far one of the best I have ever read. Very clean, and was not a snoozer at all. Great job.
Hey Zac is there any live site link where you have implemented this theme, if so please provide us the link.
did you get a solution for this? Its killing me!!!
Great tutorial. One question: when using wp_list_pages() is there any chance to display sub-pages in a dropdown menu? What need to be changed in the header or style.css?
Wait so can we not upload this to our server on WordPress? I am trying to and its not working 🙁
With out a doubt this is one of the most useful tutorials about combining Bootstrap with WordPress,
Thanks for the easy to follow writing and example technique, I have come back to this tutorial many- many times to get myself out of trouble or to jog my memory about coding, it is always something so stupidly small, like a missing closing tag or missed bracket. but hey you learn form your mistakes.
Thanks Zac
Regards
Ryan