
When you watch an animated Pixar movie, the 3D graphics are extremely detailed and realistic because they’re “pre-rendered”. Each frame may have taken many hours or days for the computer to render and then later you watch those rendered frames in a finished sequence. “Real-time” imagery typically renders frames at around 60 times per second (or 60fps) and it’s used in interactive environments like games and the web, because you cannot predict what the user will do next. My first experience with real-time 3D computer graphics was 20 years ago in the days of Doom, which, wasn’t even technically 3D rendering by modern standards. Today we live in a time where (much better looking) real-time 3D images can be rendered in a mobile web browser like Safari on iOS8. Check out this demo along with the JavaScript code behind it:
See the Pen Wooden Barrel in three.js by Nick Pettit (@nickpettit) on CodePen.
(For iOS8 users, this version might work a little better)
The enabling technology, WebGL, is now supported in every major desktop browser. It’s also rapidly making its way onto phones. This is an incredible leap forward that allows us to create stunning interactive imagery that was not previously possible (here are some examples). My guess is that once companies catch on to this, it’s going to be a desirable skill in potential job applicants, especially at companies that create a lot of marketing materials or sells physical products. However, most web designers and developers don’t have much experience with creating 3D assets in general. In other words, the capability is now there via WebGL, but it can’t be applied ubiquitously because the ever-expanding skill set of designers and devs does not (yet) include 3D modeling and texturing. This could become a contract or specialty role in the future, but right now it’s a great way to differentiate your skills from the crowd.
If you want to start out by making some 3D happen in the browser really quick, check out my beginner’s guide to three.js and get started. However, this article is intended to break down the fundamentals of 3D graphics for web designers and developers. There’s a lot of lingo and none of it relates to HTML or CSS, so let’s dig in.
Contents
3D Basics
In each section of this article, we’ll build up an example project that features a wooden barrel. This example will include geometry, lighting, and several different types of textures. Here’s an animated GIF that will give you a visual overview of what we’re covering.
Before we examine the specific steps of creating 3D assets, let’s first quickly talk about some 3D web technology and terms.
CSS 3D versus WebGL
I wrote a blog post comparing CSS 3D properties and WebGL already, but the TL;DR is this: CSS 3D transforms are perfect if you want to move a couple 2D HTML elements on the page in 3D space. It’s not ideal for rendering complicated images with lots of detail. You may have seen some flashy demos that make use of dozens of HTML elements all translating in perfect unison, but that’s not really the purpose of CSS 3D transforms. Instead, if you want to render complex 3D objects, it’s better to think about using WebGL.
WebGL is a JavaScript API based on the popular OpenGL graphics library that allows you to access the GPU (graphics processing unit) from a web browser. You can then render images to the <canvas> element and make them appear on a regular web page. This is a much better way to animate 3D imagery than using tons of <divs> and ugly non-semantic markup to create geometry.
WebGL versus Three.JS
3D programming can be really hard. If you’re interested in hitting the absolute limit of GPU performance in a web browser, or you’re excited by the mathematics of projecting 3D geometry to a rasterized pixel grid, then please do program in pure WebGL. The technology will always need more smart people writing renderers and doing cool things with it.
However, if you’re just interested in making some cool 3D graphics, I recommend using a renderer and WebGL framework that makes working with WebGL much easier. My favorite right now is three.js because it’s a very active project with lots of great examples. The thing is, once you’re able to do some simple things in three.js, you’ll probably want to create something to actually render.
Geometry
3D computer graphics are traditionally composed of polygons (usually triangles or quadrilaterals, depending on the rendering technology) that are connected in a lattice-like structure called a wireframe or a mesh. The words “mesh”, “wireframe”, and “geometry” are often all used interchangeably to describe a 3D object. In the picture below, our mesh is a wooden barrel. It doesn’t look like wood yet, because there’s nothing to describe the surface of the object; that comes later.

This wireframe view shows you how lots of triangles can be shaped to form a whole object. More triangles mean more detail, but it can also increase performance demands and cause animation frame rates to slow down.
I created this model in a software package called Maya, which is made by Autodesk. This is a paid program, but if you’re just looking to try it out, they offer a free trial as well as a student version. You could also achieve similar results in Blender, which is a free and open source 3D package. There are many other programs that can do 3D modeling, but those two are amongst the most popular. Explaining the basics of 3D modeling is an in-depth topic unto itself and beyond the scope of this article, but there’s plenty of help out there already if you want to learn more about a particular piece of software.
Once the geometry is modeled, it needs to be converted into a JSON format that three.js understands. Fortunately, the project includes several converters for popular 3D packages. Finally, the geometry needs to actually be loaded into the scene. In the example, the code that loads the geometry into the scene is towards the end:
// Load in the mesh and add it to the scene.
var loader = new THREE.JSONLoader();
loader.load(
  "https://s3-us-west-2.amazonaws.com/s.cdpn.io/25480/barrel.js",function(geometry){
  mesh = new THREE.Mesh(geometry, material);
  scene.add(mesh);
});
Lighting
If there’s no light in a room, then you can’t see anything. The same is true in 3D graphics; there must be at least one light present in a three.js scene in order to see objects.

Fortunately, three.js makes it pretty simple to add several different types of light sources to a scene. In the example, I first add a point light, which you can imagine as a glowing ball of light at a fixed point in space, radiating in all directions. In real life, this is similar to a lamp. Next, we add a directional light, which is a broader light source that just comes from a general direction, similar to the sun.
// Create some lights and add them to the scene.
pointLight = new THREE.PointLight( 0x3300aa );
pointLight.position.x = -100;
pointLight.position.y = -1;
pointLight.position.z = -50;
pointLight.distance = 2000;
pointLight.intensity = 1.4;
scene.add( pointLight );

directionalLight = new THREE.DirectionalLight( 0xffaa00 );
directionalLight.position.set( 1, 10, 50 ).normalize();
directionalLight.intensity = 1.4;
scene.add( directionalLight );
Each of these lights has a color, position, and intensity. It’s important to spend some time tweaking these things, because lighting can dramatically impact the mood and general feel of a scene. For some perspective, modern animated films and video games typically have entire teams of people that just light scenes.
Shaders and Textures
Shaders are special programs that describe how the surfaces of geometry should be drawn. Shaders will often expect to be supplied with several special images called texture maps, and depending on the shader, these texture maps might be rendered in different ways. Three.js includes some industry standard shaders like Lambert and Phong, but if you’re feeling ambitious, you can write your own shaders. In fact, there’s an entire website called ShaderToy that’s dedicated to just shaders; every example is made out of just 2 triangles (even though most of them create the illusion of geometry).
For completeness, I should mention that a new style of shading called PBR (physically based rendering) is currently coming into vogue. PBR produces more realistic results because it’s a more accurate simulation of how light interacts with a surface. Unfortunately, I have not yet come across any (free) PBR shaders for WebGL, but here’s an example of what PBR looks like in WebGL. PBR is still transitioning into use, so for now, we’ll take a more tried-and-true approach. If you would like to read more, here’s an excellent introduction to the basics of PBR.
In our example, we’re using Phong shading. Then, we’re feeding several texture maps into the Phong shader. Each of these maps serves a slightly different purpose.
Note: These high quality texture maps are commercially available from GameTextures and they graciously gave me permission to use them in this post. Don’t copy that floppy! 🙂 However, if you’d like to create your own original textures, an image editing tool like Photoshop is a great place to get started. If you want to take texturing further, companies like Allegorithmic and Quixel both make several tools specifically designed for creating textures.
// Create a material using texture maps
// Note: These are commercial textures from http://gametextures.com/ being used with permission.
diffuse = THREE.ImageUtils.loadTexture( "https://s3-us-west-2.amazonaws.com/s.cdpn.io/25480/Misc_WoodBarrelOldMold_2k_d.jpg" );
specular = THREE.ImageUtils.loadTexture( "https://s3-us-west-2.amazonaws.com/s.cdpn.io/25480/Misc_WoodBarrelOldMold_2k_s.jpg" );
normal = THREE.ImageUtils.loadTexture( "https://s3-us-west-2.amazonaws.com/s.cdpn.io/25480/Misc_WoodBarrelOldMold_2k_n.jpg" );
var material = new THREE.MeshPhongMaterial({
map: diffuse,
specular: 0xffffff,
specularMap: specular,
shininess: 10,
normalMap: normal
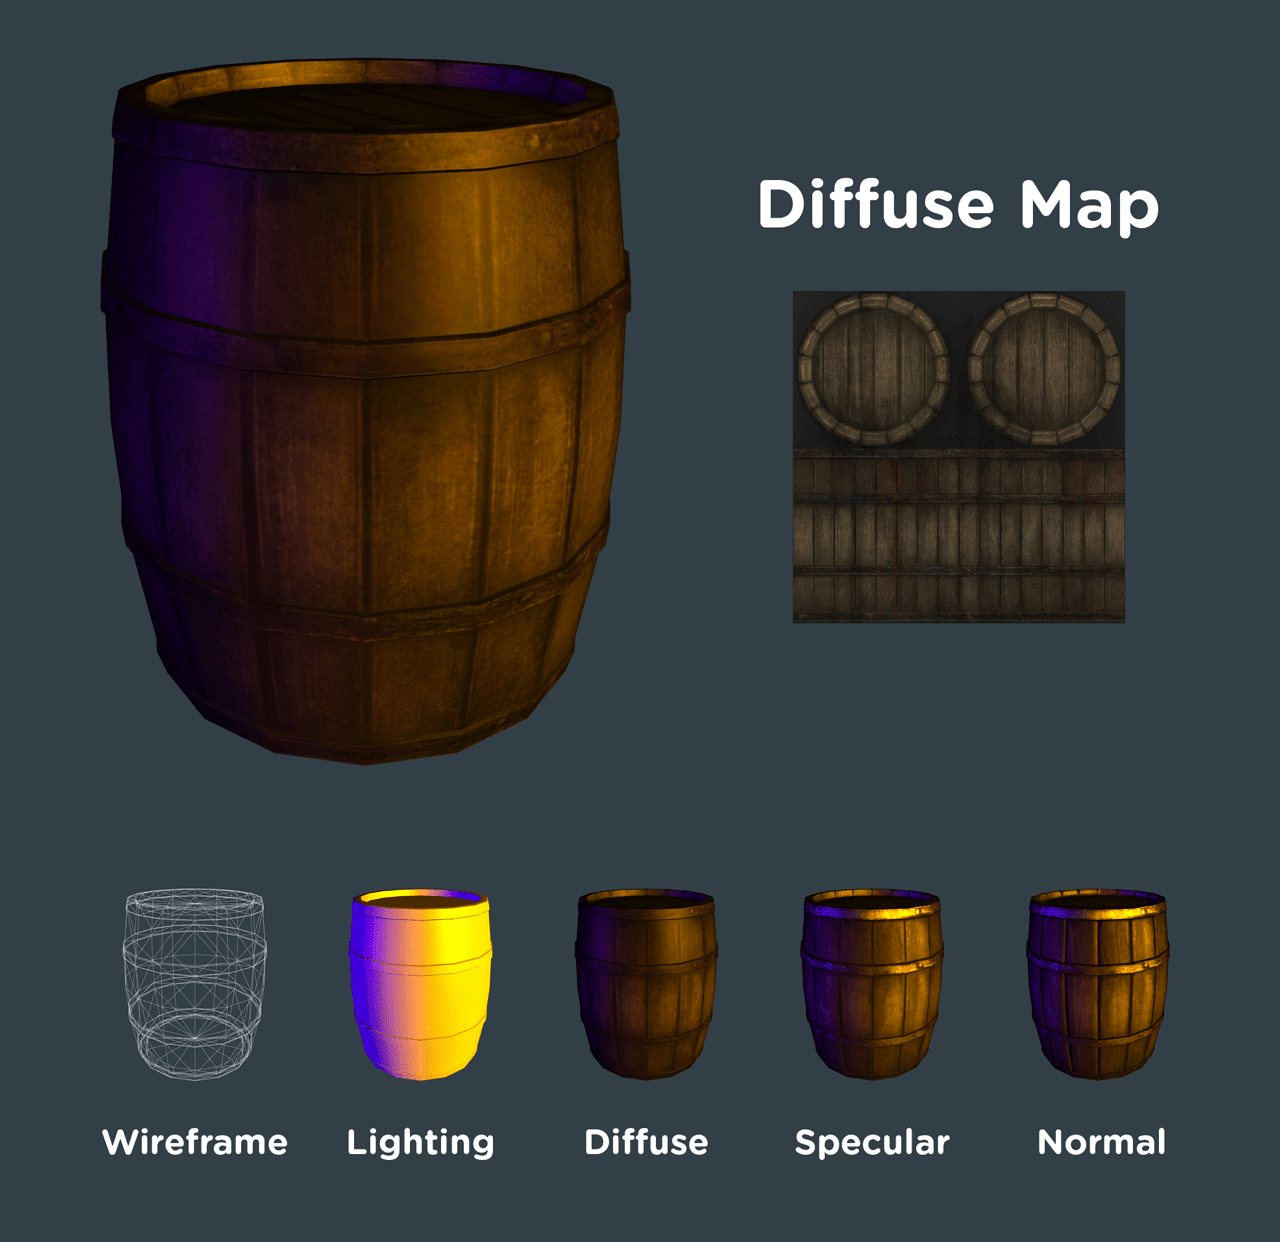
});Diffuse Map
The most basic type of texture map is called the “diffuse” map. This is an image (in this case, a .jpg file) that describes the color of a surface under perfectly diffused lighting conditions, where nothing is shiny and no raised surfaces are apparent. In other words, this is the color of an object in its most pure form. When it’s applied to our wooden barrel, it starts looking like a real object.
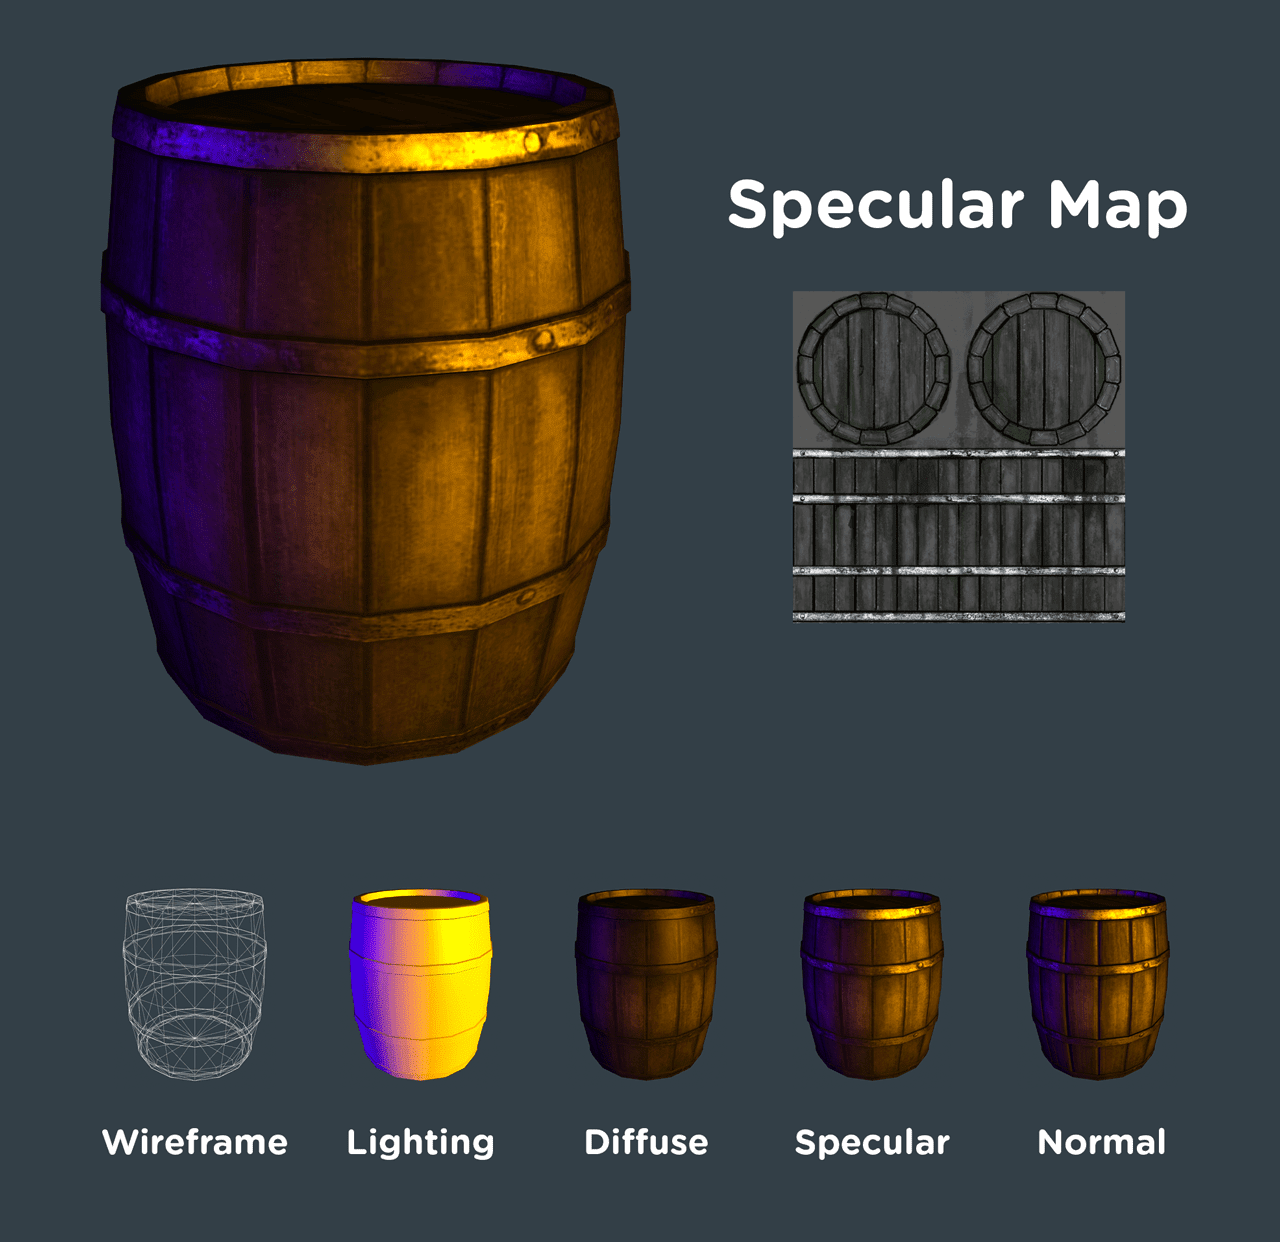
Specular Map
If you look closely at the previous example, you’ll notice that the lighting on the barrel just doesn’t look quite right. The surface looks closer to a shiny faux linoleum material than moldy wooden planks or rusting metal. That’s because the diffuse map only describes the color. However, if we add a “specular” map, we can describe what parts of the surface should be shiny and reflect lots of light, and which parts should be dull. In a specular map, the brighter parts are shiny and the darker parts are dull. You’ll notice that in our example specular map, the metal hoops are bright white because they should reflect more light than the wood.
Normal Map
We could probably stop with the specular map, but if you look at the previous example, you’ll notice that light doesn’t quite react to details very well. The cracks between the wooden planks look flat, and there’s no dimension to the rivets on the metal hoops. We can do better.
On today’s hardware, it would be a little bit excessive to model such fine geometry on a 3D model that’s meant to be rendered in real-time. We could probably get away with it in this isolated example, but in a larger scene (like a pirate ship battle) this barrel might be a small prop in the scene. Spending lots of polygons on objects like this would likely slow down performance. Instead, we can fake the fine details with a texture called a “normal” map.
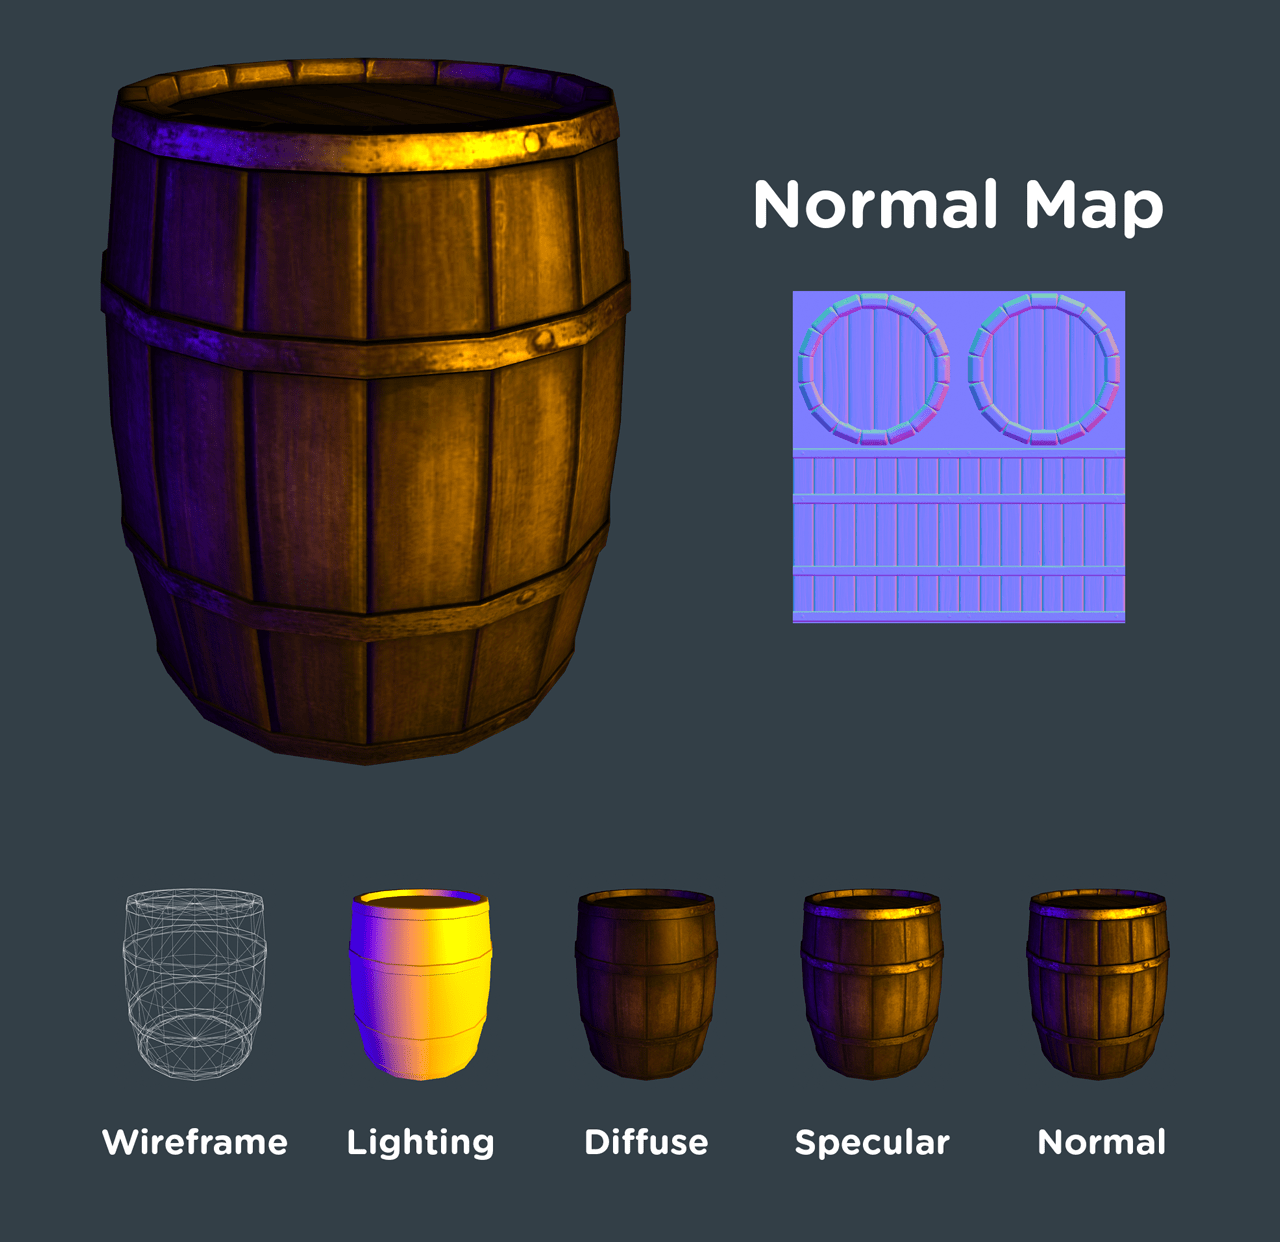
A normal map looks pretty weird at first. Basically, each polygon on a 3D model has what’s called a “normal” which is a vector that is perpendicular to the face. As an example, if you held a pencil straight up and down on your desk, it could be said that the pencil is the “normal” of the desk’s surface. These normals help the shader and renderer understand which parts of the model should be lit and which parts should be in shadow.
However, we can sort of hack these normals by feeding in information that isn’t present in the geometry. In the normal map, the RGB (red, green, and blue) components correspond to the XYZ axis, respectively. Put another way, the normal map simulates what light might look like if the geometry had additional detail. The object appears to have more geometric detail, but it’s literally a trick of light and shadow.
UV Mapping
At this point, you might be wondering how the wooden barrel is mapping the correct parts of our 2D textures to the 3D geometry. For example, why doesn’t the texturing for the top of the barrel randomly appear on the sides? In order to map that 2D information to the proper locations on the 3D geometry, it’s necessary to do what’s called “UV mapping”. Every 3D model has to be unwrapped into a 2D map, similar to how cartographers take our three dimensional planet and make 2D maps. This step varies depending on the 3D package that you use, but I wanted to mention it here, just in case you notice some very odd mapping when applying textures for the first time.
Conclusion
WebGL has broad applications, including games, product marketing, data visualization, and so much more. It’s a new form of rich media on the web, just like video, audio, and images. If this article has left you scratching your head, please feel free to post your questions in the comments section!
Check out Nick’s courses at Treehouse.


I salute all the Pixar movie 3D animators for a well detailed animations and dedications. I keep in watching their work and as I continue to amaze myself how difficult it is and how many hours, days and months did it take to finish a single movie.
Anyway, this post of yours Nick is timely post that is worth to read even years passed.
That’s pretty cool, reminds me of a pirate barrel..
like.
http://www.bia2skin.ir/
It is very good post,end users will easily get attract .
I am also interested in 3D on the Web and its potential for education. In fact I have created my own free educational application based on X3D and X3DOM rather than threejs. My purpose is not to advertise my application but to get professional’s ideas on the comparison between threejs and x3dom. I have just created a 4D cube at https://vrmath2.net/content/hypercube-tesseract, and was wondering how this will be done in threejs. Thanks.
Great tut but i think a little bit difficult but its worth it to try 😀 !!!I suggess u guys to use this software that i started too and i am doing everything in JB is. It takes to me a bid to grab it, because it works unlimited. But now I am happy, because it is lightning fast, task what took me in the past 3 – 4 days are now complete in 5 minutes. Let me share the link with you, because for me it changed everything http://jb-webs.com
Wow! Nick, thank you so much for this in-depth introductory article. This is exactly what I needed to know about what 3D rendering in browsers was all about. Thanks again! =)
It really is cool what you can do with WebGL and ThreeJS. I’ve gone through a couple of books and it doesn’t take long to make some interesting things.
http://lukepettway.name/demos/threejs-demos/
That extrude example is neat! I never even noticed the ExtrudeGeometry() function before, but it’s actually one of the well documented functions. http://threejs.org/docs/#Reference/Extras.Geometries/ExtrudeGeometry