
Last Updated on May 21, 2015 by Jake Rocheleau
Some dynamic user profile layouts have been implementing more complicated JavaScript features. Notably the dropdown settings menu has been a staple of social networking websites. This is a great method for allowing easy access to updating the user profile, or even posting new content onto the website. The jQuery Toolbar.js plugin allows us to create a mini settings menu nested with Bootstrap icons.
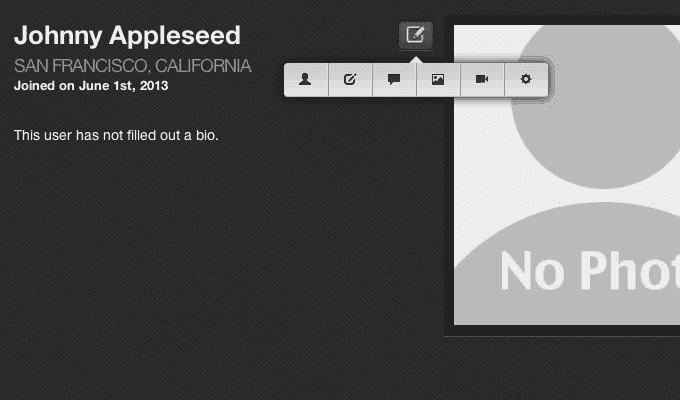
In this tutorial I want to show how we can build a small user profile page with a mini-settings tooltip popup. Each of the user options is defined by an icon glyph related to the action. This may be confusing to some users, but you can change these values to be any contextual item as well. The mini tooltip is meant to save room in your webpage by offering quick access to popular site features. Check out my live sample demo to get an idea of what we are making.
Live Demo – Download Source Code
Contents
Getting Started
The first step is to download a copy of the Toolbar.js plugin from Github. This will include their own webpage demo, along with the core files we need to get the plugin working. Namely these are bootstrap.icons.css and the accompanying glyphicons PNG image. We also need the jquery.toolbars.css document for the default tooltip styles, along with jquery.toolbar.min.js for the actual toolbar plugin codes. This requires a dependency on jQuery which we can include directly through Google’s CDN.
<!doctype html>
<html lang="en-US">
<head>
  <meta http-equiv="Content-Type" content="text/html;charset=utf-8">
  <title>Popup Toolbar Icons Demo</title>
  <meta name="author" content="Jake Rocheleau">
  <link rel="shortcut icon" href="http://teamtreehouse.com/assets/favicon.ico">
  <link rel="icon" href="http://teamtreehouse.com/assets/favicon.ico">
  <link rel="stylesheet" type="text/css" media="all" href="css/styles.css">
  <link rel="stylesheet" type="text/css" media="all" href="css/jquery.toolbars.css">
  <link rel="stylesheet" type="text/css" media="all" href="css/bootstrap.icons.css">
  <script type="text/javascript" src="https://ajax.googleapis.com/ajax/libs/jquery/1.9.1/jquery.min.js"></script>
  <script type="text/javascript" src="js/jquery.toolbar.min.js"></script>
</head>
When I was testing this plugin I could not get it to run properly with the jQuery 1.10.1 version. For some reason there must be a weird bug in the update because I can get everything working with the version released directly before this current release. Hopefully it will all work out in the near future. Just be aware of this tip when you go to build Toolbar.js into your own projects.
Adding the Icons
Looking inside the page HTML itself is rather easy to compile. You can place the toolbar navigation HTML almost anywhere in the page and it should work. The jQuery codes use absolute positioning to keep this element within the container, both for the fadeIn and fadeOut animation effects. In my page I have kept the toolbar HTML within the container so that everything is organized and easy to edit.
  <div id="menucontainer" style="position: relative;">
    <span id="editmenu"><img src="images/edit-profile-icon.png" alt="Edit"></span>
    <div id="user-options" class="toolbar-icons" style="display: none;">
        <a href="#"><em class="icon-user"></em></a>
        <a href="#"><em class="icon-edit"></em></a>
        <a href="#"><em class="icon-comment"></em></a>
        <a href="#"><em class="icon-picture"></em></a>
        <a href="#"><em class="icon-facetime-video"></em></a>
        <a href="#"><em class="icon-cog"></em></a>
    </div>
  </div>
The Twitter Bootstrap library has a class for organized PNG icons. These may be implemented almost anywhere in your layout, and the default Toolbar.js plugin uses them exclusively within the menu. Class names are based off the icons themselves, such as .icon-user which displays an outline of a person. It would be possible to use an icon font instead, which can scale naturally based on the font size. Or you could even use text and skip the glyphs altogether.
But the greatest part of this navigation is the simplicity for getting it to append anywhere on the page. You merely attach this to an element and the event listener will activate based on the user’s click action. Most of the CSS menu items are typical but I want to outline one part of my custom styles.
#editmenu {
  display: block;
  margin-top: 5px;
  width: 36px;
  height: 30px;
  text-align: center;
  padding-top: 5px;
  -webkit-border-radius: 5px;
  -moz-border-radius: 5px;
  border-radius: 5px;
  border: 1px solid #121212;
  box-shadow: inset 0px 1px 3px 0px rgba(0,0,0,0.3), 0px 1px 0px 0px rgba(255,255,255,0.2);
  background-color: #434343;
  background-image: -webkit-gradient(linear, left top, left bottom, from(#595959), to(#434343));
  background-image: -webkit-linear-gradient(top, #595959, #434343);
  background-image: -moz-linear-gradient(top, #595959, #434343);
  background-image: -ms-linear-gradient(top, #595959, #434343);
  background-image: -o-linear-gradient(top, #595959, #434343);
  background-image: linear-gradient(top, #595959, #434343);
  cursor: pointer;
}
#editmenu:active {
  background-color: #404040;
  background-image: -webkit-gradient(linear, left top, left bottom, from(#505050), to(#404040));
  background-image: -webkit-linear-gradient(top, #505050, #404040);
  background-image: -moz-linear-gradient(top, #505050, #404040);
  background-image: -ms-linear-gradient(top, #505050, #404040);
  background-image: -o-linear-gradient(top, #505050, #404040);
  background-image: linear-gradient(top, #505050, #404040);
  box-shadow: inset 0px 2px 6px 1px rgba(0,0,0,0.65), 0px 1px 0px 0px rgba(255,255,255,0.2);
}

#editmenu img { opacity: 0.7; }
#editmenu:hover img { opacity: 1.0; }
The edit menu is actually a span HTML tag located inside the menu container. The design is built using CSS3 gradients along with a small compose icon as a PNG image. It will increase to 100% opacity when the user hovers over the menu, and it provides a nice effect which is all generated using CSS3.
Toolbar.js in Action
Since all of the other CSS is written into libraries we really don’t need to examine it. You do have the option to overwrite all the default Toolbar styles for yourself, and it doesn’t take much effort when you can inspect the elements using Chrome or Firebug. But I am certainly more impressed with the Toolbar plugin so let’s dive into the JavaScript codes.
$(function(){
  $('#editmenu').toolbar({
    content: '#user-options',
    position: 'bottom',
    hideOnClick: true
  });
The toolbar is attached onto my #editmenu button and will trigger once the user clicks. For the plugin content option I’m passing #user-options which should target the internal menu list of icons. Remember that you can style this in any way you choose – it just helps to work with the default Toolbar.js styles as you are first getting started.
The position may also be adjusted based on the top, right, left or bottom. I used “bottom” in my example because it has the most room where the icons are not cutting off important page content. But Toolbar.js is extremely flexible and you really can implement this almost anywhere. The other option hideOnClick will hide the toolbar menu after the user clicks an icon. This defaults to false but I’ve set it as “true” since that makes more sense.
Typical Event Handlers
Along with the typical options for Toolbar.js we can also attach functions onto various events. toolbarShown and toolbarHidden are two basic examples which allow you to run custom JS codes once the menu displays and hides itself. But within my demo example I have written a function attached onto toolbarItemClick. This will trigger a function after the user clicks onto any toolbar item.
  $('#editmenu').on('toolbarItemClick', function(event){
    // when the user clicks an icon we call this function
    console.dir(event);
    $(this).trigger('click');
  });
});
The events are handled using jQuery’s internal .on() method. We pass the event object into this new function which can tell us details about the click event, and which specific icon has been selected. I am executing a function console.dir() which will output the event data into your browser console. It will display in a different section for each type of browser – but you can always view the console data in some way.
Also you may notice that my last line of code uses jQuery’s .trigger() method for calling a click event. This will force the click to behave as normal instead of just executing my callback function. So we will get some console output related to the click event, and then the toolbar will auto-hide itself just like the user had clicked normally. There are lots of ways to customize this amazing plugin and I think my sample demo can provide a good starting point.
Live Demo – Download Source Code
Final Thoughts
The vast quantity of jQuery plugins has been growing rapidly. I am a huge fan of open source web development, and the jQuery library is a prime example for modern webmasters. I hope this guide may prove useful for anybody looking to customize the Toolbar.js plugin. There are a number of optional parameters which let you control actions and callback functions after the user selects a menu item. I have gone into some detail about these parameters, but check out the plugin homepage if you want to learn more.


can you help me on how to redirect to a different page when I click on the first sub menu. For Eg. If I click on user icon i should redirect me to the user profle page. Newbie here