
Last Updated on May 21, 2015 by Laura Coronel
In part 1 we covered basic CSS concepts like the cascade and CSS rules. In this article, we’ll take things a step further with the CSS box model and basic selector types.
Contents
The CSS Box Model
Understanding how the box model works is the very basis of designing with CSS. Every HTML element, no matter how big or small, can be thought of as a rectangular box made up of content, padding, borders and margins. The box model applies to all HTML elements – it’s essentially a box that wraps the elements. So first, we’ll need to think of every HTML element as a rectangle or box.
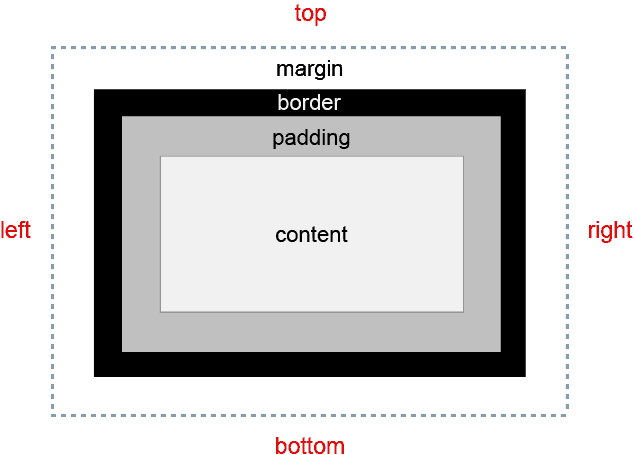
The CSS Box Model example.
The innermost area — and core component — is the content area, which is the area containing the element’s actual content, such as text or images.
The padding area surrounds the content area; it separates the content from the border area above.
The border area of the box is the outermost part of the box — we can think of it as an outline to the box. Although borders are optional, different styles such as color and thickness can be applied to them.
Finally, the margin area exists outside of the box; it’s the space around an element that separates it from other elements. So just remember that with margins we create space around the elements.
Adding CSS to a Page
We can add CSS to a page several different ways, and as we’ll learn, each has its advantages or disadvantages. Let’s review the different methods we can use.
Inline Styles
One of the ways we can add styles to a page is with inline styles. Inline styles mix content with presentation. To add them, we use the style attribute inside the HTML element we want to style.
<body style="background: lightblue;">
Inline styles are at the lowest level possible of the cascade, so that means they will override any styles declared in external or internal style sheets. They should be used sparingly because if we need to make any changes it means we’ll need to go directly to our markup, so we’re not really separating content from presentation — making maintenance difficult and impractical. Inline styles might be good for creating quick HTML/CSS mockups and prototypes, or for temporary styles not meant to be shared with other elements on the page.
Internal Styles
Internal styles are included in the <head> section of the document and are defined using the <style> tag. With this method we can write all of our CSS rules within the HTML document.
<style>
  h1 {
    color: white;
    background: black;
  }
</style>
Internal styles can be useful for temporary use, testing a new feature or small iteration.
The downside to using internal styles on a larger website is that since the styles are on the same page they are required to be downloaded each time the page is loaded. It also means that we may need to duplicate a lot of the same styles across multiple pages.
External Style Sheet
With an external style sheet we can change the look of an entire website with just one file, then reference it in the <head> section of the document using the <link> element.

In our example above, the rel attribute specifies the relationship between the current document and the linked document, which in this case is a style sheet. The type attribute specifies the media type of the linked document. However, in HTML5, type is no longer required, so we can omit it if we prefer. Finally, the href attribute points to the location of the CSS file.
@import Method
The @import rule can be used in external or internal style sheets. This method allows us to import CSS from other files, so it shares some of the same advantages as linking a style sheet, such as browser caching and maintenance efficiency. When using this method, the @import statement must precede all other declarations in order for it work properly.
This method can make our CSS more modular by splitting it into different files. The page can link to one style sheet which can import other style sheets for reset, layout, typography, etc…
@import 'reset.css';
@import 'layout.css';
@import 'typography.css';
The drawback to using this method is performance. Each @import statement is also a new HTTP request.
More on Selectors
Selectors are one of the most important and powerful parts of CSS. They are essentially patterns used to allow us to select the elements we want to style based on their type, attributes, or even a position in the document. We’ll cover four basic selector types to get us started.
Type Selectors
A type selector selects an element type in the document with the corresponding name. For example, we can add a background color to our page by selecting the body and adding a background property.
body {
  background: lightblue;
}
Descendant Selectors
We can combine type selectors to create what are called descendant selectors. A descendant selector selects an element that is a descendant of another; it’s made up of two or more selectors separated by whitespace.
h2 em {
  color: green;
}
Class Selectors
A class selector selects an element based on its class attribute. Classes are specified with the dot (.) character followed by the class name. Classes are not unique, so multiple elements on a page can have the same class applied to them, and an element can also have multiple classes in its class attribute.
.intro {
  font-weight: bold;
}
ID Selectors
An ID selector selects an element based on its ID attribute using the pound (#) symbol. IDs are unique, so an element can only have one ID and a page can only have one element with that ID. We can apply both a class and an ID to an element, just remember that IDs carry more specificity than classes do.
#wrapper {
  width: 90%;
  margin: 0 auto;
}
IDs also have browser functionality. They can be used as fragment identifiers for creating landmarks in pages. Let’s say we give the h1 at the top of our page an ID of “top”, then add a link to the bottom of the page with an href attribute of “top” preceded by a “#”:
<h1 id="top">My Website Heading</h1>
...
<a href="#top">Back to top</a>
When the link is clicked, the browser will locate the element with the ID of “top”.
These basic selectors are just some of the many ways we can target elements. In future articles, we’ll learn how we can get more complex and specific with our CSS selectors.


