
Last Updated on May 21, 2015 by
With mobile web browsing now accounting for 15% of all global internet traffic building web applications targeted at mobile has become more important than ever. Building for mobile is very different to creating web applications targeted at the desktop environment. The way in which we interact with mobile devices is inherently different and therefore requires a different approach when it comes to designing our applications.
In this blog post we are going to be focussing on the how we interact with multi-touch displays. You are going to be learning about the APIs that are available for building multi-touch web applications. After a quick bit of initial theory you’ll build a fully-functional multi-touch drawing app that works great on your phone or tablet.
Lets get started!
A Primer on Touch Events
Before we dive into the demo, lets quickly take a look at the events and objects that you will be using to create multi-touch web applications.
Types of Touch Events
There a six types of touch events:
touchstart– Triggered when a pointer first touches the screen.touchmove– Triggered when a pointer is moved on the screen.touchend– Triggered when a pointer leaves the screen.touchcancel– Triggered when a pointer is disrupted. This could be for a number of reasons:- Another event occurred that disrupted the touch.
- The pointer left the window and entered another area, such as the browser’s UI.
- There are more pointers on the screen than the browser supports. If this happens the first touch that is being tracked will be cancelled.
touchenter– Triggered when the pointer enters the target element.touchleave– Triggered when the pointer leaves the target element.
Note: Both touch and mouse events are triggered to make sure that non-touch-specific code still runs correctly on mobile devices. If you don’t want the mouse events to be triggered make sure that you use event.preventDefault() in your event handlers.
Each TouchEvent has a number of properties. For the purpose of this post we’re just interested in one, changedTouches. This property contains a list of all the Touch objects that changed with the event.
There is also a property named touches which contains a full list of all the active touch points.
Touch Objects
Each Touch object includes a number of properties that provide information about the position of the pointer on the screen. For this blog post you are just going to focus on three properties: identifier, pageX, and pageY.
identifier– A unique ID for the touch object. This allows you to track an individual pointer throughout an interaction with the device.pageX– The position of the touch point relative to the left of the screen. This property includes any scroll offset.pageY– The position of the touch point relative to the top of the screen, including any scroll offset.
Note: Take a look at the documentation for a full list of properties that are available on Touch objects.
Browser Support
Chrome, Firefox and Opera all include support for touch events on the desktop. Chrome even includes a method of emulating touch events using non-touch devices (i.e. a mouse). This comes in handy when testing your applications. You’ll learn how to enable that feature later in this post.
| IE | Firefox | Chrome | Safari | Opera |
|---|---|---|---|---|
| – | 18.0+ | 22.0+ | – | 15+ |
As you might expect, support for touch events across mobile browsers is very good. All the major mobile browsers support touch events. The outlier is in IE which supports Pointer Events instead.
| iOS Safari | Android Browser | Blackberry Browser | Opera Mobile | Chrome for Android | Firefox for Android | IE Mobile |
|---|---|---|---|---|---|---|
| 3.2+ | 2.1+ | 7.0+ | 11.0+ | 31.0 | 25.0 | – |
Source: http://caniuse.com/touch
Building a Multi-Touch Drawing App

For the remainder of this post you’re going to build a multi-touch drawing app using touch events and the Canvas API. The primer on touch events has already covered all of the things that you need to know to handle interactions. Don’t worry if you haven’t worked with the Canvas API before, I’ll walk you through all the code as we go.
See the Demo Download The Code View on CodePen
Note: If you want to learn more about the 2D Canvas API check out my previous article on the subject.
Setting up the HTML and CSS
The first job is to set up the HTML and CSS for your application. Create a new file called index.html and copy in the following code.
<!doctype html>
<html lang="en">
<head>
    <meta charset="UTF-8">
    <title>Touch Event Demo</title>

    <meta name="viewport" content="width=device-width, initial-scale=1.0, user-scalable=no">

    <style>
    body, html {
        margin: 0;
    }
    </style>
</head>
<body>
    <canvas id="myCanvas" width="500" height="500"></canvas>
    <script src="app.js"></script>
</body>
</html>
Here you’ve set up a simple page that contains a <canvas> element. You don’t need much CSS for this demo so you’ve placed this with the <head>.
A key element in this markup is the meta viewport tag.
<meta name="viewport" content="width=device-width, initial-scale=1.0, user-scalable=no">This tag will disable pinch-zoom on mobile devices; that feature can often get in the way when creating multi-touch applications.
Emulating Touch Events with Chrome Dev Tools
Before we go any further lets quickly take a look at how you can emulate touch events in Google Chrome. This will come in handy when testing your applications.
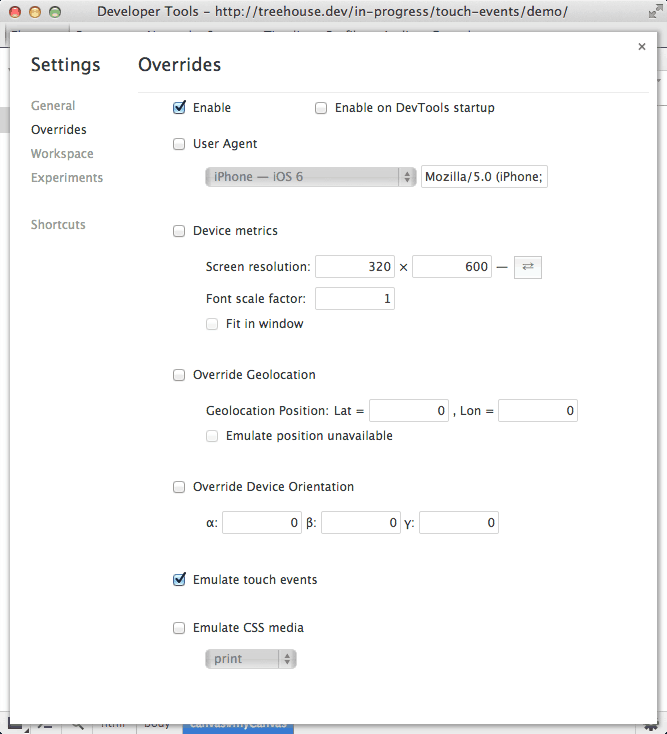
Emulating touch events using Chrome dev tools.
- Launch the Chrome Developer Tools.
- Mac:
Command+Option+I - Windows:
Ctrl+Shift+I
- Mac:
- Now open the settings page (cog in bottom right corner).
- Click on the Overrides tab on the left-hand side.
- Tick Enable.
- Tick Emulate touch events.
Enabling this feature will cause Chrome to fire touch events as you interact with the app using your mouse. As you build the demo application you will want to have this feature enabled.
Getting Started on the JavaScript
In this section you are going to make a start on the JavaScript that will power your multi-touch application.
Create a new file called app.js and save it in the same folder as your index.html file.
Copy the following code into your app.js file.
(function(){

    // Get the canvas.
    var canvas = document.getElementById('myCanvas');

    // Set the canvas to fill the screen.
    canvas.width = window.outerWidth;
    canvas.height = window.outerHeight;

    // Get a 2d drawing context.
    var ctx = canvas.getContext('2d');

    // Used to keep track of active touches.
    var currentTouches = new Array;

    // The rest of the code goes here...

}());
This code mainly handles setting up the canvas. You have created a canvas variable and initialized it by fetching the <canvas> element in your HTML markup.
You then set the width and height properties of the canvas so that it fills the entire window.
Next you create a 2D drawing context by calling the getContext('2d') method on your canvas. This is then stored in the ctx variable. If you’re not familiar with the Canvas API think of the drawing context like you would a pen or pencil when drawing on paper. It provides a number of methods that can be used for drawing objects on your canvas.
Finally, you create an array called currentTouches. This will be used to keep track of the touch points that are currently active on the screen.
Now add the following code to your app.js file. This should replace the last comment in your current code.
// Returns a random color from an array.
var randomColor = function () {
    var colors = ['#3F3F3F', '#929292', '#00A3EE', '#F5D908', '#D80351'];
    return colors[Math.floor(Math.random() * colors.length)];
};

// Finds the array index of a touch in the currentTouches array.
var findCurrentTouchIndex = function (id) {
    for (var i=0; i < currentTouches.length; i++) {
        if (currentTouches[i].id === id) {
            return i;
        }
    }

    // Touch not found! Return -1.
    return -1;
};
In this code snippet you have created two helper functions, randomColor and findCurrentTouchIndex. You will be using these later on.
The randomColor function will return a color from the colors array. Every new touch on the screen will be assigned a color using this function.
The findCurrentTouchIndex function will loop through the currentTouches array until it finds an object with the desired id. The position of that object in the array is then returned. We can’t modify a Touch object itself so in order to store the color that is associated with a pointer we have to save this information in a separate array.
Handling New Touches
In this section you’re going to be writing the code that will handle new touch events. Lets start by defining the touchStart function.
Add the following code to your app.js file.
// Creates a new touch in the currentTouches array and draws the starting
// point on the canvas.
var touchStarted = function (event) {
    var touches = event.changedTouches;

    for (var i=0; i < touches.length; i++) {
        var touch = touches[i];
        var touchColor = randomColor();

        currentTouches.push({
            id: touch.identifier,
            pageX: touch.pageX,
            pageY: touch.pageY,
            color: touchColor
        });

        ctx.beginPath();
        ctx.arc(touch.pageX, touch.pageY, 2.5, Math.PI*2, false);
        ctx.fillStyle = touchColor;
        ctx.fill();
    }
};
Here you have started by accessing the changedTouches array that is present on the TouchEvent object. You then loop through this array to access each of the individual Touch objects.
For each touch you first generate a random color using the randomColor function you created earlier. You then push a new object into the currentTouches array. This object contains four properties: id, pageX, pageY, and color. The first three of these are set using the corresponding properties from the Touch object.
The code will then draw the initial touch point on the canvas. The call to beginPathcreates a new path to draw from.
Note: Objects on the canvas are mainly drawn using lines (with a few exceptions), just as you would if you were drawing with a pen and paper.
The call to the arc method draws the outline of a circle. Don’t worry too much about the syntax here. It looks a bit funky because this method is used to draw more than just circles.
You then set the fillStyle property of the drawing context using the color that you generated for this touch. The call to fill will color in the circle and close the path.
Now all that’s left is to add the event listener that will call the touchStarted function when the touchstart event is fired.
Add the following to your app.js file.
// Set up an event listener for new touches.
canvas.addEventListener('touchstart', function(e) {
    e.preventDefault();
    touchStarted(event);
});
Drawing on The Move
Your next task is to write the code that will draw a line as the user drags their finger (or other touch pointer) across the screen.
Copy this code into your app.js file.
// Draws a line on the canvas between the previous touch location and
// the new location.
var touchMoved = function (event) {
    var touches = event.changedTouches;

    for (var i=0; i < touches.length; i++) {
        var touch = touches[i];
        var currentTouchIndex = findCurrentTouchIndex(touch.identifier);

        if (currentTouchIndex >= 0) {
            var currentTouch = currentTouches[currentTouchIndex];

            ctx.beginPath();
            ctx.moveTo(currentTouch.pageX, currentTouch.pageY);
            ctx.lineTo(touch.pageX, touch.pageY);
            ctx.lineWidth = 4;
            ctx.strokeStyle = currentTouch.color;
            ctx.stroke();

            // Update the touch record.
            currentTouch.pageX = touch.pageX;
            currentTouch.pageY = touch.pageY;

            // Store the record.
            currentTouches.splice(currentTouchIndex, 1, currentTouch);
        } else {
            console.log('Touch was not found!');
        }

    }
};
The touchMoved function again starts by fetching the changedTouches array and then looping through each of the Touch objects.
For each Touch object we start by using the findCurrentTouchIndex function to find the position of the corresponding object in the currentTouches array. If the object exists, a value larger or equal to zero will be returned. You can then retrieve the stored object from the currentTouches array using this index. This object contains the color that will be used for the line as well as the pageX and pageY coordinates that represent the position of the previous touch point.
You then call beginPath to create a new path to draw from. The call to moveTo sets the start position for this path to the location of the previous touch point (i.e. the current end of the line on the canvas). Using the lineTo method you draw a path from the start point to the new touch position.
For this path to become visible you set the lineWidth and strokeStyle properties of the drawing context and then call the stroke method to color the path.
Now you’re done drawing on the canvas, you update the pageX and pageY properties of the currentTouch object and store this back in the currentTouches array. This is so that you know where to draw the next part of the line from when the pointer moves.
To finish up you just need to add an event listener that will call the touchMoved function when the touchmove event is fired.
// Set up an event listener for when the touch instrument is moved.
canvas.addEventListener('touchmove', function(e) {
    e.preventDefault();
    touchMoved(e);
});
Letting Go
When the user removes the pointer from the screen you need to draw the final touch position and then remove the corresponding object from the currentTouches array.
Start by adding the following code to your app.js file.
// Draws a line to the final touch position on the canvas and then
// removes the touh from the currentTouches array.
var touchEnded = function (event) {
    var touches = event.changedTouches;

    for (var i=0; i < touches.length; i++) {
        var touch = touches[i];
        var currentTouchIndex = findCurrentTouchIndex(touch.identifier);

        if (currentTouchIndex >= 0) {
            var currentTouch = currentTouches[currentTouchIndex];

            ctx.beginPath();
            ctx.moveTo(currentTouch.pageX, currentTouch.pageY);
            ctx.lineTo(touch.pageX, touch.pageY);
            ctx.lineWidth = 4;
            ctx.strokeStyle = currentTouch.color;
            ctx.stroke();

            // Remove the record.
            currentTouches.splice(currentTouchIndex, 1);
        } else {
            console.log('Touch was not found!');
        }

    }
};
The code here is much the same as in touchMoved. However instead of updating and storing the currentTouch object you remove it from the currentTouches array.
The touchEnded function should be called if either the touchend or touchleave event is fired.
Add the following event listeners to your app.js file.
// Set up an event listener for when a touch ends.
canvas.addEventListener('touchend', function(e) {
    e.preventDefault();
    touchEnded(e);
});

// Set up an event listener for when a touch leaves the canvas.
canvas.addEventListener('touchleave', function(e) {
    e.preventDefault();
    touchEnded(e);
});
Handling Cancelled Touches
The last event you need to deal with is cancelled touches. A touch can be cancelled for a number of reasons. This usually happens if something else takes control of the touch (like the browser UI), or if there are too many touch points on the screen (in which case the first touch point gets cancelled).
If a touch gets cancelled you want to immediately remove the corresponding object from the currentTouches array. There’s no need to draw anything on the canvas.
Copy the following JavaScript code into your app.js file.
// Removes cancelled touches from the currentTouches array.
var touchCancelled = function (event) {
    var touches = event.changedTouches;

    for (var i=0; i < touches.length; i++) {
        var currentTouchIndex = findCurrentTouchIndex(touches[i].identifier);

        if (currentTouchIndex >= 0) {
            // Remove the touch record.
            currentTouches.splice(currentTouchIndex, 1);
        } else {
            console.log('Touch was not found!');
        }
    }
};
This touchCancelled function will loop through each of the changedTouches and remove the corresponding objects from the currentTouches array.
Now you just need to add an event listener that calls touchCancelled when the touchcancel event is fired.
// Set up an event listener to catch cancelled touches.
canvas.addEventListener('touchcancel', function(e) {
    touchCancelled(e);
});
Finishing Up
That completes your multi-touch drawing application. Fire it up on a mobile device and give it a go!
See the Demo Download The Code View on CodePen
For extra credit you could try adding UI elements that allow you to manipulate the width of the lines, or the colors that are available.
Summary
In this blog post you’ve learned about touch events, and have created your very own multi-touch drawing application.
Mobile web usage is growing at a staggering pace. Taking full advantage of this platform shift goes way beyond just responsive design. By using these platform-specific APIs we can make sure that our web applications are delivering a great user experience across multiple devices.


I was reading this post; it has a great collection of several programing codes. But I can’t understand some codes, so can you please share it with output?