
Last Updated on July 14, 2015 by Laura Coronel
One of the coolest APIs to hit the web in recent years is the Web Audio API. This allows you to create, load and manipulate audio directly in the browser; as well as perform a whole load of other functions that basically transforms your web browser into your own mini studio.
In this blog post you will be using the Web Audio API to create a synthesizer pad that responds to user interactions.
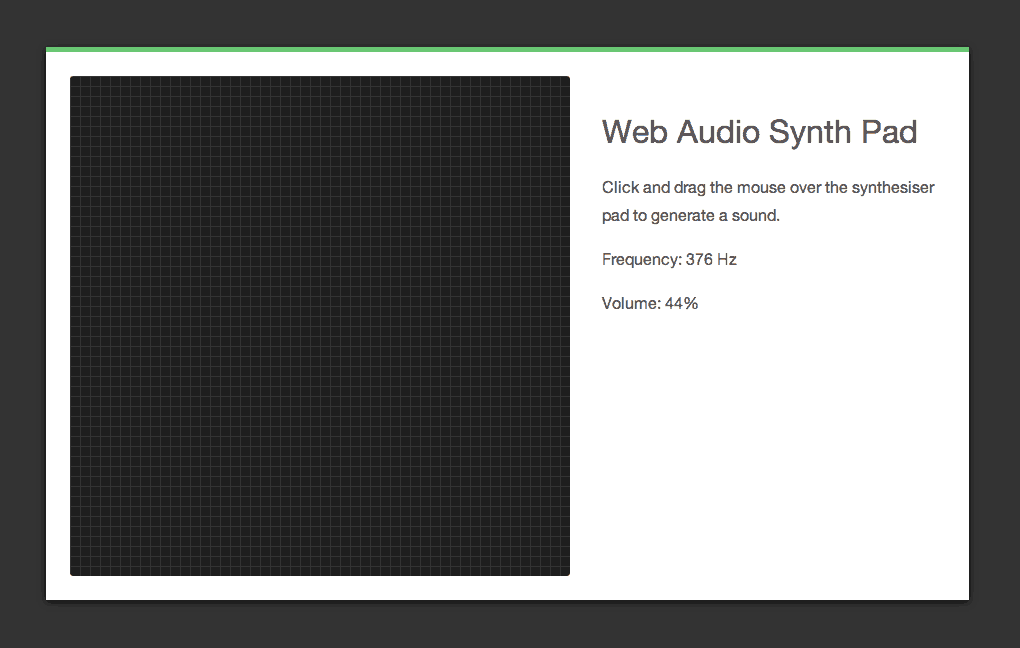
The synthesizer app you will be creating.
View the Demo Download The Code View on CodePen
Contents
Browser Support for the Web Audio API
At the time of writing this post the Web Audio API is only supported in Chrome, Opera and Safari. Firefox plans to add support in the near future.
For full information on browser support check out: Can I use: Audio API.
Setting up the HTML and CSS
To get started you first need to set up the HTML and CSS files for your project. Begin by creating a new file called index.html and copying the following code into it.
<!DOCTYPE html>
<html lang="en">
<head>
  <meta charset="utf-8">
  <title>Synth Pad Web Audio Demo</title>

  <link rel="stylesheet" href="style.css">
</head>
<body>
  <div id="page-wrapper" class="clearfix">
    <canvas id="synth-pad"></canvas>
    <div id="info">
      <h1>Web Audio Synth Pad</h1>
      <p>
        Click and drag the mouse over the synthesizer pad to generate a sound.
      </p>
      <p>
        Frequency: <span id="frequency">n/a</span>
      </p>
      <p>
        Volume: <span id="volume">n/a</span>
      </p>
    </div>
  </div>

  <script src="app.js"></script>
</body>
</html>
Here you have defined a number of HTML elements that will make up the user interface for the synthesizer pad. The most important of these is the <canvas> element. This will form the surface of the pad. You have also added two <span> elements that will be used to display the pitch (frequency) and volume of the note that is being played.
Make sure that you download the code resources and copy the style.css file into your project directory.
Setting up the SynthPad JavaScript Module
Now that you have the HTML and CSS setup for you app it’s time to start writing the JavaScript code. For this project you will be creating a module called SynthPad that will contain all of the code needed to make your app work. Using a modular pattern like this helps to make your code more usable.
Create a new file called app.js and add the following code to it.
var SynthPad = (function() {
  // Variables
  var myCanvas;
  var frequencyLabel;
  var volumeLabel;

  var myAudioContext;
  var oscillator;
  var gainNode;

  // Notes
  var lowNote = 261.63; // C4
  var highNote = 493.88; // B4

  //
  // Put the rest of the code here...
  //
})();

// Initialize the page.
window.onload = function() {
  var synthPad = new SynthPad();
}
Lets take a moment to break down exactly what is going on in this code.
You start by defining a new module called SynthPad. This will contain all of the variables and functions that are related to the synthesizer pad.
Next, you declare a number of undefined variables. These will be used to store references to key elements on the page as well as objects created using the WebAudio API. You also create some variables that define the upper and lower limits for the frequencies that can be generated on the pad.
Finally you attach an event listener to the window.onload event that will initialize the SynthPad module when the page has loaded.
Next you need to create a constructor that will be called when the SynthPad module is initialized. This will be responsible for fetching HTML elements on the page and setting up event listeners.
Copy the following code into your app.js file.
// Constructor
var SynthPad = function() {
  myCanvas = document.getElementById('synth-pad');
  frequencyLabel = document.getElementById('frequency');
  volumeLabel = document.getElementById('volume');

  // Create an audio context.
  myAudioContext = new webkitAudioContext();

  SynthPad.setupEventListeners();
};

// Export SynthPad.
return SynthPad;
The SynthPad.setupEventListeners() function used here doesn’t exist just yet. You’ll be creating this in the next section.
The last line of this code exports the constructor. This means that when you initialize the SynthPad elsewhere in your app the constructor you defined here will be called.
There is one thing in this code block I haven’t mentioned yet. The call to webkitAudioContext() creates a new AudioContext. The AudioContext interface provides methods for creating AudioNodes that represent audio sources, processing modules or the audio destination. The AudioContext interface also manages how different AudioNodes are connected to each other.
Lets use the example of a guitarist’s setup to better understand how AudioNode objects work and the role of AudioContext.
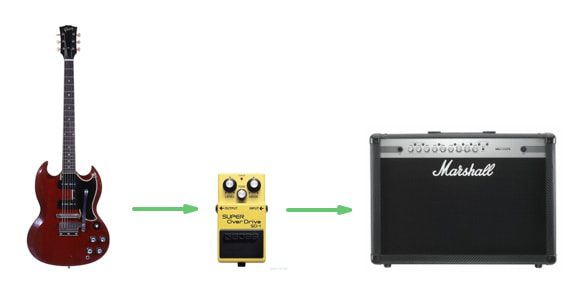
In this setup the guitar is an input source; the effects pedal is a processing node; and the amplifier is the audio destination. These are all AudioNode objects. The setup as a whole (including the cables that connect the devices) represents the AudioContext.
Listening for Events
Your next task is to setup event listeners that will handle interactions with the pad. Create this SynthPad.setupEventListeners() function in your app.js file.
// Event Listeners
SynthPad.setupEventListeners = function() {

  // Disables scrolling on touch devices.
  document.body.addEventListener('touchmove', function(event) {
    event.preventDefault();
  }, false);

  myCanvas.addEventListener('mousedown', SynthPad.playSound);
  myCanvas.addEventListener('touchstart', SynthPad.playSound);

  myCanvas.addEventListener('mouseup', SynthPad.stopSound);
  document.addEventListener('mouseleave', SynthPad.stopSound);
  myCanvas.addEventListener('touchend', SynthPad.stopSound);
};
You want this app to work with both cursor and touch-oriented devices so you’ve added event listeners here for both sets of events.
The mousemove event listener disables scrolling on touch devices. This is necessary otherwise the user wouldn’t be able to drag their finger across the pad effectively.
The mousedown and touchstart event listeners call SynthPad.playSound(). This is responsible for synthesizing the note.
The mouseup, mouseleave, and touchend events will call SynthPad.stopSound() to stop the audio.
Note: We’re not going to worry about support for multi-touch in this demo but it is possible. If you’re feeling ambitious once you’ve finished this tutorial have a go at adding support for multi-touch.
Creating Sounds
In this section you are going to create the function that is responsible for interacting with the Web Audio API to create sounds.
Copy the following code into your app.js file.
// Play a note.
SynthPad.playSound = function(event) {
  oscillator = myAudioContext.createOscillator();
  gainNode = myAudioContext.createGainNode();

  oscillator.type = 'triangle';

  gainNode.connect(myAudioContext.destination);
  oscillator.connect(gainNode);

  SynthPad.updateFrequency(event);

  oscillator.start(0);

  myCanvas.addEventListener('mousemove', SynthPad.updateFrequency);
  myCanvas.addEventListener('touchmove', SynthPad.updateFrequency);

  myCanvas.addEventListener('mouseout', SynthPad.stopSound);
};
Here you first create a new OscillatorNode. This is responsible for creating the waveform that produces the note.
Next up you create a GainNode that will be used to control the volume.
You then set the type of the OscillatorNode to triangle. This controls the shape of the periodic waveform which in turn effects the sound that you will hear. There are five different types: sine, square, sawtooth, triangle and custom.
You then use the connect() method to link together the GainNode and OscillatorNode. This is like adding the cables between the guitar, effects pedal and amp. The OscillatorNode is the audio source (the guitar) so this needs to be connected up to the GainNode (the effects pedal) which in turn needs to be connected to AudioContext.destination (the amplifier).
Next you call SynthPad.updateFrequency(). This function will set the note frequency and volume based on the position of the cursor (or finger) on the pad.
A call to the start() method fires up the OscillatorNode. This will cause the note to start playing. The single parameter here indicates when the sound should start playing (in seconds). You want it to start playing immediately so this parameter has been set to 0.
To finish up you create two event listeners that will call SynthPad.updateFrequency() when the cursor or finger is moved. You also create an event listener that will call SynthPad.stopSound() if the mouse leaves the pad.
Stopping Sounds
Now lets create the function that will stop the OscillatorNode, and therefore the audio. Add the following code to your app.js file.
// Stop the audio.
SynthPad.stopSound = function(event) {
  oscillator.stop(0);

  myCanvas.removeEventListener('mousemove', SynthPad.updateFrequency);
  myCanvas.removeEventListener('touchmove', SynthPad.updateFrequency);
  myCanvas.removeEventListener('mouseout', SynthPad.stopSound);
};
Here you call the stop() method on the OscillatorNode. As with start(), the parameter determines when the sound should be stopped.
You also remove the event listeners that were tracking the mouse movements. We don’t this information anymore if the user is not interacting with the pad.
Changing the Pitch and Volume
In this section you are going to write the code that handles calculating note frequencies and the volume.
The pitch of the note being played will increase (get higher) as the user drags their cursor from left to right across the pad. The volume will increase as the cursor is dragged from the bottom to the top of the pad.
Lets start by creating the calculateNote() function. This will use the position of the cursor on the pad to determine what the frequency of the note should be. Copy the following into your app.js file.
// Calculate the note frequency.
SynthPad.calculateNote = function(posX) {
  var noteDifference = highNote - lowNote;
  var noteOffset = (noteDifference / myCanvas.offsetWidth) * (posX - myCanvas.offsetLeft);
  return lowNote + noteOffset;
};
Here you first calculate the range between the highNote and lowNote variables you created earlier. The next line then starts by calculating what frequency value is represented by 1 pixel on the pad. This is then multiplied by the position of the cursor on the pad to give the value that should be added to lowNote to produce the final frequency.
Next up you need to write a function that calculates the volume. Copy the following into your app.js file.
// Calculate the volume.
SynthPad.calculateVolume = function(posY) {
  var volumeLevel = 1 - (((100 / myCanvas.offsetHeight) * (posY - myCanvas.offsetTop)) / 100);
  return volumeLevel;
};
The calculateVolume() function is similar to calculateNote() but this time you are using the position of the cursor along the Y axis of the pad.
Now that you have these two helper functions defined you can create the main calculateFrequency() function. This is responsible for extracting the position of the cursor (or touch point) from an event; fetching the frequency and volume values; and updating the OscillatorNode and GainNode.
Add the following code to your app.js file.
// Fetch the new frequency and volume.
SynthPad.calculateFrequency = function(x, y) {
  var noteValue = SynthPad.calculateNote(x);
  var volumeValue = SynthPad.calculateVolume(y);

  oscillator.frequency.value = noteValue;
  gainNode.gain.value = volumeValue;

  frequencyLabel.innerHTML = Math.floor(noteValue) + ' Hz';
  volumeLabel.innerHTML = Math.floor(volumeValue * 100) + '%';
};
Here you first use the calculateNote() and calculateVolume() functions to get note and volume values. You then set the OscillatorNode's frequency property using the noteValue and the GainNode's gain property using volumeValue. To finish up you update the frequency and volume labels in the UI.
The final function you need to create is SynthPad.updateFrequency(). This function is called repeatedly when the user moves the cursor across the pad. It is also called when the mousedown or touchstart events are fired.
Add this function to your app.js file.
// Update the note frequency.
SynthPad.updateFrequency = function(event) {
  if (event.type == 'mousedown' || event.type == 'mousemove') {
    SynthPad.calculateFrequency(event.x, event.y);
  } else if (event.type == 'touchstart' || event.type == 'touchmove') {
    var touch = event.touches[0];
    SynthPad.calculateFrequency(touch.pageX, touch.pageY);
  }
};
Here you first check to see if the event has been caused by someone using a mouse or a touch device. If a mouse is being used you extract the position of the cursor from the event data and pass this to the calculateFrequency() function.
For touch events, you need to get the first object in the event.touches list and then extract the position of the pointer for that touch. You then pass this data to the same calculateFrequency() function.
Congratulations! You should now have a working synthesiser pad that’s powered by the Web Audio API.
View the Demo Download The Code View on CodePen
Final Thoughts
In this blog post you have learned how to use the Web Audio API to create a mini synthesizer pad. We’ve barely scratched the surface of what can be achieved using this API, but you now have the foundation needed to explore more complex applications.
The Web Audio API has many uses within modern web applications, especially when it comes to creating games. If you’re interested in learning more about web audio I recommend checking out some of the links listed below.
Until next time, happy coding!


the download code is broken and a different version than the demo. copy paste the demo app from codepen to your text editor to get it working
amazing article but doesn’t work in firefox
People who claim to be teachers of the web always forget to write their code as the standardized version, so in a few years it will not work.
Sort of a non-sequitur, since the demo still functions perfectly fine.