Last Updated on June 7, 2023 by Dev Support
Knowing a user’s location in an Android app can be extremely useful. Users take their devices everywhere and are constantly using them on the go, and as developers we can capitalize on that by providing a more contextual experience based on their current location.
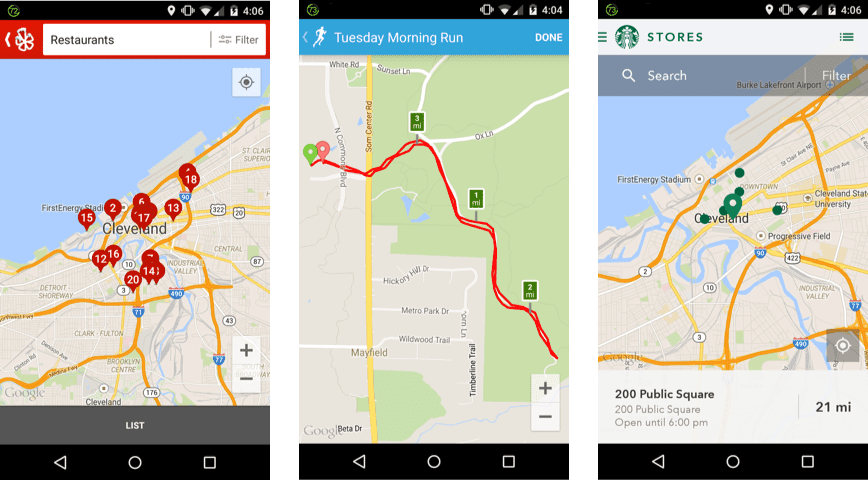
Accessing the current location of an Android device is easier than ever, but it can still be a little tricky, especially for the first time. What follows is a guide on the very basics of retrieving a user’s current location and displaying it with a marker on a map. The project files for this project are available on GitHub, but follow along and in a few minutes we’ll build a super simple location finder!
This is a somewhat complex topic in Android, but these step-by-step guidelines should explain everything you need. If you would like to learn more about the fundamentals of Android programming that lead up to this, please check out my Android Development Track on Treehouse.
Related Reading: What Employers Are Looking for in a Junior Android Dev
Contents
Location and Google Play Services
Android has two basic ways to determine a user’s location. The first is to use the built-in location APIs that have been available since Android was first introduced. These still work, but not as well as the newer location APIs bundled as part of the beast known as Google Play Services:
The Google Location Services API, part of Google Play Services, provides a more powerful, high-level framework that automates tasks such as location provider choice and power management. Location Services also provides new features such as activity detection that aren’t available in the framework API. Developers who are using the framework API, as well as developers who are just now adding location-awareness to their apps, should strongly consider using the Location Services API. – link
Google Play Services is a bundle of services and APIs from Google that we can use for lots of features in Android apps. They are installed on a majority of devices and run on Android 2.3 and up. There are a lot of different parts of Google Play Services, but we will see how to include them in a project and use them for detecting location in a quick and effective way.
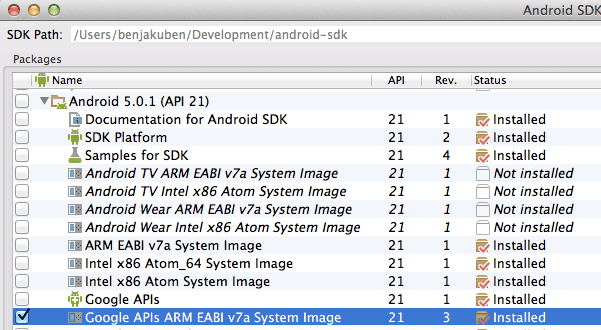
We need to download the Google Play Services SDK using the SDK Manager. It’s a separate download just like a new version of the Android SDK. If you don’t have it already, check out the Setting Up Google Play Services page on the Android developer site for details on how to download it. You may also want to download an emulator (AVD) image that uses the Google APIs, but more on that below.
Creating the Project
*If you are having trouble with creating the project or any of the code, download my completed project from GitHub.
We are going to work with a project template available in Android Studio. The “Google Maps Activity” template generates some boilerplate code for location that will make this very easy for us.
- Create new project (I named mine “I Am Here”).
- Select “Phone & Tablet” as the form factor. We aren’t going to work with anything else for this project, though it will be fairly straightforward to extend it.
- Select the “Google Maps Activity” as the template for the Activity and then finish creating the project:

The Google Maps Activity template makes a few things quite a bit easier
Configuring Google Play Services
Your new project should start with google_maps_api.xml open, but if not, you can find it in res/values. This file contains helpful comments about what you need to get started. It even has a URL! Basically all you need to do is visit this personalized link and sign up for a Google Maps API Key. It’s free to sign up if you don’t already have an account, and when you get a key from that site you come back to this file and replace YOUR_KEY_HERE with your new key. The screenshots below walk through this process if you need a reference.
Select “Create a new project” and click Continue: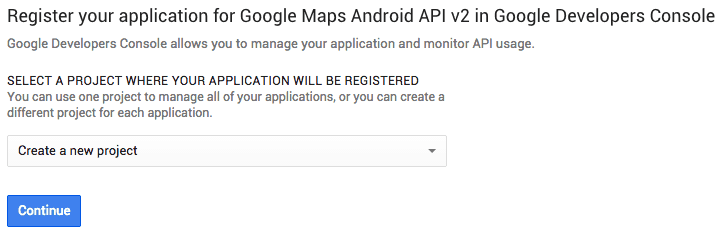
Creating the new project takes a few seconds: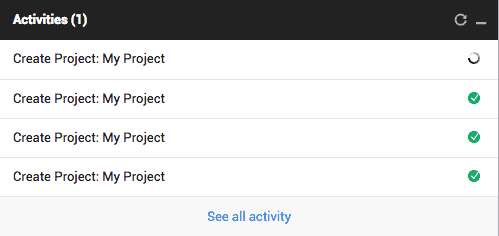
Click Create to finally create your API key: 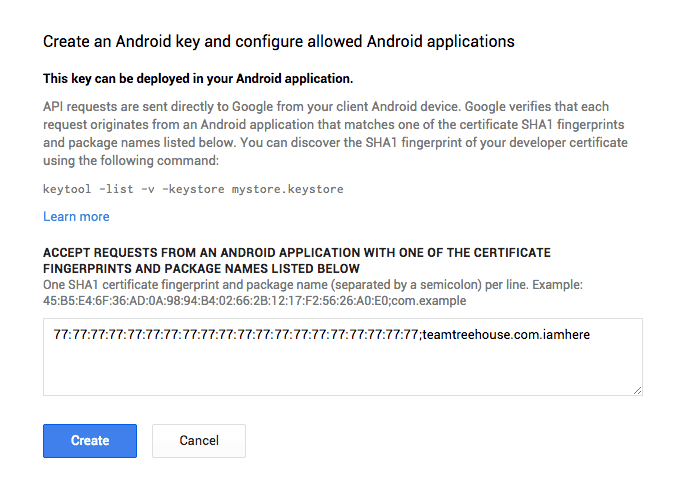
Finally, copy and paste your API KEY into your app!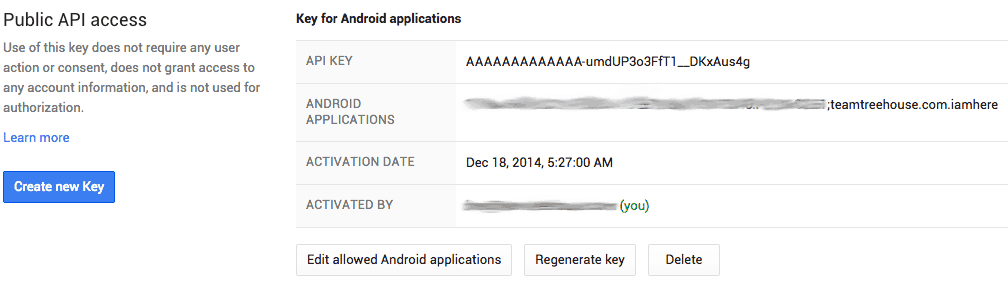
google_maps_api.xml
<resources>
  <string name="google_maps_key_instructions" templateMergeStrategy="replace"><!--

  TODO: Before you run your application, you need a Google Maps API key.

  To get one, follow this link, follow the directions and press "Create" at the end:

  https://console.developers.google.com/flows/enableapi?apiid=maps_android_backend&keyType=CLIENT_SIDE_ANDROID&r=XX:XX:XX:XX:XX:XX:XX:XX:XX:XX:XX:XX:XX:XX:XX:XX:XX:XX:XX:XX%3Bteamtreehouse.com.iamhere

  You can also add your credentials to an existing key, using this line:
  XX:XX:XX:XX:XX:XX:XX:XX:XX:XX:XX:XX:XX:XX:XX:XX:XX:XX:XX:XX;teamtreehouse.com.iamhere

  Once you have your key (it starts with "AIza"), replace the "google_maps_key"
  string in this file.
  --></string>

  <string name="google_maps_key" templateMergeStrategy="preserve">YOUR_KEY_HERE</string>
</resources>
Note this is really just a simple string resource. If you want to organize strings differently, feel free to move the google_maps_key string into strings.xml.
We’re ready to run the app for the first time at this point, but before we do, let’s take a look at what is included in our build.gradle file. Open the build.gradle file for the app module (not the whole Project), and we find this in the dependencies section at the bottom:
dependencies {
  compile fileTree(dir: 'libs', include: ['*.jar'])
  compile 'com.android.support:appcompat-v7:21.0.3'
  compile 'com.google.android.gms:play-services:6.5.87'
}
The last line here is the important one to pull in Google Play Services. Gradle’s dependency management system will get the appropriate files we need so we can use them in our app. This used to be a lot harder, so thank you, Gradle! Don’t worry if your version numbers are different. These change constantly as new releases of the libraries are published, so you will likely be using a newer version than this if your tools are up-to-date.
Running for the First Time
I mentioned earlier that we need a device or emulator that has Google Play Services installed. Most devices do have this installed by default, but the Android emulators that run just the Android APIs do not. If we try running this app with one of those emulators, we will see an error message like the screenshot below.
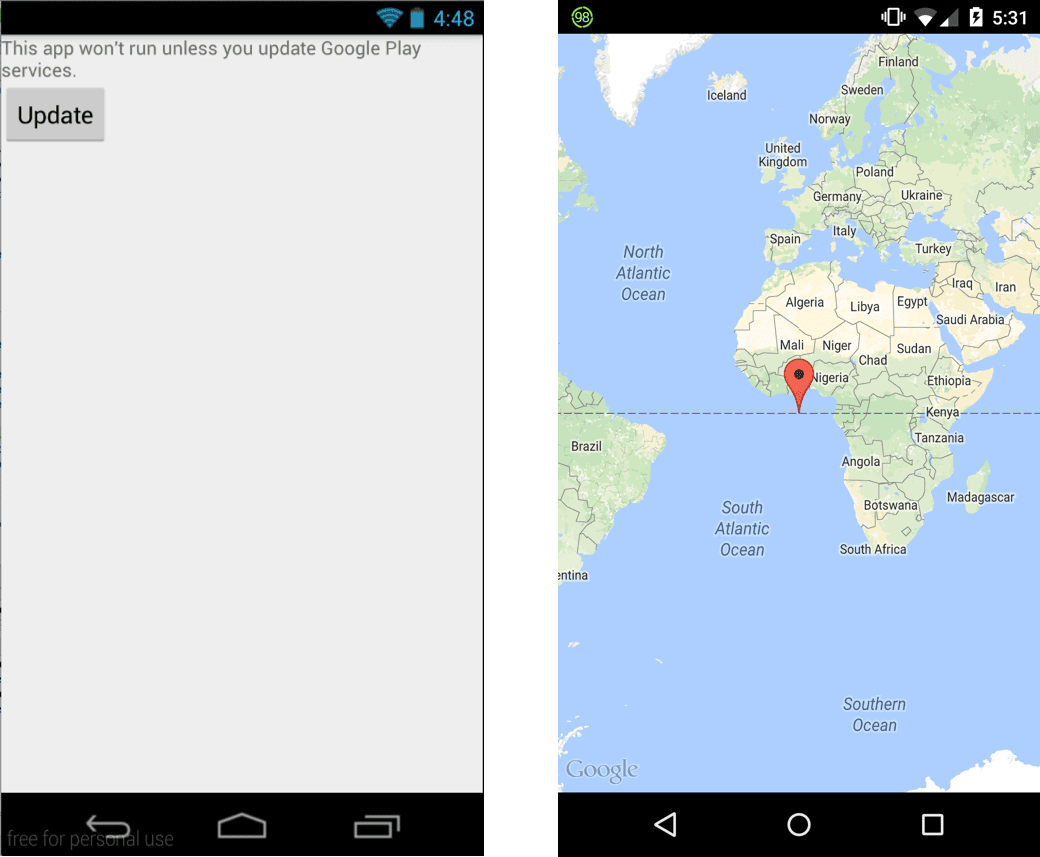
Start the SDK Manager again and select one of the emulator (AVD) images that uses the Google APIs. Once you have an appropriate device or emulator to test on, run the app and verify that the map loads. If so, then your new API key is valid and your project is ready to extend!
Make sure you have a device or emulator that runs the Google APIs!
Getting the Current Location
Using maps in an app no longer require extra permissions, but accessing the location of the device still does. The required permissions should already be in your AndroidManifest.xml file from the template, but check to make sure these two are there:
<!--
The ACCESS_COARSE/FINE_LOCATION permissions are not required to use
Google Maps Android API v2, but are recommended.
-->
<uses-permission android:name="android.permission.ACCESS_COARSE_LOCATION" />
<uses-permission android:name="android.permission.ACCESS_FINE_LOCATION" />
Checking for Google Play Services
The first thing we need to do is check to make sure that Google Play Services are even available. Like I said, it is installed by default on most devices, but if it isn’t we should prompt the user to install it before using our app. Fortunately this part is taken care of automatically for us by the generated code in our project. There are comments about this in MapsActivity.java.
Creating a Google API Client
Let’s finally add some code! We’ll start by adding a new member variable in MapsActivity.java. We are going to use the GoogleApiClient, which is the latest client in Google Play Services that was designed to make this and other functions from Google Play Services easier to setup and use.
private GoogleApiClient mGoogleApiClient;
We’ll need a TAG variable in a little bit, so let’s add that while we’re here:
public static final String TAG = MapsActivity.class.getSimpleName();
And now we can initialize our client it at the bottom of MapActivity’s onCreate() method.
mGoogleApiClient = new GoogleApiClient.Builder(this)
        .addConnectionCallbacks(this)
        .addOnConnectionFailedListener(this)
        .addApi(LocationServices.API)
        .build();
Don’t worry that there is an error about this: we’ll fix it in a moment!
So what exactly are these lines doing for us? The first is to create a new GoogleApiClient object using the Builder pattern that you may have seen in Android with things like AlertDialogs. The methods are chained together to make the code easier to understand. The next two lines tell the new client that “this” current class (MapsActivity) will handle connection stuff. We’ll add that next.
The fourth line adds the LocationServices API endpoint from GooglePlayServices, and then finally the client is built for us. It’s almost ready to connect!
Related Reading: Java Basics for Android Development – Part 2
Implementing Location Callbacks
But first we need to implement some methods for those interfaces related to those two lines about callbacks and a listener. Getting a user’s location is an asynchronous process because it might take a little time to get the location data. We don’t want the app to be unresponsive while it’s waiting, so we do that work in the background. When that work is done in the background, it needs to get back to this main thread somehow. That’s where callbacks come in. The code we write in a callback method gets executed when that background work “calls back” with some sort of result.
Anyhow, up in the line where we declare our class, add implements and these interfaces:
public class MapsActivity extends FragmentActivity implements
        GoogleApiClient.ConnectionCallbacks,
        GoogleApiClient.OnConnectionFailedListener {
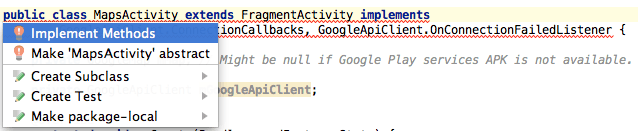
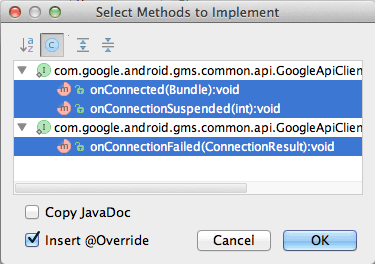
The error for “this” in our GoogleApiClient lines is now gone because “this” class is now implementing the appropriate interfaces. But new errors are showing because we need to add the required methods. Click somewhere on the line we just added, and then hit ALT+ENTER to bring up Android Studio’s Quick Fix menu. Select “Implement Methods” and then click “OK” to choose the three selected methods (see screenshots below).
Very nice! For now, let’s just log the fact that we are connecting and disconnecting in each method:
@Override
public void onConnected(Bundle bundle) {
    Log.i(TAG, "Location services connected.");
}

@Override
public void onConnectionSuspended(int i) {
    Log.i(TAG, "Location services suspended. Please reconnect.");
}
Connecting and Disconnecting
Alright, our client is built and ready to start work. We need to connect it before we can use it, so let’s add a call to connect the client in our Activity’s onResume() method. Why onResume() and not onStart()? Remember the Activity’s lifecycle. Our Activity may be paused at any time, like when a call or text message comes in, for example. So we want to pause and then resume any activity, such as network connections or location updates like this. onResume() is called right after onCreate(), so if we connect there then we will always be able to access location when our Activity is visible.
Add the line mGoogleApiClient.connect() to the onResume() method that should already be in MapsActivity.java:
@Override
protected void onResume() {
    super.onResume();
    setUpMapIfNeeded();
    mGoogleApiClient.connect();
}
Whenever we add code in onResume() we want to think about adding corresponding code in onPause(). We don’t always need something, but in this case we want to disconnect from location services when our Activity is paused. Then we will be reconnected if the Activity is resumed again. Add this whole method below onResume(). Notice that we are verifying that the client is connected before calling disconnect(). This isn’t super important now but it will be necessary later.
@Override
protected void onPause() {
    super.onPause();
    if (mGoogleApiClient.isConnected()) {
        mGoogleApiClient.disconnect();
    }
}
Logging the Current Location
When our client finally connects to the location services, the onConnected() method will be called. We just added an empty shell for that method using the Quick Fix, but now we can get the last known location and log it.
Using the Google Play services location APIs, your app can request the last known location of the user’s device. In most cases, you are interested in the user’s current location, which is usually equivalent to the last known location of the device. – link
Add the following line in the onConnected() method:
Location location = LocationServices.FusedLocationApi.getLastLocation(mGoogleApiClient);
Great! This seems like enough…but the last location might be null if this is the first time Google Play Services is checking location, or perhaps for other reasons. So let’s start by adding a null check and only handling this new location if it is NOT null. We’ll handle the new location in a new method, so add this code and then we’ll add the method:
if (location == null) {
    // Blank for a moment...
}
else {
    handleNewLocation(location);
};
Now add this new method to the MapsActivity class:
private void handleNewLocation(Location location) {
    Log.d(TAG, location.toString());
}
Now if we run this and check the log we will see either a successful location printed or nothing at all. It totally depends if the emulator or device we are testing on has a location stored in the last known location from Google Play Services. Don’t worry if yours doesn’t show anything yet because we will handle that scenario in a moment. But if there is a location to retrieve it looks like this:
![]()
Handling Errors
We won’t do anything special about the error cases, but it’s important to know that Google Play Services includes some built-in mechanisms for handling certain errors. The first thing we need is a constant static member variable at the top of our MapsActivity class. This defines a request code to send to Google Play services, which is returned in Activity.onActivityResult():
private final static int CONNECTION_FAILURE_RESOLUTION_REQUEST = 9000;
Then paste the code below into the onConnectionFailed() method. There are more detailed comments in the source on GitHub, and check the documentation for a little more information.
@Override
public void onConnectionFailed(ConnectionResult connectionResult) {
    if (connectionResult.hasResolution()) {
        try {
            // Start an Activity that tries to resolve the error
            connectionResult.startResolutionForResult(this, CONNECTION_FAILURE_RESOLUTION_REQUEST);
        } catch (IntentSender.SendIntentException e) {
            e.printStackTrace();
        }
    } else {
        Log.i(TAG, "Location services connection failed with code " + connectionResult.getErrorCode());
    }
}
Requesting Location Updates
Now that we’ve done the bare minimum about getting a location, let’s go one step further and learn how to request location updates. This is especially important when, as mentioned earlier, the last known location is not available from the fused location provider we are using. It also becomes particularly important in an app that tracks the user’s location, like a run-tracking or navigation app.
We need to implement one more interface: LocationListener. Add this to the list of interfaces implemented in the class declaration, but when you do, make sure you import the Google Play Services version of LocationListener, not the regular Android version! Check this screenshot to see the difference based on the different packages:
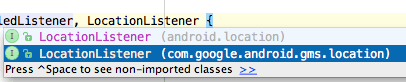
Make sure you get the Google Play Services one!
This is what our class declaration should now look like:
public class MapsActivity extends FragmentActivity implements
        GoogleApiClient.ConnectionCallbacks,
        GoogleApiClient.OnConnectionFailedListener,
        LocationListener {
Once again we will have an error about unimplemented methods, and once again we can use the Android Studio Quick Fix to add what we need. Click anywhere on this line and hit ALT + ENTER. Select “Implement Methods” and click OK to implement onLocationChanged().
This new method gets called every time a new location is detected by Google Play Services. So as the user is moving around with their phone or tablet, the location APIs are updating the location silently in the background. When the current location is updated, this method is called, and we can now handle it in our Activity. We happen to have a method already that is perfect for this: handleNewLocation()!
@Override
public void onLocationChanged(Location location) {
    handleNewLocation(location);
}
Creating and Starting the Request
We have the onLocationChanged() callback prepared, but we don’t have anything set up yet to actually call it. We need to create and configure a special LocationRequest object. We will use it in a few places, so let’s add a new member variable:
private LocationRequest mLocationRequest;
Now we can initialize this variable in onCreate(). Copy and paste these lines and then read on for an explanation.
// Create the LocationRequest object
mLocationRequest = LocationRequest.create()
        .setPriority(LocationRequest.PRIORITY_HIGH_ACCURACY)
        .setInterval(10 * 1000)        // 10 seconds, in milliseconds
        .setFastestInterval(1 * 1000); // 1 second, in milliseconds
This creation method once again chains method to create and configure the location request in an organized way. The first thing we do is set the priority to high accuracy. This means that we are requesting as accurate a location as possible. This kind of request requires more power and time, but for lots of apps we want to know the user’s location with high accuracy. If we don’t need such an accurate location we can use one of the lower priorities instead.
The next line sets the interval between active location updates. In a navigation app, for example, we probably want a low interval. But a lower interval (more frequent requests) has a “direct influence on the amount of power used by your application”, so we must choose wisely.
Finally, the last line sets the fastest interval at which our app will receive updates. This can be lower than the interval we set ourselves in case other apps are requesting location updates from Google Play Services. When that happens, our app can passively listen to any location updates, which doesn’t cost any extra power.
Now we just need to use this request. We use it with our GoogleApiClient using a special method from the fused location provider. Let’s add this line in our onConnected() method where we check to see if the last location is null:
@Override
public void onConnected(Bundle bundle) {
    Location location = LocationServices.FusedLocationApi.getLastLocation(mGoogleApiClient);
    if (location == null) {
        LocationServices.FusedLocationApi.requestLocationUpdates(mGoogleApiClient, mLocationRequest, this);
    }
    else {
        handleNewLocation(location);
    }
}
For this example we are only going to request location updates when the last location is not known. If we needed to, though, we could rewrite this code to ignore the last location and always request new updates.
Removing Updates When Finished
Just like we have to disconnect our client, we also need to explicitly remove location updates after requesting them. We do this with the opposite method, which we can call in onPause() when we disconnect our Google API client:
@Override
protected void onPause() {
    super.onPause();
    if (mGoogleApiClient.isConnected()) {
        LocationServices.FusedLocationApi.removeLocationUpdates(mGoogleApiClient, this);
        mGoogleApiClient.disconnect();
    }
}
Showing a Location on a Map
Let’s finish this simple app with a quick lesson on how to add a marker on a map for a given location. We will show the user’s current location and then center the map on it. The generated code from this project template makes this very easy to do!
Take a look at the setUpMap() method that is already in our class. When running this app we have already seen how a default map marker is added at latitude/longitude of 0, 0. This is the line of code that adds that marker:
private void setUpMap() {
    mMap.addMarker(new MarkerOptions().position(new LatLng(0, 0)).title("Marker"));
}
All we need to do is write this same line with the new latitude and longitude values available in our Location variable. (Feel free to remove or comment this line out if you only want one marker on your map, though you can add as many markers as you want.)
The following lines of code will be added in our handleNewLocation() helper method. First, we can get the latitude and longitude coordinates of the location using these two methods from the Location class:
double currentLatitude = location.getLatitude();
double currentLongitude = location.getLongitude();
For convenience, let’s use these coordinates to create a new LatLng variable:
LatLng latLng = new LatLng(currentLatitude, currentLongitude);
We could copy and paste the line to add a marker from setUpMap(), but let’s build a new one to see how it works. The first thing we need to do is define the options about the new marker using the class MarkerOptions. In this example we will set its position and the title that will appear when it is tapped on:
MarkerOptions options = new MarkerOptions()
    .position(latLng)
    .title("I am here!");
We then add a marker to the map using these options with this line:
mMap.addMarker(options);
And just one more line of code! It’s a big map, and we may need to adjust the view to center on this new location. We do that by moving the “camera” that is viewing the map:
mMap.moveCamera(CameraUpdateFactory.newLatLng(latLng));
Our final handleNewLocation() method now looks like this:
private void handleNewLocation(Location location) {
    Log.d(TAG, location.toString());

    double currentLatitude = location.getLatitude();
    double currentLongitude = location.getLongitude();
    LatLng latLng = new LatLng(currentLatitude, currentLongitude);

    MarkerOptions options = new MarkerOptions()
        .position(latLng)
        .title("I am here!");
    mMap.addMarker(options);
    mMap.moveCamera(CameraUpdateFactory.newLatLng(latLng));
}
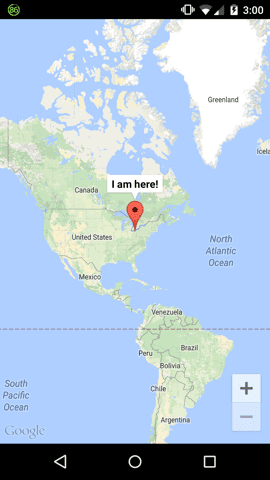
And if we run the app to verify, we will see a new marker that lets us know exactly where we are, in case we didn’t know that already. 🙂
To Infinity…and Beyond!
That may seem like a lot of work to get a user’s location, but if you successfully completed it, you now have a working model to use whenever you need to access location in the future. Congratulations!
Personally, I don’t like having my Activities implement so many interfaces. I generally try to abstract such things into separate objects. I’ve done that with this project and made it available as a separate GitHub repo if you want to check it out. It does the same exact thing as what we have just covered but with a slightly different organization. This alternate solution is easy to plug and play into existing activities, so please feel free to use and improve it!
The training module about location from Google Play Services can be a little tricky to navigate, but it is a great reference if you get stuck. Definitely check it out if you need to do more in your app than the basics covered here. Also stay tuned for a future Treehouse course that will cover these steps and more!
To check out Treehouse today, start with our 7-day free trial!


Very helpful. Thanks.
Thanks, this works 🙂
Hi sir
Could you contact with me by email please
Awesome article! I want to implement location tracking; like a running-app which tracks your location across the course of a session.
if (mMap == null) {
mMap = ((SupportMapFragment) getSupportFragmentManager().findFragmentById(R.id.map))
.getMap();
}
This line is giving me an error it cannot resolve getmap()
if (mMap == null) {
SupportMapFragmnet mapFrgmnet = (SupportMapFragment) getChildFragmentManager().findFragmentById(R.id.map))
.getMapAsync(this/getActivity);
}
and use this code in OnViewCreated() method in case of if you are using Fragment
As a beginner I found this tutorial too hard to understand.
My question is what if I want to show the location history of the user, which would then show the route of the locations travelled by the user. Is there any way please let me know..Thanks
Wow great tutorial!
But this code is not working in Marshmallow … can anyone tell me why ?
You need to add the run time permission for the Marshmallow and above.
How is ‘LocationServices.API’ resolved?
I could never get it resolved and the code subsequently fails to compile. Even after I input the correct implements (‘GoogleApiClient.ConnectionCallbacks’ and ‘GoogleApiClient.OnConnectionFailedListener’) ‘LocationServices’ still gets the “Cannot resolve symbol ‘LocationServices'” error.
What am I missing here?
Hi.
As you can see in this tutorial you have to add
compile ‘com.google.android.gms:play-services:x.x.x’
in your build.gradle(Module: app)
or you can add
compile ‘com.google.android.gms:play-services-location:x.x.x’
specially for LocationServices.
Hello to all,
One question, If I just want to use the location and not the google map, do I require the google maps api key??
I tried without it and is not working.
Regards.
No, you don’t need API key if you just want the user location. Keys are required when you are playing with Google APIs like Google Maps, YouTube, etc.
My app is running but not showing my current location. why?
Hi,
I am trying to access latitude and longitude “but not through the GPS enable” so did with the “net enabled concept” and used the following code
String locationProvider = LocationManager.NETWORK_PROVIDER;
LocationManager locationManager = (LocationManager) this
.getSystemService(Context.LOCATION_SERVICE);
Location location = locationManager
.getLastKnownLocation(locationProvider);
the problem here is sometimes it works but most the time returns “zero”
By using google API will solve this problem
Thanx in advance
One doubt. How to see in google maps android application real time location of friends?
Hire a developer?
very helpful code and thank you 10/10,but you forgot one parameter in @Override
public void onLocationChanged(Location location) {
mMap.clear();
handleNewLocation(location);
}
add map clear to remove old bad habits…
Hi,
I came here from the TeamTreeHouse tracks. I can’t seem to be able to run this in an emulator. I create the project, enter my google API key, and when running the App in the emulator I get always the “IAmHere won’t run unless you update the Google Play services”. Then if you click the “Update” button, the app crashes, and that’s all.
I’ve tried with many emulators, and always the same result. Is actually a real way of running this in an emulator?
This is by far the best tutorial i have had on adding location awareness to an app. I am really grateful that you took the time to write it. God bless you so much.
Thank you very much, Ben. This has helped me a lot.
Now I have updated my ‘Stormy’ app with location. I really like your teaching manner.
Keep going!
Great tutorial Ben, thanks!
I had a problem,
how to get the (longitude and latitude) coordinates from Google Maps then sent it by SMS (Short Message Services) and change it to the real address for eclipse or android Studio?
I really hope that you’d give me the complete source code how to make it, as soon as possible, thanks
I think there is a typo in the template for the Google Maps Activity template in Android Studio.
in the google_maps_api.xml it reads:
“…Once you have your key (it starts with “AIza”), replace the “google_maps_key”
string in this file.
–>
” YOUR_KEY_HERE
”
But shouldn’t the sentence read “Once you have your key (it starts with “AIza”), replace the “YOUR_KEY_HERE”
string in this file.
–>”
since earlier in the “string name” line the text “google_maps_key” needs to remain unchanged and the “YOUR_KEY_HERE” is the postion for the key?
I first tried my key in the “google_maps_key” and of course it did not work. Then I had to use my brain and replace “YOUR_KEY_HERE” and all was fine.
If my proposal is correct, how does one get Google to update the template to be a little less confusing?
Hello my friends, great tutorial. I have a problem, this works in android 4.1.2. But my problem its doesnt works in android 6.0. If someone know what happen please help me. Thank you so much.
From 6.0, just adding the permission to Manifest does not work.
First we have to explicitly ask for the permission at run time like:
if(ContextCompat.checkSelfPermission(this,Manifest.permission.ACCESS_FINE_LOCATION)!= PackageManager.PERMISSION_GRANTED){
ActivityCompat.requestPermissions(MainActivity.this, new String[]{Manifest.permission.ACCESS_FINE_LOCATION}, 1600);
}
Also since the user can decline the permission, enclose all of the mentioned location api calls inside a try catch block to catch the SecurityExceptions thrown when permissions are missing 🙂
Hi!
What do you mean try catch on location api calls? (Regarding the issue with android 6)
I can see that the crashes I have (SecurityException) happens in onConnected callback method.. which is weird , because why would it get to onConnected in the first place instead of onConnectionFailed ?
Also, my issue is that when I show the dialog to allow the location permission, and the user hits “deny” , it shows him the dialog again. And it goes that way again and again until it just crashes..
Any help here?
Thank you!!
there’s a small problem when i pause and resume my app it’s not responding and searching for GPS notification is gone maybe because i didn’t include setupmapifneeded() in the onResume() because you didn’t define it here? please help
Hi Peter! As this is an older post I’d recommend asking your question in the Treehouse Community, where students and teachers are always happy to help. 🙂
I found the complete package of MapsActivity.Java in GitHub has been outdate due to the version of Gradle being different and I keep getting the “Authorization failure” on Google Map Android APIs v2. Please update the package so that i could correct my setting if u can xD
Thank you for taking the time to do this, It worked for me. I’m going to get more in depth with it for my application, but this was the best tutorial I have seen on any subject matter. Everyone on stackoverflow just gets snippy, and I don’t like to post because then I have to wait for the answer.. Thank you for not only giving us the code, but explaining it. “If you give a man a fish, he eats for a day. If you teach him how to fish, he eats for a lifetime.” Seriously though, I appreciate your effort for the well-being of the coding community
There was one hiccup I had, but I figured it out. when you set the location object to the lastknownlocation you now have to check some runtime permissions. I’m not sure If I did this correctly, but it seems to work.. This is in the onConnected method.
Location location = null;
if (ContextCompat.checkSelfPermission(this, Manifest.permission.ACCESS_FINE_LOCATION)
== PackageManager.PERMISSION_GRANTED) {
location = LocationServices.FusedLocationApi.getLastLocation(mGoogleApiClient);
}
else
{
// requestPermissions(new String[]{android.Manifest.permission.ACCESS_FINE_LOCATION}, 0);
Toast.makeText(this, “Should ask for the approval/denial here”, Toast.LENGTH_LONG).show();
}
I added the lines into onConnected method but got two errors as:
Error:(134, 26) error: cannot find symbol method checkSelfPermission(MapsActivity,String)
Error:(135, 20) error: cannot find symbol variable PackageManager
Error:Execution failed for task ‘:app:compileDebugJavaWithJavac’.
> Compilation failed; see the compiler error output for details.
Information:BUILD FAILED
Please help, and thsnk you very much in advance
Thanks for the positive feedback, Will! We really appreciate it. Keep up the great work. 🙂
Hello,
This tutorial is very nice…
but i want to move marker as per my location changed , continuously move marker to my new current location
Hi Jay! As this is an older post, I’d recommend asking your question in the Treehouse Community. Our students and teachers are always happy to help!
how can i activate my”My Locatio” in my map, becouse i do everything and it does not apear and i need
Hi Daniel! Have you tried asking in the Treehouse Community? Students and teachers are always happy to help.
Hi, I followed the steps for setting up the the project and generating the key exactly and used the credentials provided by treehouse, but Google Services doesn’t like the key, or at least it’s not letting me connect to the server. Are we not supposed to be using “17:8A:66:F5:C7:FF:50:E3:77:FB:79:8A:79:3F:30:43:FC:D6:CE:61;teamtreehouse.com.iamhere”, assuming we import your project from github?
Hey, great tutorial. However I am facing a problem, the app works fine on the emulator but doesnt show anything in the phone. what is the error here?
Thanks in advance!
The best Android Location tutorial I ever read. Up to date, and to the point. Easy to follow.
Thanks for your great work. Good job and have a nice day.
Hi,
Fantastic article! I want to implement location tracking; like a running-app which tracks your location across the course of a session. Any ideas how to do that? I understand I can request location updates frequently. But that is as much as I understand.
Check out the “Creating and Starting the Request” section above. In it I talk about the setInterval() method, which you can set to get updates every few seconds. You’ll need to store each location returned into some sort of collection (maybe an ArrayList). Then you can use those data points to draw on a map, determine distance, etc.
I am using eclipse luna. I have no errors but I am not able to get the current location. The marker is showing as seen in your first screenshot which shows the (0,0) lattitude and longitude. After that the current location is not getting updated. It still remains in (0,0). I have used the exact code as yours. Please suggest a solution for this. Thank You.
Hi Joshua,
I am facing the similar problem. Have you found the solution yet? If so, please provide the solution.
I have similar issue. Have you found the solution to this?
In my case, I used the simulator to test. When I tested on the phone with location service turned on and run the app it showed my current location on the map.
Yeah, that one worked for me. But it doesn’t show the actual location(about 30-40 yards fluctuation). Do you having this problem?
HI Ben,
Thank you so much for this article. Currently i am working with Employee payroll system and i need to track Employee location with time who is on Field work.
He will log in through his phone and his id will send to system where admin can work on it. so can you help me how can I display the map of employee location on a system??
The Payroll system is in asp.net
Hi Sukanya! This would be a great question to ask in the Treehouse Community, where our teachers and students are always happy to help.
Time saving tutorial…
a great thanks to the developer.
Thank u soo much…by the way…setupmapifneeded() is not defined here..pl add it..
Can u explain about locations nearby shown in app, and in listview.
Great tutorial!
Worked through it in about an hour and everything working like a charm!
Please keep writing stuff like this!
Can u tell me How can i set a EditText Button Users enter location and go to her place??
Many many thanks… That was great
Informative information i have learn new things about the Android. thanks for sharing and i m waiting for next update
when i am running this code, my application got crashed.. :/
Awesome Tutorial. Please help me here http://stackoverflow.com/q/34158921/4924793
Many thanks!
it is running properly but not displaying anything . please tell me what i am doing wrong
when i am running this code, my application got crashed, please help me
i have same issue that when i run it it got crashed if your issue isresolved please let me know that how did you fix it?
This post is very usefull.
good post,helped me to add some more features in my app.
Dear Ben. I am using your tutorial for making weather application, and want to implement this location class in my app. But i am not sure how to call this class and use it in my main application to get weather data according to current location. Can you please help me to sort it out?
Hi, Ben. Great article. I am doing Android development Track at the moment and just finished ‘Build Weather App’ course. I was checking this article to implement GEO location in that app. But information provided here is aiming for the entirely new project, therefore it is not clear how to add API with all code and where. Could you provide more information on this and more links on Google services?
I love this code though I had to troubleshoot for almost 24 hours before it finally worked.
Please, I have 2 requests to make. Firstly, Can you help out so that it the location can automatically zoom into street view? Secondly, I need to capture this data and send into the database. How do I go about it?
You can contact me for more insight.
Hi,
This tutorial has really help full for me and i got it step by step guide.
Thanks a lot.
Keep it up!
Hi,
This tutorial has really helped me and was really clear with the step by step guide.
Thanks a lot.
Keep it up!
Ben
This was a detailed and useful tutorial. Thank you for helping newbies in becoming actual developers! 😀
Hi,
Thank u so much for tutorial, u help me!!
Hello,
Thank you so much for a wonderful tutorial. With this help, I was able to incorporate the location based weather into the Weather app. Now as the user moves, he will be able to get the weather based on his current location.
Thanks,
-Nitin
Hi Nitin,
I’m about to start this course, I’m wondering how did you implement it into your app? Just by scanning over the document I can already tell I need to create a new project?
Thanks
Hi Ben,
something is not clear.
‘getLastLocation(client)’ – does it return CURRENT location or last received by the app?
The reason I’m asking is that I have Location services turned OFF in Settings (Nexus 6, Android 5.1.1)
but still receive onConnected() with non-null last location!?
Before I requested location I checked:
lm.isProviderEnabled(LocationManager.GPS_PROVIDER) – false
lm.isProviderEnabled(LocationManager.NETWORK_PROVIDER) – false
but
GoogleApiAvailability.getInstance().isGooglePlayServicesAvailable(context) – SUCCESS.
And as far as I understand this last one just tells me ONLY that Google services are installed and running.
And it does not tell me if I can get location using these services.
Am I correct?
Nick
Thank you so much for this detailed and easy-to-follow tutorial.
I did everything as stated but current location marker is not being displayed. I can’t seem to figure out what the problem is. Please help.
This doesn’t work for me, the app just crashes..
Whenever I build the app from Android Studio it doesn’t give me the methods set up map etc. why?
hello There!
I need help on how to load coordinates of the a certain location form MySql databse to my android app HELP PLEASE!
Thanks
When i run the code for current location then it shows the multiple markers at the nearby current location.whats the error??i am not understanding.please solve my problem
Thanks a lot!! i got to know what exactly each and every statement means. But however, in my genymotion the marker is being placed at the wrong position, and if i turn on my GPS in genymotion then a marker is placed at the latitude and logitude values of my genymotion. I mean by default latitude and longitude values are present and a marker is placed there but i want a marker to be placed at my position. Could you please help me to rectify this error. I have surfed a lot on this but i am not able to rectify it. It would be of great help if u help me.
Thanks Ben, One of the best tutorials for Google maps i ever came across, good job man, u took the time to explain us thoroughly ,step by step. It really helped me allot.
Please dont put a onPause() here 😉 Continue and take it to next level. Personally i am trying to build a location based app. And i require your help in this regard, i want to use my location and send these params of lat/lng to a webserver java/servlet technology and plot them there? How can i do that?
How to display markers using mysql database (lat, long )
That abstract class in sweeeeet.
i wonder,how i can send sms with location?can u help me
Hi,
I was reading this article “https://blog.teamtreehouse.com/beginners-guide-location-android”, and I think there is a typo.
In this article, it is saying “onResume() is called right after onCreate(), so if we connect there then we will always be able to access location when our Activity is visible.”, but I think onResume() is called right after “onStart()” rather than onCreate() based on android documentation. You might want to double check,
Thanks,
Eric
Awesome Post !! Thanks for the insight.
However, I have one question.
Since the location requested from
Location location = LocationServices.FusedLocationApi.getLastLocation(mGoogleApiClient);
can be null, you have created a LocationRequest and requested periodic updates. However I want to get the location one time only. If getLastLocation(mGoogleApiClient); returns null, is there any way I can request location just once and not handling any location changes.
Hey Vaibhav,
I am facing exact same problem.
Did you find any solution for this?
Hi there,
I am also getting the same problem that is getting location first time on android mobile. getlastknownlocation is null and onlocationchanged is not called..So need help over here..
-Rajender Jindal
Thank You,
Thank You Soo Much…
very usefull code for me..
thank u once again….
Thank you very much. It was very usefull to avoid the NullPOinterException from Location.
Thanks again.
How can i stop the requests manually?
Hi Ben,
Excellent tutorial, very easy to follow along and helped me get started with the services location API. Do you have any tutorials for tracking a users device? (I noticed something similar in the middle pic below the title banner of this page) I am building a running app and trying to implement a GPS feature but I am getting very inaccurate results. Any help or suggestions would be greatly appreciated.
Wow, great tutorial!
It was very helpful, thanks!
First of all, great post 🙂
Secondly, I have a small problem. I implemented this code (well, one from git because I need gps in more then one activity) and I am not getting any refresh of location once I get it. Simply, nothing is telling my phone to look for a new one.
In the code below I am showing OnConnected method:
@Override
public void onConnected(Bundle bundle) {
Log.i(TAG, “Location services connected.”);
Location location = LocationServices.FusedLocationApi.getLastLocation(mGoogleApiClient);
if (location == null) {
LocationServices.FusedLocationApi.requestLocationUpdates(mGoogleApiClient, mLocationRequest, this);
if(mAct==1) {
if (((MainActivity) mContext).getmFirstTimeGps()) {
showGpsSettingsAlert(((MainActivity) mContext).getmLanguage());
((MainActivity) mContext).setmFirstTimeGps(false);
}
}
}
else {
mLocationCallback.handleNewLocation(location);
}
}
Shouldn’t line below request new updates:
LocationServices.FusedLocationApi.requestLocationUpdates(mGoogleApiClient, mLocationRequest, this);
Thank You in advance 🙂 I am really struggling with this…
So while I was typing question I came up with an idea 😀 I copied the request into an else statement as well. This fixed it.
Fantastic post, this is exactly what i have been looking for, finally i’ll be able to track my minions through GPS 😀
Hahaha – tracking minions is what it’s all about! 🙂
Hi,
Awesome post.This post is useful for all people.This is really nice apps.You explain everything in a good manner. Thanks for sharing this with us. I would love to share this article with my followers .
Keep up your good work!
Have a nice day!
Regards,
varija tripathi
Thanks! Glad you found it useful!
Awesome Tutorial. Please help me here http://stackoverflow.com/q/34158921/4924793
Many thanks!
I want to implement location sharing in my app ,it means i want to share my current location to my friend and others how it will be done??can you help me as soon as possible??
Thanks&Regards
Rabindra Dangwal
India
ive been looking around for this as well, cant seem to find the solution yet though..
You Need to develop an android Application so you can share location to others… there are abstract steps you keep in your mind ..
1) Get Your Location From GPS.
2)Use Google Cloud Messaging (GCM) in Your App to share your Location with other.
3)This could be done by Enabling GCM API and then embed it in your app to for sending and receiving msgs…
4) msgs may include your ( Latitude , Longitude)