
If you’re looking to take your programming skills to another level, Treehouse offers unlimited access to a variety of courses starting at $25/month. Try our program out with a free seven-day trial today.
In this blog post we’re going to cover how to use WebSockets to create real-time web applications. Before we dive into learning about the WebSocket protocol and API I first want to spend a little time going through some of problems that face real-time web applications and how the WebSocket spec aims to solve them.
Contents
- 1 A Brief History of Real-Time Web Applications
- 2 How to Use WebSockets
- 3 Tutorial: Demo Using WebSockets
- 4 Creating WebSocket Connections
- 5 How to Fix WebSocket Errors
- 6 Sending Messages With WebSocket
- 7 Receiving Messages With WebSocket
- 8 Closing Connections
- 9 Monitoring WebSocket Traffic with the Chrome Dev Tools
- 10 WebSockets on the Server
- 11 Browser Support for WebSockets
- 12 Final Thoughts
- 13 Further Reading
A Brief History of Real-Time Web Applications
The web was built around the idea that a client’s job is to request data from a server, and a server’s job is to fulfill those requests. This paradigm went unchallenged for a number of years but with the introduction of AJAX around 2005 many people started to explore the possibilities of making connections between a client and server bidirectional.
Web applications had grown up a lot and were now consuming more data than ever before. The biggest thing holding them back was the traditional HTTP model of client initiated transactions. To overcome this a number of different strategies were devised to allow servers to push data to the client. One of the most popular of these strategies was long-polling. This involves keeping an HTTP connection open until the server has some data to push down to the client.
The problem with all of these solutions is that they carry the overhead of HTTP. Every time you make an HTTP request a bunch of headers and cookie data are transferred to the server. This can add up to a reasonably large amount of data that needs to be transferred, which in turn increases latency. If you’re building something like a browser-based game, reducing latency is crucial to keeping things running smoothly. The worst part of this is that a lot of these headers and cookies aren’t actually needed to fulfil the client’s request.
What we really need is a way of creating a persistent, low latency connection that can support transactions initiated by either the client or server. This is exactly what WebSockets provide and in this post you are going to learn all about how to use them in your own applications.
How to Use WebSockets
WebSockets are used to provide a connection between a client and a server so that both parties can send data at any time.
The client uses a process known as the WebSocket handshake, which helps establish a connection between the server and the client. This handshake process starts when the client sends a regular HTTP request to the server. An Upgrade header is included in this request that informs the server that the client wishes to establish a WebSocket connection.
Here is a simplified example of the initial request headers.
GET ws://websocket.example.com/ HTTP/1.1
Origin: http://example.com
Connection: Upgrade
Host: websocket.example.com
Upgrade: websocket
Note: WebSocket URLs use the ws scheme. There is also wss for secure WebSocket connections which is the equivalent of HTTPS.
If the server supports the WebSocket protocol, it agrees to the upgrade and communicates this through an Upgrade header in the response.
HTTP/1.1 101 WebSocket Protocol Handshake
Date: Wed, 16 Oct 2013 10:07:34 GMT
Connection: Upgrade
Upgrade: WebSocket
Once the handshake is complete, the initial HTTP connection is replaced by a WebSocket connection that uses the same underlying TCP/IP connection. From here, either party can start sending data.
WebSockets allows you to transfer as much data as you’d like without incurring the overhead associated with traditional HTTP requests. Data that is transferred through a WebSocket is referred to as messages. These messages consist of one or more frames that contain the data you’re sending (the payload).
Each frame is pre-fixed with 4-12 bytes of data. This is to ensure the message can be properly reconstructed when it reaches the client side. This frame-based messaging system helps to reduce the amount of non-payload data that is transferred, leading to significant reductions in latency.
Note: It’s worth noting that the client will only be notified about a new message once all of the frames have been received and the original message payload has been reconstructed.
Tutorial: Demo Using WebSockets
Building a WebSockets Demo Application
In true Treehouse style you’ll create a simple demo application that communicates with a WebSocket server. Before we dive into the details of the API you first need to set up a few files for your demo.
See the Demo Download The Code View on CodePen
Create an index.html file and populate it with the following markup.
<!DOCTYPE html>
<html lang="en">
<head>
  <meta charset="utf-8">
  <title>WebSockets Demo</title>

  <link rel="stylesheet" href="style.css">
</head>
<body>
  <div id="page-wrapper">
    <h1>WebSockets Demo</h1>

    <div id="status">Connecting...</div>

    <ul id="messages"></ul>

    <form id="message-form" action="#" method="post">
      <textarea id="message" placeholder="Write your message here..." required></textarea>
      <button type="submit">Send Message</button>
      <button type="button" id="close">Close Connection</button>
    </form>
  </div>

  <script src="app.js"></script>
</body>
</html>
Here you have created a few key elements that will be used in your application: a <div> for displaying messages about the connection status; a list that will be used to display messages sent to, and received from the server; and a form for inputting messages.
The style.css file referenced here can be found in the code resources download.
Next up create a file called app.js and add the following JavaScript code in it.
window.onload = function() {

  // Get references to elements on the page.
  var form = document.getElementById('message-form');
  var messageField = document.getElementById('message');
  var messagesList = document.getElementById('messages');
  var socketStatus = document.getElementById('status');
  var closeBtn = document.getElementById('close');

  // The rest of the code in this tutorial will go here...
};
Here you have created a number of variables and initialized them by fetching key elements on the page.
Creating WebSocket Connections
Okay, so now that you’ve got your demo application setup we can start learning about the WebSocket API. To begin with you are going to learn how to create a new WebSocket connection.
Creating WebSocket connections is really simple. All you have to do is call the WebSocket constructor and pass in the URL of your server.
Copy the following code into your app.js file to create a new WebSocket connection.
// Create a new WebSocket.
var socket = new WebSocket('ws://echo.websocket.org');
Once the connection has been established the open event will be fired on your WebSocket instance.
For your demo application you are going to add an event listener that will update the status <div> with a message to show the user that a connection has been established.
Add the following code to you app.js file.
// Show a connected message when the WebSocket is opened.
socket.onopen = function(event) {
  socketStatus.innerHTML = 'Connected to: ' + event.currentTarget.url;
  socketStatus.className = 'open';
};
Here you also add the class open to the status <div>, this is purely for styling purposes.
How to Fix WebSocket Errors
You can handle any errors that occur by listening out for the error event.
For your demo application you’re just going to add some code that will log any errors to the console.
// Handle any errors that occur.
socket.onerror = function(error) {
  console.log('WebSocket Error: ' + error);
};
Sending Messages With WebSocket
To send a message through the WebSocket connection you call the send() method on your WebSocket instance; passing in the data you want to transfer.
socket.send(data);
You can send both text and binary data through a WebSocket.
For your demo application you need to send the contents of the textarea to the server when the form is submitted. To do this you first need to set up an event listener on the form.
Add the following code to your app.js file.
// Send a message when the form is submitted.
form.onsubmit = function(e) {
  e.preventDefault();

  // Retrieve the message from the textarea.
  var message = messageField.value;

  // Send the message through the WebSocket.
  socket.send(message);

  // Add the message to the messages list.
  messagesList.innerHTML += '<li class="sent"><span>Sent:</span>' + message +
                            '</li>';

  // Clear out the message field.
  messageField.value = '';

  return false;
};
When the form is submitted this code will retrieve the message from the messageField and send it through the WebSocket. The message is then added to the messagesList and displayed on the screen. To finish up, the value of messageField is reset ready for the user to type in a new message.
Receiving Messages With WebSocket
When a message is received the message event is fired. This event includes a property called data that can be used to access the contents of the message.
For the demo application you need to create an event listener that will be fired when a new message is received. Your code should then retrieve the message from the event and display it in the messagesList.
To achieve this, copy the following code into your app.js file.
// Handle messages sent by the server.
socket.onmessage = function(event) {
  var message = event.data;
  messagesList.innerHTML += '<li class="received"><span>Received:</span>' +
                             message + '</li>';
};
Closing Connections
Once you’re done with your WebSocket you can terminate the connection using the close() method.
socket.close();
After the connection has been closed the browser will fire a close event. Attaching an event listener to the close event allows you to perform any clean up that you might need to do.
For your demo you will want to update the connection status when the connection is closed. Add the following code to your app.js file to do this.
// Show a disconnected message when the WebSocket is closed.
socket.onclose = function(event) {
  socketStatus.innerHTML = 'Disconnected from WebSocket.';
  socketStatus.className = 'closed';
};
To complete the demo application you need to add an event listener that will be fired when the ‘Close Connection’ button is clicked. This should call close() on the WebSocket.
// Close the WebSocket connection when the close button is clicked.
closeBtn.onclick = function(e) {
  e.preventDefault();

  // Close the WebSocket.
  socket.close();

  return false;
};
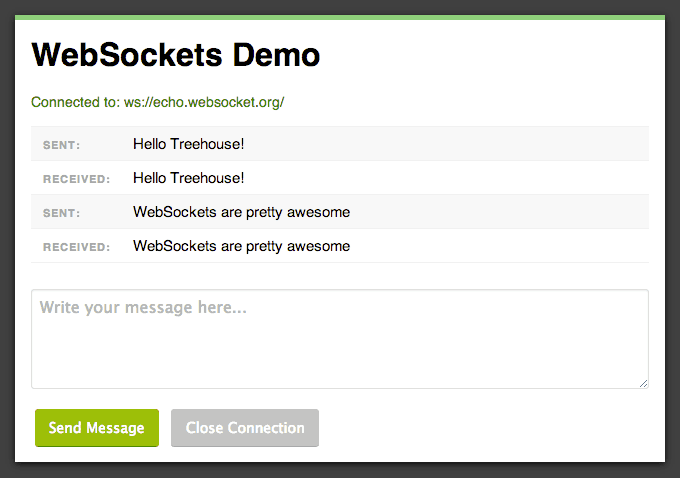
Your demo application is now complete!
Open index.html in your browser and try sending some messages. You should see that the server echoes your messages back to you.
Monitoring WebSocket Traffic with the Chrome Dev Tools
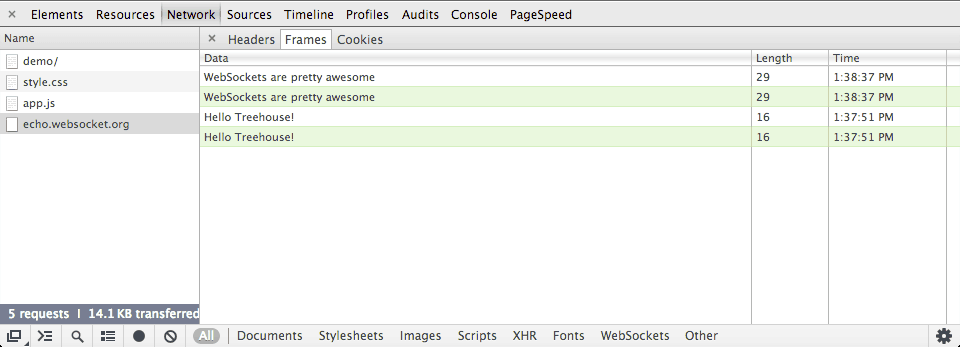
WebSocket Monitoring in Chrome Dev Tools
The developer tools in Google Chrome include a feature for monitoring traffic through a WebSocket. You can access this tool by following these steps:
- Open up the Developer Tools.
- Switch to the
Networktab. - Click on the entry for your WebSocket connection.
- Switch to the
Framestab.
This tools will show you a summary of all the data sent through the connection. In my testing it didn’t seem to update automatically so you might need to switch in and out of the Frames tab if you’re sending messages with the dev tools open.
WebSockets on the Server
In this article we have mainly focused on how to use WebSockets from a client-side perspective. If you’re looking to build your own WebSocket server there are plenty of libraries out there that can help you out. One of the most popular is socket.io, a Node.JS library that provides cross-browser fallbacks so you can confidently use WebSockets in your applications today.
Some other libraries include:
- C++: libwebsockets
- Erlang: Shirasu.ws
- Java: Jetty
- Node.JS: ws
- Ruby: em-websocket
- Python: Tornado, pywebsocket
- PHP: Ratchet, phpws
Browser Support for WebSockets
WebSockets are supported in almost all modern web browsers. The only exceptions being the Android browser and Opera Mini.
For up-to-date information on browser support check out: Can I use Web Sockets.
Final Thoughts
In this post you’ve learned about the WebSocket protocol and how to use the new API to build real-time web applications.
WebSockets represent a big step in the evolution of the internet. Just as AJAX changed the game in the mid 2000s; having the ability to open bidirectional, low latency connections enables a whole new generation of real-time web applications. Including what I hope will be some pretty awesome games!
If you’re interested in learning more about WebSockets – and browser networking in general – I recommend checking out some of the links below.


Thank you so much for the excellent example code. It worked right out of the zip file!
An outstanding share! I’ve just forwarded this onto a co-worker who had
been doing a little homework on this. And he actually bought me lunch because I discovered it for
him… lol. So let me reword this…. Thank YOU for the meal!!
But yeah, thanx for spending time to discuss this matter here
on your website.
Hi,
Problem statement –
In my app, developers are exchanging data over socket untill getting a particular message in frames tab.
So, that message sometimes pop in websocket request, sometimes in 3rd req.
I want to simulate websocket requests in jmeter.
I want to simulate web socket requests visible in chrome developer tools in jmeter.
Any help will be helpful
This is my first time go to see at here and i am truly impressed to read everthing at one place.
Very nice explanation. Although websocket is a low level implementation and requires some boilerplate code, it is a great technology for the next-gen realtime apps
Thanks for this. One small niggle for those who like to type out example code: I think “event.currentTarget.URL” should be all lowercase, as it yielded “connected to: undefined” when I tried this.
+1 on this, that was my experience too.
Thanks for pointing that out. I’ve updated the code example.
The demo code needs to be updated to use wss instead of ws – seems like echo.websocket.org only supports secure websockets
+1… needs to be ‘wss://echo.websocket.org’ to work
A very well explained introduction to web sockets. Keep up the good work!!
Amazing introduction to web sockets. Totally helpful for understanding the concepts and getting started.
You have misspelled Erlang as Errlang.
You can also add Exlir solution called Phoenix to the list of server side implementations.
Thanks for pointing that out, Victor! We’ve made the correction. 🙂
Hello thanks for this tutorials I have developed an SMS messenger for internal communication and need an online host can some help me
Thanks.
Very good description in order to understand why web sockets has been introduced and very detailed tutorial kinda steps given
for a beginner like me its awesome 🙂
Hi, I want to know, if you will add a course about this topic in treehouse
Hi,
I am new to WebSockets, I typed the whole code snippet mentioned above and tried to run it but it shows error.
window.onload = function() {
ReferenceError: window is not defined
Could you please help me?
Thanks in advance!
こんにちは、ニートポスト。 あなたと一緒に | 問題問題 | があるありますに インターネットエクスプローラ、かもしれないこの| テストをチェック? IEはそれにもかかわらずのセクション| | | チーフと巨大のの一部 この問題が原因の|素晴らしい| |素晴らしい|壮大な|に起因する優れた}の書き込みオミット {出たままになります。
海外激安 店内全品ポイント10倍 http://plcontrols.co.uk
理由 ウェブページウェブサイト、無動作しているこれの管理者が質問 非常にすぐに内容|、その機能品質に、 、それは次のようになります。
品揃え充実の 店内全品ポイント10倍 http://plumascontabil.com.br
Do you know how to persist client connections such that WS server can actively push messages to client? On Stack Overflow, I have seen people suggesting using a global dictionary to keep track of the connections (keyed by userID). But I see such implementation cannot be scaled because the global dictionary is not shared outside the process context.
Hello, nice post!
The problem I am facing and I don’t seem to find any single tutorial on the web is setting the socket implementation in my server.
I have a website hosted somewhere and I cannot find out how to deploy a web server using PHP. How do I set up an endpoint like : ws://echo.websocket.org . How do I keep the script up and running, locally its easy by using the terminal to start the web sockets but how about in the server?
there is not connected error
my site url is
http://azeemkhan.me/YU-rewamp/chat3/index.html
i have created a sample application in c# with webAPI template it is showing error like
The IIS WebSocket module is not enabled. For more information on enabling this module, please see http://go.microsoft.com/fwlink/?LinkId=231398.
can u suggest me what to do?
I am learning basic websocket, and my question is how do we have to replaced your line
var socket = new WebSocket(‘ws://echo.websocket.org’);
with our computer/host IP address?
I can see message sent. When I send message from other computer with different static IP I cannot see them as received as you mentioned.
Thank you for basic tutorial.
Hi Tashi,
You will need to set up a web socket server on your machine that echoes the message.
I’d recommend checking out Socket.io. There’s a tutorial that covers building a web socket server.
http://socket.io/get-started/chat/
First of run the WebServer with specific port number .
lets say you are running webserver in port 8080 in your local machine, then the URL will be replace by host name and port number.
var conn = new WebSocket(‘ws://localhost:8080’);
or
var conn = new WebSocket(‘ws://127.0.0.1:8080’);
Great introduction into WebSockets. Though I know Treehouse doesn’t show C# tutorials, this is a great library for C# and WebSockets.
http://signalr.net/
http://www.asp.net/signalr
Awesome post! But did not mention libraries to use with PHP. I found ones:
http://socketo.me/
https://github.com/Devristo/phpws
Thanks Gabriel!
I’ve added those libraries to the post 🙂
Always wanted to start digging these websockets, very good introduction. Thanks for your article !