
Last Updated on June 7, 2023 by Laura Coronel
Android now includes a component that makes it very easy to add a navigation drawer to an app that the user can slide in from the side. I first remember seeing this in the Facebook app in iOS, and I thought it was a pretty nifty mobile design pattern (though others some people strongly disagree). I will assume you are here because you think it is good for your app, though!
In Android this component is called the navigation drawer. The Android design guidelines have a nice section on when and how we should use the navigation drawer in an app. One of my favorite uses if for power-user features that might be confusing or overwhelming for infrequent users of the app, but that are nice to have easily accessible in a menu that can be pulled in from the side.
Android Studio now includes a project template for an app that includes a navigation drawer:
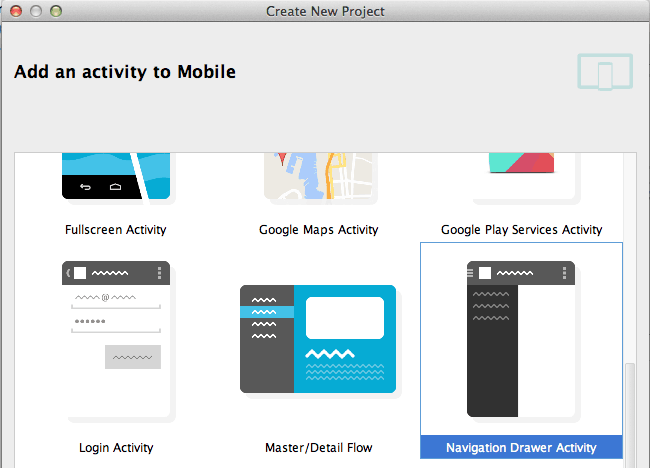
It is built on Fragments, which is a useful model to have, especially if you want a common navigation drawer across multiple screens. It might be a little more than needed for a simple app, so below I will walk through how to add a navigation drawer to an existing app from scratch. If your needs go beyond what we cover here, there is a lot of good information on the Android Developer site about how to create a Navigation Drawer.
Also check out: What is Android Development?
Contents
Open or Create a Project
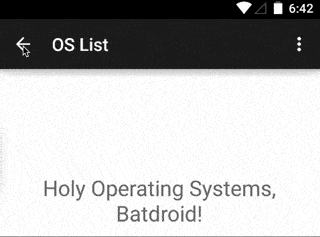
If you care to follow along, clone or download my super simple starter app from GitHub: OS List. (The finished source is available at the end of this article.) All you need is an Activity, though. This app will target Android 4.0 and above, but the support library that brings us the Navigation Drawer makes this available on even older versions.
Your project may already contain the required dependency to use the Android support library, but if not, add the following line to the dependencies section in the build.gradle file for your app module:
compile 'com.android.support:appcompat-v7:21.0.3'
(You will probably want to use the latest version of the library.)
Update the Layout
The first thing we need to do is modify the layout for our Activity. We simply need to provide a regular layout for the Activity plus a separate layout for the navigation drawer, but both layouts are contained inside the same container: DrawerLayout.
In OS List, we have a simple RelativeLayout with a TextView and ImageView. To add a navigation drawer, we add a new root element of type android.support.v4.widget.DrawLayout.
<android.support.v4.widget.DrawerLayout
    xmlns:android="http://schemas.android.com/apk/res/android"
    xmlns:tools="http://schemas.android.com/tools"
    android:id="@+id/drawer_layout"
    android:layout_width="match_parent"
    android:layout_height="match_parent">
</android.support.v4.widget.DrawerLayout>
Then we add a ListView for the side drawer view:
<ListView
    android:id="@+id/navList"
    android:layout_width="200dp"
    android:layout_height="match_parent"
    android:layout_gravity="left|start"
    android:background="#ffeeeeee"/>
The ListView (or whatever View we use as the side navigation drawer), should be no more than 320dp wide, so that it does not cover the entire Activity when it is out.
You can view the entire layout file here in the completed project on GitHub.
Set the List and Adapter in the Activity
Now that we have a ListView to work with, let’s set it in the Activity. In this example we will use a simple String array as our data set for the list, and an ArrayAdapter to adapt the data. (For more information about using lists and adapters, check out Android Lists and Adapters in the Treehouse library.)
First, let’s add two member variables to our Activity:
private ListView mDrawerList;
private ArrayAdapter<String> mAdapter;
Then we can set the ListView in onCreate():
mDrawerList = (ListView)findViewById(R.id.navList);
To add items and configure the list, let’s create a helper method that we can call inside onCreate():
private void addDrawerItems() {
    String[] osArray = { "Android", "iOS", "Windows", "OS X", "Linux" };
    mAdapter = new ArrayAdapter<String>(this, android.R.layout.simple_list_item_1, osArray);
    mDrawerList.setAdapter(mAdapter);
}
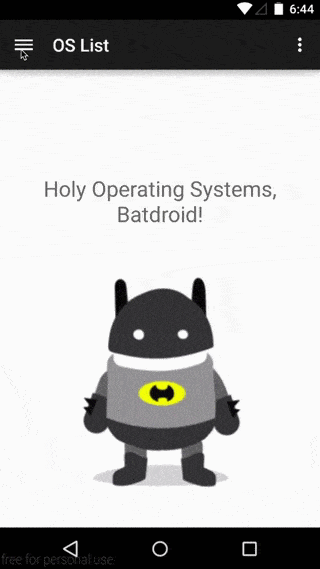
At this point we have a working navigation drawer! Hooray!

We can perform an action when each item in the side navigation list is tapped just like we would for a regular ListView. Let’s set an OnItemClickListener and simply make a Toast about each item in the list:
mDrawerList.setOnItemClickListener(new AdapterView.OnItemClickListener() {
    @Override
    public void onItemClick(AdapterView<?> parent, View view, int position, long id) {
        Toast.makeText(MainActivity.this, "Time for an upgrade!", Toast.LENGTH_SHORT).show();
    }
});
This is the minimum basic code we need for a navigation drawer, but there is much more we can do!
Add a Toggle Switch in the Action Bar
Opinions may vary on this, but I personally prefer a hamburger menu or some kind of icon in the Action Bar that lets me know the navigation drawer is there. We can use the default icon provided by Android with a few more changes in our Activity. We can show it by adding two lines in our onCreate() method (though it won’t do anything yet):
 getSupportActionBar().setDisplayHomeAsUpEnabled(true);
 getSupportActionBar().setHomeButtonEnabled(true);
To get this to work correctly, we need to configure something called an ActionBarDrawerToggle.
Let’s start with a few new member variable for this new object. We need one for the toggle, one for the DrawerLayout we added to our layout, and a String that we will use to update the title in the Action Bar:
private ActionBarDrawerToggle mDrawerToggle;
private DrawerLayout mDrawerLayout;
private String mActivityTitle;
Before we forget, let’s set mDrawerLayout and mActivityTitle in onCreate():
mDrawerLayout = (DrawerLayout)findViewById(R.id.drawer_layout);
mActivityTitle = getTitle().toString();
Using a toggle requires two String resources, so let’s add those in strings.xml in the res/values directory before we proceed:
<string name="drawer_open">Open navigation drawer</string>
<string name="drawer_close">Close navigation drawer</string>
Okay! Now we can add a new helper method that we will call from onCreate() after the drawer items have been set up:
private void setupDrawer() {
}
Here is where we will initialize mDrawerToggle. Autocomplete is really helpful here; or just copy and paste from below. We want to create a new ActionBarDrawerToggle instance that uses the context, mDrawerLayout, and those two new string resources we added, and then we need to implement two methods: onDrawerOpened() and onDrawerClosed():
mDrawerToggle = new ActionBarDrawerToggle(this, mDrawerLayout,
        R.string.drawer_open, R.string.drawer_close) {

    /** Called when a drawer has settled in a completely open state. */
    public void onDrawerOpened(View drawerView) {
    }

    /** Called when a drawer has settled in a completely closed state. */
    public void onDrawerClosed(View view) {
    }
};
When the drawer is opened, we can set a new title for the Action Bar (if we want). We also want to invalidate the options menu in case it needs to be recreated with different options for when the navigation drawer is open:
public void onDrawerOpened(View drawerView) {
    super.onDrawerOpened(drawerView);
    getSupportActionBar().setTitle("Navigation!");
    invalidateOptionsMenu(); // creates call to onPrepareOptionsMenu()
}
And then when it is closed we will do the opposite. Revert the title (which we stored in mActivityTitle) and again invalidate the options menu:
public void onDrawerClosed(View view) {
    super.onDrawerClosed(view);
    getSupportActionBar().setTitle(mActivityTitle);
    invalidateOptionsMenu(); // creates call to onPrepareOptionsMenu()
}
At this point our toggle still won’t work. We need to add two more lines to enable the drawer indicator (the lovely hamburger menu) and then attach this new toggle object to our drawer layout. Add these two lines in setupDrawer() after mDrawerToggle is set:
mDrawerToggle.setDrawerIndicatorEnabled(true);
mDrawerLayout.setDrawerListener(mDrawerToggle);
Finally, we need to activate this in the onOptionsItemSelected() method. Add this block of code anywhere in the method:
if (mDrawerToggle.onOptionsItemSelected(item)) {
    return true;
}
To see the whole file check out MainActivity.java in the completed project on GitHub.
Keep Everything in Sync
Notice in the animated gif above that the icon isn’t quite in sync with the drawer. We need to call one more method in the onPostCreate() lifecycle method of our Activity. Inside onPostCreate(), call mDrawerToggle.syncState() to sync the indicator to match the current state of the navigation drawer:
@Override
protected void onPostCreate(Bundle savedInstanceState) {
    super.onPostCreate(savedInstanceState);
    mDrawerToggle.syncState();
}
The other scenario we need to plan for to keep things in sync is when the configuration of the Activity changes, like, for example, going from portrait to landscape or showing the soft keyboard on the screen. We do this in the Activity’s onConfigurationChanged() method, which you may need to add:
@Override
public void onConfigurationChanged(Configuration newConfig) {
    super.onConfigurationChanged(newConfig);
    mDrawerToggle.onConfigurationChanged(newConfig);
}
Related Reading: Scheduling Time-Sensitive Tasks in Android with the AlarmManager
Next Steps
At this point we have a complete, working example of a navigation drawer that can be swiped in from the side or accessed via a button in the Action Bar. There is a lot more we can customize depending on our needs, of course, but this is a powerful tool that is now very easy to use thanks to the components added to the Android support library.
Look for courses, workshops, and other tips like this in the Android section of the Treehouse library, and check out the 7-day free trial. Happy coding!


Thank you for this nice tutorial, even if it seems to be a little bit older. This helped me finally achieve to add a navigation drawer menu with a hamburger icon. And best thing is, it works extremely smooth! Great job. Looking forward for more.
Thanks a lot.
Job well done, thanks guys for making learning easier.
I am new to android and this post helps me to improve. Thanks for the informative post.
Great thanks to a great tutorial. Just one small comment here that it seems latest version of Android Studio (which I’m using) complaints about setDrawerListener() method to be deprecated. It seems that changing to addDrawerListener() takes that off, just for future reference.
Great example, how do I startactivti to a second main_activity2 and keep the bar at the top
Another great guide from the Great Ben Jakuben.
Because of Ben Jakuben and Ben Deitch I code Android freely!
The B&B of Treehouse !
Good tutorial, everything was going fine until I realized my button never changes to a hamburger icon. It’s always an arrow. Everything works but I can’t get the arrow to change to a hamburger menu. I followed everything exactly as shown.
Hi,
I have a Activity SignIn layout in my app. also, I have a “content_signin” layout.
when I place “android.support.v4.widget.DrawerLayout” codes after “” app shows the drawer but I can’t use my signIn page textboxes/buttons “It blocks them even when the drawer is closed”, however the drawer works perfect. 2- when I placed it before “” the signIn page works perfect but the drawer side menu doesn’t show up (I can see the drawer sign on top).
so, any Idea where to place the drawer layout codes?
Thank you
Hi Ben!
This is a greet Tutorial for adding Navigation Drawer. I was trying many examples before but non of them works on my app except this one. i’m appreciate your help. I currently have a sign In page in my app with text boxes and buttons but when I added your drawer to that page the other buttons don’t work anymore. but the navigation drawer works perfect.
I’m new to Android.. what might be the problem? it looks like something block my signIn page. I added drawer onCreate as you said and I initialized and took care of my signIn Text boxes onStart() event.
public void onStart() {
super.onStart();
mSendButton.setOnClickListener(new View.OnClickListener() {
public void onClick(View v) {
onClickSignIn();
}
});
}
Thanks
When I click on an item it does not call the setOnItemClickListener method, what might be the problem?
Hi Thomas! As this is an older post, I’d recommend heading to the Treehouse Community to ask your question. Treehouse students and teachers are always happy to help!
Love This Tutorial, It actually explains stuff.
now I did have a problem. getSupportActionBar() Does not work! It says it’s undefined and I don’t see it explained anywhere, is that another method we create or something the android system has?
That’s the only thing that isn’t functioning, but Other than that, Awesome Tutorial!
I agree, this was an awesome tutorial(works as of July 31, 2016). I am new to android development and don’t really enjoy reading through documentation but this one was clear enough(if you have basic knowledge about android development).
Regarding your getSupportActionBar method not being recognized. Make sure the following are true:
1. Activity must extend AppCompatActivity
2. Build.gradle for your app must have a dependency
compile ‘com.android.support:appcompat-v7:23.4.0’
3. If you get an error message that it might produce a null pointer exception then do this
if( getSupportActionBar !=null ) {
getSupportActionBar.setTitle(“”); // or whatever you want to use
}
Hope this helps
Good luck!
Hi, do u know how to send the drawer to the foreground? it goes to the back of the page when I open it 🙁
Hi,
This article is really helpful,
I want to knw how can i add fragments on top of the main activities content layout.??
Thanks , its really very helpful.
Hi,
This article is really helpful for me , i am new on Android app development.
I want a search bar as the first item of my navigation drawer.How can i do that?
In this example at place of android i want a search bar
how can i use a saerchview at that place.
Thank you sor for this great tutorial,I used all the tips you gave us in this tutorial.I just want to ask how to make the drawer navlist and the toggle on the right side not left.Please if you can help me.
Regards
Nice one.
Will plz tell me how to add icon to navigation drawer???
Very nice. Is anybody know how to add TextView (anything) to the main_activity and after calling a fragment the TextView disapear?
void adddrawerItems();
{
String[] osArray = { “Android”, “iOS”, “Windows”, “OS X”, “Linux” };
mAdapter = new ArrayAdapter(this, android.R.layout.simple_list_item_1, osArray);
mDrawerList.setAdapter(mAdapter);
}
i get error that
expression expected
best tutorial i have found for starting with navigation drawer. Awesome work
Nice tutorial….very helpful….I have a small doubt. Is it possible to transfer data from one fragment to other in Navigationdrawer?
thanx for this tutorial but i’want know if i can replace Listnav with activity Layout
as any simple activity
heelo sir,
i’m in problem that i want to when i click DrawerView then open listof item and hide action bar
i have given intent event inside the onitemclick of setonitemclicklistener, but its not working, why?
Thanks for the tutorial !
But the navigation drawer does not register the clicks unless you specify these two lines :
mDrawerList.bringToFront();
mDrawerLayout.requestLayout();
nice tutorial but how to add submenu? can you give me sample code.. thanks..
Hello Ben, this was a great tutorial. I wanted to ask that if I have 7 screens in my app and in every page I want to use this navigation bar with the same data in it, how should I proceed? I need all the activities as navigation drawer, but do i need to initialise navlist and list view in each and every Java class???
Hi Ben ! !
Your tutorial is really nice and i want say thank for this tutorial.
and i have question that how to add a activity in these items like in “android”,”ios” and “windows”.
when i tap on a item i see “time for an upgrade!” but i want to open an activity when i tap on these items
please share your coding.
Glad you found it useful! You can open a new Activity the same way as any other time: by using an Intent and startActivity. Here’s a quick example that you can plug in where I have the code to display “Time for an upgrade!”:
Intent intent = new Intent(this, NewActivityName.class);
startActivity(intent);
hey Ben !!
It’s show error when i add “Intent intent = new Intent(this, NewActivityName.class);
startActivity(intent);” replace with Tost (Toast.makeText(MainActivity.this, “Time for an upgrade!”, Toast.LENGTH_SHORT).show();)
that error is “remove match intent”
so how can i improve this error
help me please.
Hey Ben!
when i use codes
“Intent intent = new Intent(MainActivity.this, NewActivityName.class);
startActivity(intent);”
to open an new Activity on item click of listview, its open in separate window but i want to
open it in same windows on place of Batdroid image,
how can i do it ?.
help me please !!!!!!
To select different activities by clicking one of the navigation drawer array items I replaced the code to display “Time for an upgrade!” with
@Override
public void onItemClick(AdapterView parent, View view, int position, long id) {
switch (position) {
case 0: //First item
startActivity(MainActivity.this, NewActivity.class);
break;
case 1: //Second item
Intent intent = new Intent(MainActivity.this, NewActivity.class);
startActivity(intent);
//Etc
}
}
Here’s the stack overflow for the question I asked and the example code I worked off of:
http://stackoverflow.com/questions/38558620/how-do-i-open-specific-activities-when-selecting-from-an-array-in-a-navigation-d
Hi Ben,
I’ve been trough your tutorial, and it works fine.
Now I want to know how to use the drawer itens to navigate between fragments.
I find a kind of difficult to use the examples created by Android Studio, besides having other problems generating the app with gradle, that frequently can’t create the resources class “R”.
Regards,
Flávio
I just uploaded video with drawer + fragments. Maybe it can help you. Link:
https://www.youtube.com/watch?v=tnWdMigEd4U
The example on the Android Developer Website [1] is implementing your scenario.
As you can see, the main content view of the activity contains a FrameLayout. Here they insert/remove dynamically a fragment based on user’s input in the navigation list.
[1] https://developer.android.com/training/implementing-navigation/nav-drawer.html
Initial startup app download link is not found. Please help!
Sorry about that! I fixed the link in the “Open or Create a Project” section. Click “OS List” for the starter files now.
Android have provided an useful and flexible interface for its users. Moreover the codes given here provides excellent results. Thanks for keeping us updated.
Wow!!! An innovative method to ease up the navigation in Android. Cool thing.!!
How to use something like this :
private void addDrawerItems() {
String[] osArray = { “Android”, “iOS”, “Windows”, “OS X”, “Linux” };
mAdapter = new ArrayAdapter(this, android.R.layout.simple_list_item_1, osArray);
mDrawerList.setAdapter(mAdapter);
}
But having something like : ” R.string.AndroidText ” instead of “Android”
And also have different link for each things like one separate for android, another one for iOS.
Thanks for your answer.
Regarding your first question, you could use a string-array in your strings.xml
and get the items in your .java file, as follows:
Resources res = getResources();
String[] planets = res.getStringArray(R.array.planets_array);
Read more about this on [1] :
[1] http://developer.android.com/guide/topics/resources/string-resource.html
Hello, I am new to Android Development so it is really a helpful article for me. Thanks for sharing.
I really like the hamburger to arrow animation and how it is connected to the draw position but notice most apps cover it (even Google’s) when you slide the navigation draw out. It seems odd to cover the button. Is it possibly part material design language?
Hi Andrew,
The documentation for Material Design does show the navigation drawer covering the action bar: http://www.google.com/design/spec/layout/structure.html#structure-side-nav
I slightly prefer having the button show. It’s kind of a pain to get it to work as specified in the design docs, too! Have a look at this StackOverflow question and answers to see some potential solutions: http://stackoverflow.com/q/26440879/475217
Hopefully this gets easier with an update to the SDK or support library in the future. 🙂
Android is most widely used mobile OS now a days. Thanks for sharing useful article regarding this.
This is a great information that you have shared with us. Thanks a lot. Hope to see more in future.
Thanks, Justin! Glad you enjoyed it! 🙂 Lots more in the works for Android at Treehouse!