
Last Updated on July 14, 2015 by Laura Coronel
Templates are one of the key tools at any developers disposable. They make it easier for us to build complex websites that are maintainable and easy for other developers to understand. With the exception of a few JavaScript frameworks, most templating is done on the server. When a request comes in to the server the templating engine pieces together the relevant templates and sends the constructed page down to the browser. This is great for a lot of use cases but with the increasing popularity of applications that run solely on the client-side we need a robust solution for handling templates in the browser. Enter the new HTML <template> element.
Contents
The <template> Element
The <template> element allows developers to create client-side templates made up of chunks of reusable DOM. The key thing about HTML templates is that they are inert. Your templates are not rendered by the browser until you activate them using JavaScript. This also means that any content they contain (images, video, audio) will not be loaded or played until the template is put to use.
It’s also worth noting that content within a template is not considered part of the main document. Trying to select an element within a template from the main document object will not work. Instead you first have to select the template and then use querySelector() to access the element you want to target. You will see an example of this later.
Checking for Browser Support
The <template> element is currently supported in Chrome, Firefox and Opera (15+).
You can detect support for HTML templates by checking to see if the content property is present on a <template> element. Here is an example:
if (‘content’ in document.createElement(‘template’)) {
  // Templates are supported.
} else {
  // Templates are not supported.
}
Creating HTML Templates
Creating a template is pretty straight-forward. All you need to do is create a <template> element and give it an appropriate ID.
Lets take a look at an example template that could be used for a blog comment.
<template id="comment-template">
  <li class="comment">
    <div class="comment-author"></div>
    <div class="comment-body"></div>
    <div class="comment-actions">
      <a href="#reply" class="reply">Reply</a>
    </div>
  </li>
</template>
Here we create a template with the ID comment-template. Our template’s content consists of a list item (<li>) with a number of <div>s that contain the comment author, body and a link for users to write a reply.
You can also include CSS and JavaScript within your templates using the <style> and <script> elements.
Using HTML Templates
In order to use your template you will need to write a little JavaScript. Lets take a look at an example.
var tmpl = document.getElementById('comment-template');
document.body.appendChild(tmpl.content.cloneNode(true));
Here we start by getting a reference to our <template> element using it’s ID and store this in a variable named tmpl. In this example we are not manipulating anything within the template so we just create a copy of the it’s content (tmpl.content.cloneNode(true)) and add this to the document.body.
Now that we’ve covered the basics I think you’re ready to move onto something a little more complex.
In this next example we are going to render a series of blog comments using a template. Lets assume that there is an unordered list (<ul>) element in the main document that we want to add our comments to.
Note: I’ve created a variable named comments that contains an array of comment objects for us to play around with. In reality you would probably be loading this data via AJAX.
// An array of comments.
var comments = [
  {'author': 'Joe', 'body': 'I love this product.'},
  {'author': 'Mary', 'body': 'Great idea. I have got to get me one of these!'},
  {'author': 'Eric', 'body': 'These things are fantastic. I bought three.'}
];

// Get a reference to the comments list in the main DOM.
var commentsList = document.getElementById('comments');

// Loop through each of the comments and add them to the comments list.
for (var i = 0; i < comments.length; i++) {
  var comment = comments[i];
  var tmpl = document.getElementById('comment-template').content.cloneNode(true);
  tmpl.querySelector('.comment-author').innerText = comment.author;
  tmpl.querySelector('.comment-body').innerText = comment.body;
  commentsList.appendChild(tmpl);
}
Here we start by getting a reference to the comments list in the main DOM.
We then loop through the items in the comments array. Each time we create a new variable called comment and initialize it with the appropriate comment in the array. This just makes the code a little more readable.
We then select our <template> element and make a clone of the content using content.cloneNode(). This just means that we can add our text without changing the original template.
Next we find the <div> elements that should contain the comment author and body by calling the querySelector on our tmpl variable. Then we update the innerText properties of these elements so that they contain the author and body content.
Finally we add our cloned template content to the commentsList using the appendChild method.
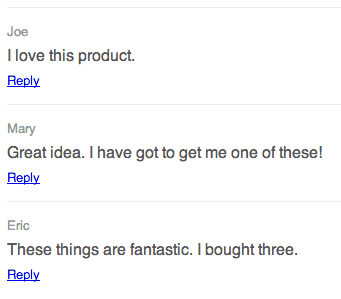
Comments Rendered Using HTML Templates
Final Thoughts
In this blog post you have learned how to use the new HTML <template> element to define chunks of DOM that can be reused by your applications. Although browser support is currently confined to Chrome, Firefox and the latest release of Opera I’m optimistic that we will see support emerging in other browsers too.
It’s worth remembering that as HTML templates rely on the use of JavaScript, user’s with browsers that have JavaScript disabled will not be able to see the content rendered using templates. This problem also affects some older screen-readers. It’s important to think this through and provide fallbacks for assistive technologies where appropriate.


hey,it’s a good tutorial.But,there is one thing i found wrong as yor are referring comments as a ID in Javascript but you had declared it as a class.Please correct that fault.
Is there a way to have the template shared across multiple files and be updated? This is to say can I have one template file which is utilized by several pages so if I update the one template file all of the pages will change?
How to use select box with?
I tried to set the value of select box but its not working.
“liTemp.querySelector(“.req-type”).value = requirement.type;”
Please help.
Thanks so much for the great tutorial. For some reason there does not seem to be a lot of info about the template tag out there but it looks very handy.
on this part :
// Get a reference to the comments list in the main DOM.
var commentsList = document.getElementById(‘comments’);
where are you getting ‘comments’ from ?
ブランドN級品ブランドコピー 代引き,スーパーコピー時計,ブランドN級品,楽天コピーブランド,,偽物ブラン日本最大級の最高のスーパーコピーブランド財布激安代引き販売店,スーパーコピー時計の激安老舗.!国内No.1時計コピー工房,アフターサービスも自ら製造したスーパーコピー時計なので、技術力でお客様に安心のサポー トをご提供させて頂きます。スーパーコピー 代引きN品をご 購入の方は、こちらへ.弊社は正規品と同等品質のコピー品を低価で お客様に提供します!すべての商品は品質2年無料保証です。
[url=http://www.gginza.com/bag/louisvuitton/index.html]プラダ スーパーコピー,プラダ 財布 コピー,プラダ 新作 財布ブランド財布コピー,ブランド スーパーコピー 財布,プラダ スーパーコピー 財布,シャネル財布コピー,グッチ スーパーコピー 財布,エルメス スーパーコピー 財布,ルイヴィトン長財布コピー,スーパーコピー財布,エルメスコピー財布,各種のブランドはかばんをコピーします偽物ブランド,激安偽物,ブランド財布コピー,エルメス財布コピー,ブランドのコピーブランド財布,ルイ?ヴィトンブランド財布コピー,偽ブランドグッチ財布,D&G,コピー財布偽物,偽物時計コピー,時計,ボッテガベルト,,靴,その他のバッグコピー,ブランド財布激安,ブランド激安販売,偽ブランド激安市場,通販送料無料專門店 ルイヴィトンコピー 児玉店,当店ルイヴィトン コピー 財布、ルイヴィトン コピー バッグ 全MAX80%OFF!期間限定SALE。最短即日発送。送料無料ルイヴィトン コピー,ルイヴィトン コピー 財布,ルイヴィトン コピー バッグ[/url]
激安 ブランドスーパーコピー新しいものを販売しています。ルイルイヴィトンコピー、グッチコピー、シャネルコピー、ブランドコピー、ブランドスコピー、ブランドコピー時計などルイヴィトンコピー 激安 ブランド、スーパーコピー、代引き対応、レプリカ、安心通販ルイヴィトン偽物、シャネル偽物、グッチ偽物、エルメス偽物、クロエ偽物、カルティエコピー、オメガコピー、IWCコピー楽天ヴィトンコピー屋
[url=http://www.bagkakaku.com/vuitton_belt.html]激安 ブランドスーパーコピー新しいものを販売しています。ルイルイヴィトンコピー、グッチコピー、シャネルコピー、ブランドコピー、ブランドスコピー、ブランドコピー時計などルイヴィトンコピー 激安 ブランド、スーパーコピー、代引き対応、レプリカ、安心通販ルイヴィトン偽物、シャネル偽物、グッチ偽物、エルメス偽物、クロエ偽物、カルティエコピー、オメガコピー、IWCコピー楽天ヴィトンコピー屋[/url]
I appreciate this article so much! I’m still the beginner phase of learning javascript, and this was well put together and explained throughly enough for myself to be able to comprehend and understand what was going on. I will consider using the new template tag in future assignments!
can we use jquery to do the same instead of javascript?
innerText will only work in IE, use innerHTML or textContent if having issues.
very nice post with very useful information to all i like it, thanks a lot for sharing with us. http://cssxperts.com/
Modern screen readers *can* see script-generated content. That said, it always helps to add appropriate ARIA role and state attrs.
Thanks for the correction @disqus_Q1H7CSJH60:disqus.
I’ve updated the post 🙂
Looks like there is a polyfill for older browsers demo’d here: http://jsfiddle.net/brianblakely/h3EmY/
Haven’t tried it out myself though.
That’s awesome! Thanks Mike 🙂