
Last Updated on May 21, 2015 by Laura Coronel
The online development tool Github has been around for a few years now. It provides online Git repository hosting for projects written in any common programming language. Over time their online API has gone through a few changes with the most current release at version 3. I have lots of fun toying around with different APIs, and Github is no exception.
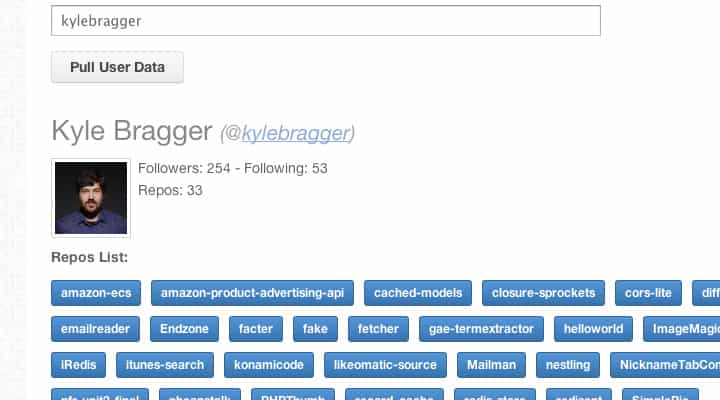
In this tutorial I want to demonstrate how we can build a remote Github webapp using jQuery and Ajax. You enter a username and using the API we pull out some information about the user and their profile stats. Since this requires a remote connection through Ajax you’ll need to host this on some type of web server, or a local server environment if you have one. I’ve also hosted a live demo that you can check out below.
Live Demo – Download Source Code
Getting Started
So far I’ve downloaded a local copy of jQuery and created another css directory for my stylesheet. The page design itself isn’t super important, but it does help to understand my whole process when building the webapp.
  <div id="w">
    <h1>Simple Github API Webapp</h1>
    <p>Enter a single Github username below and click the button to display profile info via JSON.</p>

    <input type="text" name="ghusername" id="ghusername" placeholder="Github username...">

    <a href="#" id="ghsubmitbtn">Pull User Data</a>

    <div id="ghapidata" class="clearfix"></div>
  </div>
This is all you will find in the HTML body since most of the code is appended using jQuery. #ghusername is the input field to hold the username and #ghsubmitbtn is the element we use for triggering the API call. Once the user clicks on this link we can pull out all the info we need and create one long string variable holding all the HTML. This gets applied into #ghapidata using the jQuery .html() method.
Since the majority of the content here is written in jQuery I’d like to focus solely on the scripting. But if you want to learn about my CSS styles check out the styles.css file along with my source code. All of the classes we use in jQuery have already been styled beforehand. The easiest method is to construct your interface using HTML and CSS with dummy data, and then go back to replace it with jQuery.
Different Ajax Calls
I wrote two separate ways of pulling JSON data from the server, but I want to clarify that either one can work fine. A newer solution $.getJSON() is a shorthand Ajax function where you know the response will be in JSON format. I also put together a different function which allows for a callback method using $.ajax().
  function requestJSON(url, callback) {
    $.ajax({
      url: url,
      complete: function(xhr) {
        callback.call(null, xhr.responseJSON);
      }
    });
  }
This block is found at the very bottom of the script, defined as a reusable function. It helps if you want to call different Ajax requests based on which button is pressed – that way you can pass in different variables for the request URL and callback method. There are reasons to use both of these methods but for newcomers I’d recommend using getJSON() to make problem solving a bit quicker.
Handling User Input
I’ve setup a click event listener tied onto the button which calls a new function whenever it gets clicked. My first line uses event.preventDefault() so the HREF value doesn’t get loaded into the address bar. I also put together a small loading GIF which appears while we are waiting on the Ajax request.
$(function(){
  $('#ghsubmitbtn').on('click', function(e){
    e.preventDefault();
    $('#ghapidata').html('<div id="loader"><img src="css/loader.gif" alt="loading..."></div>');

    var username = $('#ghusername').val();
    var requri   = 'https://api.github.com/users/'+username;
    var repouri  = 'https://api.github.com/users/'+username+'/repos';

    requestJSON(requri, function(json) {
Each variable is used to obtain information about the API request. Each URI is based on the username provided in the text field. It’s important that you recognize we are calling the function I wrote earlier requestJSON() and using the sample user URI to get profile info from Github.
Notice the second parameter writes in a callback function. We aren’t defining this callback elsewhere in the document, it gets initialized right away. So inside this new function we have access to the JSON data so that we can start organizing a return value. Keep this in mind as we go over the rest of the code.
Organizing API Data
Our simple JSON object is returned to a variable with the name json. First we need to check out the response and see how we are configuring the page output.
      if(json.message == "Not Found" || username == '') {
        $('#ghapidata').html("<h2>No User Info Found</h2>");
      }

      else {
        // else we have a user and we display their info
        var fullname   = json.name;
        var username   = json.login;
        var aviurl     = json.avatar_url;
        var profileurl = json.html_url;
        var location   = json.location;
        var followersnum = json.followers;
        var followingnum = json.following;
        var reposnum     = json.public_repos;

        if(fullname == undefined) { fullname = username; }
If the user does not exist we don’t get any JSON response, just a string “Not Found”. If that’s the case we end the script immediately by appending some basic HTML onto the page. Otherwise we do have a real user and we can start creating variables to hold their profile information. At the end I put together an if{} statement checking if the user has no set Full Name, then we just replace it with their account username instead.
        var outhtml = '<h2>'+fullname+' <span class="smallname">(@<a href="'+profileurl+'" target="_blank">'+username+'</a>)</span></h2>';
        outhtml = outhtml + '<div class="ghcontent"><div class="avi"><a href="'+profileurl+'" target="_blank"><img src="'+aviurl+'" width="80" height="80" alt="'+username+'"></a></div>';
        outhtml = outhtml + '<p>Followers: '+followersnum+' - Following: '+followingnum+'<br>Repos: '+reposnum+'</p></div>';
        outhtml = outhtml + '<div class="repolist clearfix">';
Now we follow-up by creating a single variable outhtml to hold all the HTML output. This is why you may find it easier to have already written the HTML so you know what will look good on the page. Once all the static information is written into HTML my last feature is to pull out a list of the user’s Github repos(including forks).
To do this we need another Ajax request. I’m going to use $.getJSON() and write another function to handle the HTML output onto the page.
        var repositories;
        $.getJSON(repouri, function(json){
          repositories = json;
          outputPageContent();
        });

        function outputPageContent() {
          if(repositories.length == 0) { outhtml = outhtml + '<p>No repos!</p></div>'; }
          else {
            outhtml = outhtml + '<p><strong>Repos List:</strong></p> <ul>';
            $.each(repositories, function(index) {
              outhtml = outhtml + '<li><a href="'+repositories[index].html_url+'" target="_blank">'+repositories[index].name + '</a></li>';
            });
            outhtml = outhtml + '</ul></div>';
          }
          $('#ghapidata').html(outhtml);
        } // end outputPageContent()
      } // end else statement
    }); // end requestJSON Ajax call
  }); // end click event handler
The repositories variable now contains a full JSON response of the user’s entire repo collection. The new function I wrote outputPageContent() will have access to this variable because it is defined at the same scope. First I check if the JSON response is empty because the user has no repositories, otherwise we output some HTML using a jQuery loop.
The simplest way is using .each() on the repositories JSON object. The callback function allows 2 parameters but we only need the index value. In basic English, this loop will append one more <li> element into the output HTML for each repo in the JSON object. I can open+close the unordered list by writing this code outside of the loop.
Finally the output function ends with $(‘#ghapidata’).html(outhtml) to render this whole HTML string right into the empty div element. This will automatically replace the small GIF loader I added before, and it’ll do the same thing if you enter a different username into the text field.
Live Demo – Download Source Code
Closing
Once you start learning the basics of API development the whole process becomes very educational. Pulling data from 3rd party services can offer many new ideas for widgets or content areas in your layout. I do hope that my example can provide a way for developers to understand the process of using an online API. Also feel free to download a sample copy of my source codes and see what else you can learn.


How to add Basic Authentication Into this?
How can I add personal access token. and which method I can uses for post and delete method? Thanks
Hi,
This only displays 30 repositories, I want to publish all public repositories for Mozilla.org (www.github.com/mozilla/repos)
How do I modify this to do that?
Thanks and Regards,
Shibani
I’ve been reading on HTTP calls and stumbled on your article. I’m surprised this works so smoothly. From what I’ve been reading “browsers only let Ajax load HTML and XML from the same domain name as the rest of the page for security reasons.” How does this work? I don’t know I can better phrase my question.
Would love to know. Thank you!
Thats CORS request, made possible by XMLHttpRequest level 2. below is plain js equivalent of above jquery ajax:
var xhr = window.XMLHttpRequest ? new XMLHttpRequest() : new XDomainRequest();
xhr.open(“GET”,”//www.externaldomain.com/resourse”, true);
xhr.withCredentials = true;
xhr.onload = function () {
if (xhr.readyState == 4 && xhr.status == 200) {
// do something with xhr.responseText
}
}
xhr.send();
Amazing tutorial! Ive understod everything for the first time… thanks a lot for this!
since you can only make 60 unauthorized requests per hour, this is pretty useless.
Nicely done. I’ve been learning AngularJS of late and decided to refactor your example in it as a comparison.
http://code.notsoclever.cc/simple-github-api-webapp-angularjs-style/
That looks awesome! thank you so much for sharing it’s definitely a nice take on the original.