


A lesser known feature of the HTML5 specification is context menus. These allow you to add custom items to the menu that appears when a user right-clicks on the page. Using JavaScript, you can then control the actions these items will perform when clicked.
In this blog post, you’re going to learn how to create your own context menus using the <menu> and <menuitem> elements.
Let’s get started.
Free trial on Treehouse: Do you want to learn more about HTML5 and front-end development? Click here to try a free trial on Treehouse.
Contents
HTML5 context menus are currently only supported in Firefox (8+). This feature has been around for some time now, but no other browsers have implemented it. However, there is a polyfill available that will add support for context menus in other web browsers.
HTML5 context menus are constructed using two elements, <menu> and <menuitem>.
The <menu> element has a number of attributes that control how it will be displayed in the browser.
<menu type="context" id="menu">...</menu>
The type attribute is used to specify that we’re creating a context menu. This is important as the <menu> element can also be used for marking up other kinds of menus.
It’s important that you give your <menu> element an id, otherwise you won’t be able to use the menu on your page (more on this later).
The label attribute can be specified on nested <menu> elements to set the text that will be displayed in the main context menu.
Similarly the icon attribute can be used to specify the location of an icon image that will be displayed alongside the label text for nested menus.
The <menuitem> element is used to create a new menu item. The label attribute should contain the text that you wish to display in the menu. You can also optionally specify an icon attribute with a path to an image to display alongside the label text.
<menuitem label="Tweet this Page" onclick="doSomething();" icon="/path/to/icon.png"></menuitem>
The action a menu item will perform is defined using JavaScript. You can use the onclick attribute to add this JavaScript directly to the <menuitem> element.
Note: I’m not a huge fan of using the onclick attribute to define event handlers, but I wasn’t able to get this working using an unobtrusive JavaScript approach.
Once you’ve created your context menu, you need to assign the menu to an element on the page. Your menu will only be visible in the context menu if the user right-clicks on this particular element.
You can assign a menu by specifying the contextmenu attribute on the desired element and setting its value to the id of your <menu> element.
<div contextmenu="menu-id">...</div>
If you want your menu to appear regardless of where the user clicks on the page, you could assign the menu to the <body> tag.
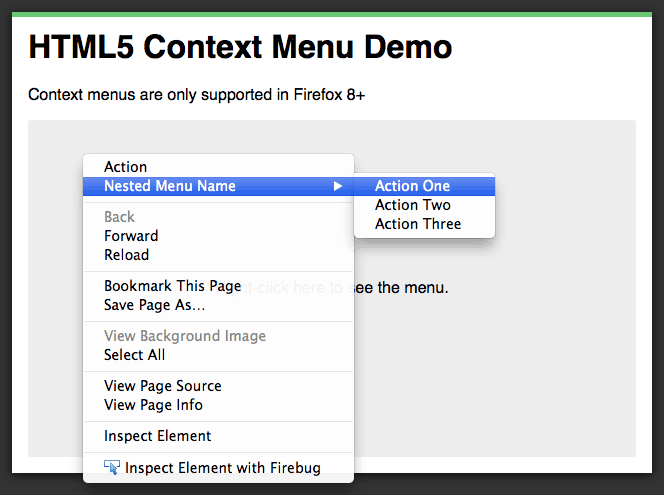
Nested Context Menus
You can nest <menu> elements within one another to create more complex menu structures. This can be particularly handy if you want to provide a large number of controls but don’t wish to clutter up the main context menu.
<menu type="context" id="menu">
    <menuitem label="Action" onclick="..." icon="icon.png"></menuitem>
    <!-- Nested Menu -->
    <menu label="Nested Menu Name" icon="/path/to/icon.png">
        <menuitem label="Action One" onclick="..."></menuitem>
        <menuitem label="Action Two" onclick="..."></menuitem>
        <menuitem label="Action Three" onclick="..."></menuitem>
    </menu>
</menu>
Nested <menu> elements should include a label attribute containing the text that will be displayed in the parent menu. You can also specify an icon attribute with a path to an image that will be displayed alongside the label.
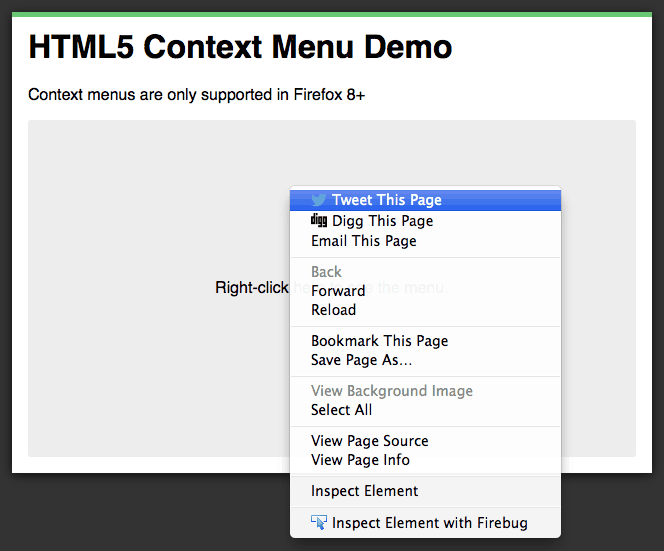
HTML5 Context Menus
Putting this all together, here is a demo of an example context menu that provides options to share the current page. Here, we’re just going to use some simple JavaScript that will redirect the user to the appropriate sharing URL when the menu item is clicked.
<!-- Create the menu -->
<menu type="context" id="menu">
    <menuitem label="Tweet This Page" onclick="window.location='https://twitter.com/intent/tweet?text=' + document.title + ' ' + window.location.href;" icon="twitter.png"></menuitem>
    <menuitem label="Digg This Page" onclick="window.location='http://digg.com/submit?url='+window.location;" icon="digg.png"></menuitem>
    <menuitem label="Email This Page" onclick="window.location='mailto:?body='+window.location;"></menuitem>
</menu>
In this case, we’re just going to use a simple <div> element that will act as our click target for the menu.
<!-- The target element that the menu is assigned to -->
<div id="target" contextmenu="menu">Right-click here to see the menu.</div>
View The Demo Download The Code
Final Thoughts
Whilst I can think of a number of legitimate uses for HTML5 context menus (in-game controls being one — pause, restart, etc.), I also worry that the power to invade the browser UI like this could be exploited. Take some time to think whether the controls you plan to provide through the context menu could not be delivered better through a different interface. We run the risk of polluting the context menu and confusing users if we don’t use this feature responsibly.
What are your thoughts about HTML5 context menus? Do you wish other browsers would hurry up and implement this feature, or are you worried that it will just be exploited? Let us know in the comments below.