
Last Updated on May 21, 2015 by Laura Coronel
In recent years we have seen the introduction of a whole new set of APIs that aim to give developers the power to store data on a user’s machine. In this blog post you are going to learn how to utilize the FileSystem API to create a virtual filesystem on the user’s machine that you can then use for storing files.
By the end of this blog post you will have created a simple HTML5 text editor that allows you to create, read, edit, and delete files that are stored in the app’s filesystem.
Lets get going!
Contents
- 1 Key Concepts and Restrictions
- 2 Browser Support
- 3 Inspecting the FileSystem with Chrome Dev Tools
- 4 Building the Text Editor Application
- 5 Step 1: Setting up the HTML and CSS
- 6 Step 2: Setting up the JavaScript
- 7 Step 3: Handling Errors
- 8 Step 4: Requesting a FileSystem
- 9 Step 5: Saving Files
- 10 Step 6: Creating the File Browser
- 11 Step 7: Loading Files
- 12 Step 8: Deleting Files
- 13 Step 9: You’re Done!
- 14 A Note on Building Offline Web Applications
- 15 Useful Links
Key Concepts and Restrictions
Before we dive into looking at some code, I first want to cover a few of the key concepts and restrictions that you need to keep in mind when using the FileSystem API.
Asynchronous vs Synchronous
There are two versions of the FileSystem API. One for synchronous calls and another for asynchronous calls. In this blog post I am going to be focusing on the asynchronous version of the API. Whilst it is sometimes useful to have the ability to execute operations synchronously, you will usually want to use the asynchronous API so that you don’t hold up any other code that needs to be executed.
Storage Types and Quotas
There are two types of storage that you can request from the browser: temporary or persistent.
Data stored in a temporary filesystem may be deleted by the browser to free up space for another application. The advantage of using a temporary filesystem is that it is automatically granted by the browser; the user does not have to explicitly allow the browser to store data on their machine. Temporary storage is great for storing data that will not break the app if it is suddenly removed. Caching data fetched from an API could be an example.
Data stored in a persistent filesystem is held in the browser until the user deletes it. You should use persistent storage if you plan to store data that is essential to your app. The slight downside of using a persistent filesystem is that the user has to grant you permission to store data. When your app first requests a filesystem a banner will be displayed asking for permission. Once the user has granted permission they will not be shown the banner again unless you request more storage space.
For more information about offline storage check out this whitepaper by Google: Managing HTML5 Offline Storage
Your filesystem is assigned a chunk of space to store data. This is known as the quota. You can request more storage if needed. In Chrome this is done using the Quota Management API. We will look at an example of how to request more storage later in this post.
Handling Errors
Many of the methods provided by the FileSystem API support an error callback. Whilst this is technically optional, you will want to include an error handler so that you can debug your application if something goes wrong.
You’ll see an example of an error handler later in this post.
Sandboxing
Filesytems are sandboxed. This means that you can only access files that exist within your app’s filesystem. The files in your app’s filesystem are also protected from being accessed by any other applications. This is an important security feature.
Note: A common misconception about the FileSystem API is that it can be used to access any file on the user’s hard drive. There are a number of reasons why this is not possible, but it ultimately comes down to security.
Same-Origin Policy
Each sandboxed filesystem is linked to a specific origin. An origin is defined as the combination of the protocol, domain and port that the app is served from.
You cannot access filesystems that belong to a different origin.
Apps must be served over HTTP or HTTPS
If you want to use the FileSystem API you must serve your application using http:// or https://. Apps served using file:// cannot access the API.
No Executable Files
For security purposes you cannot create executable files within the filesystem.
Browser Support
Support for the FileSystem API is currently restricted to Google Chrome and Opera. Both of these browsers currently use the webkit prefix. A specification for the FileSystem API has been submitted to the W3C and is currently a working draft.
| IE | Firefox | Chrome | Safari | Opera |
|---|---|---|---|---|
| – | – | 13.0+ | – | 15.0+ |
Source: Can I use – FileSystem API
Note: Google Chrome originally introduced partial support for the FileSystem API in version 8.0.
How To Detect Browser Support
A simple way of detecting support for the FileSystem API is to look for the requestFileSystem method on the window object. Keep in mind that the API is currently prefixed in Chrome and Opera.
// Handle vendor prefixes.
window.requestFileSystem = window.requestFileSystem ||
                           window.webkitRequestFileSystem;

// Check for support.
if (window.requestFileSystem) {
  // FileSystem Supported
} else {
  // FileSystem Not Supported
}
Inspecting the FileSystem with Chrome Dev Tools
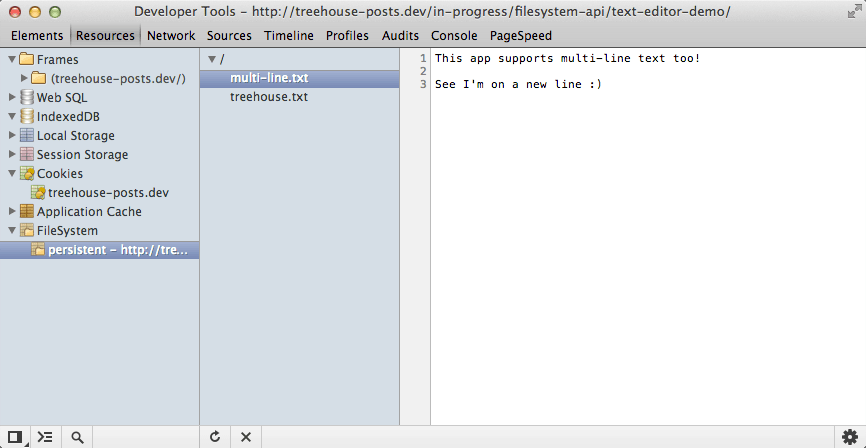
The FileSystem Inspector in Chrome Dev Tools
It can be really useful to inspect files and directories in the filesystem when you are building your applications. Luckily Chrome Dev Tools has a dedicated UI for doing just that.
Follow these steps to enable the FileSystem inspector:
- Go to
chrome://flags. - Enable the
Enable Developer Tools experimentsflag. - Reload your web browser.
- Open Chrome Dev Tools (right-click anywhere on the page and select
Inspect Element). - Click the cog in the bottom right-hand corner to open the settings.
- Click on the
Experimentstab in the sidebar. - Check the box next to
FileSystem inspection. - Now close the settings pane and select the
Resourcestab. - You should now see a
FileSystemlisting in the sidebar!
The FileSystem inspector can also be used to delete stored data.
Building the Text Editor Application
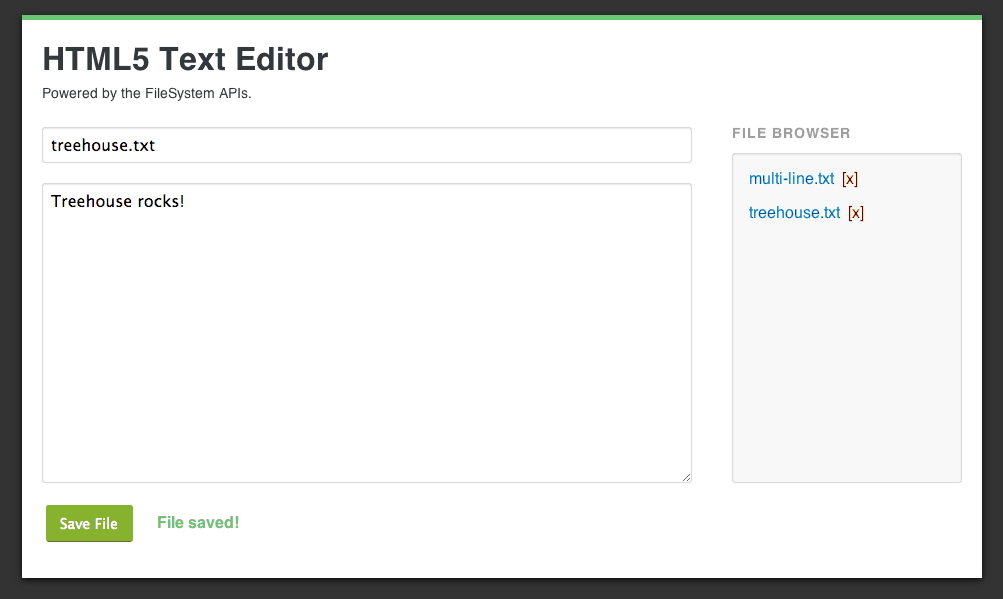
The text editor application you are going to build.
Okay, so now that you have an understanding of some of the key concepts and restrictions of the FileSystem API we’re going to dive straight into building the text editor application.
You’ll be learning about various parts of the FileSystem API along the way. The API covers a lot of ground, so you won’t be learning all of it here today. I have included a snippets folder in the code assets that includes examples of how to use other parts of the API.
Lets get coding!
See the Demo Download The Code View on CodePen
Step 1: Setting up the HTML and CSS
To get started you first need to setup the HTML and CSS for your application. The CSS stylesheet that you are going to use is available in the code resources download.
Note: As we looked at earlier, the FileSystem API is only available to apps served using http:// or https:// so you will need to be using a local development server for this tutorial. If you don’t already have one installed on your computer take a look at XAMPP.
Create a file called index.html and save it in a place that is accessible by your local development server. Next, open up that file in your favorite text editor and add the following code.
<!DOCTYPE html>
<html lang="en">
<head>
  <meta charset="utf-8">
  <title>FileSystem APIs Demo</title>

  <link rel="stylesheet" href="style.css">
</head>
<body>

  <div id="page-wrapper" class="clearfix">
    <h1>HTML5 Text Editor</h1>
    <p>Powered by the FileSystem APIs.</p>

    <form action="#" method="POST" id="file-form">
      <div class="field">
        <input type="text" name="filename" id="filename" placeholder="Filename (e.g. treehouse.txt)">
      </div>
      <div class="field">
        <textarea name="content" id="content" placeholder="Type your content here..."></textarea>
      </div>
      <div class="field">
        <button type="submit">Save File</button>
        <div id="messages"></div>
      </div>
    </form>

    <div id="files">
      <h2>File Browser</h2>
      <ul id="file-list"></ul>
    </div>

  </div>

  <script src="app.js"></script>
</body>
</html>
Here you have created a few key HTML elements for your application. The <form> will be used for creating and saving files and the <ul> element will be used to display a list of files in the filesystem. You’ve also added a messages <div> next to the save button. This will be used to give feedback to the user when a file is saved or deleted.
Make sure that you copy the style.css file from the code resources and add this to the same directory as your index.html file.
Step 2: Setting up the JavaScript
The next task is to setup the JavaScript file that will contain all of the code that powers your application. Create a new file called app.js and save it in the same directory as your index.html file.
Copy the following code into your new app.js file.
window.onload = function() {

  // Allow for vendor prefixes.
  window.requestFileSystem = window.requestFileSystem ||
                             window.webkitRequestFileSystem;

  // Create a variable that will store a reference to the FileSystem.
  var filesystem = null;

  // Get references to the page elements.
  var form = document.getElementById('file-form');
  var filenameInput = document.getElementById('filename');
  var contentTextArea = document.getElementById('content');
  var fileList = document.getElementById('file-list');
  var messageBox = document.getElementById('messages');

  // The rest of the code goes here...
};
Here you have created a variable called filesystem that will be used to store a reference to the filesystem object.
You have also created a number of variables that contain references to key elements on the page like the form, file list and message <div>.
Step 3: Handling Errors
Before we go any further it’s a good idea to create an error handler that you can use when interacting with the filesystem.
Copy the following code into your app.js file.
// A simple error handler to be used throughout this demo.
function errorHandler(error) {
  var message = '';

  switch (error.code) {
    case FileError.SECURITY_ERR:
      message = 'Security Error';
      break;
    case FileError.NOT_FOUND_ERR:
      message = 'Not Found Error';
      break;
    case FileError.QUOTA_EXCEEDED_ERR:
      message = 'Quota Exceeded Error';
      break;
    case FileError.INVALID_MODIFICATION_ERR:
      message = 'Invalid Modification Error';
      break;
    case FileError.INVALID_STATE_ERR:
      message = 'Invalid State Error';
      break;
    default:
      message = 'Unknown Error';
      break;
  }

  console.log(message);
}
This error handler simply examines the type of error that occurred and logs a message to the browser console.
Step 4: Requesting a FileSystem
Next up you need to request a filesystem from the browser. First we’re going to cover a bit of theory on how to do this and then go back to building the text editor at the end of this section.
Requesting a FileSystem from the Browser
To request a filesystem from the browser you use the requestFileSystem method. This method is prefixed as webkitRequestFileSystem in Chrome and Opera.
The requestFileSystem method has four parameters:
type– The type of storage (TEMPORARYorPERSISTENT).size– The amount of storage space you need (in bytes).successCallback– A callback that is executed when the browser grants access to the filesystem.errorCallback(optional) – A callback that is executed if an error occurs.
Here is an example of how you might request a filesystem with persistent storage. The first line here just adds cross-browser support.
// requestFileSystem is prefixed in Google Chrome and Opera.
window.requestFileSystem = window.requestFileSystem || window.webkitRequestFileSystem;

// Request a FileSystem
window.requestFileSystem(window.TEMPORARY, 1024 * 1024, successCallback, errorCallback);
Managing Your Storage Quota
Earlier we saw that filesystems are given a quota that determines how much data they can store. If you want to request more space for your application you need to use the requestQuota method. This is called on navigator.webkitPersistentStorage or navigator.webkitTemporaryStorage depending on what type of storage you are using.
The requestQuota method has three parameters:
size– The amount of space you are requesting (in bytes).successCallback– This will be executed when the browser grants the request for more space. An object will be passed into this callback function that specifies exactly how much space was granted.errorCallback– A callback that is executed if an error occurs.
navigator.webkitPersistentStorage.requestQuota(
  1024 * 1024 * 10,
  function(grantedSize) {

    // Request a file system with the new size.
    window.requestFileSystem(window.PERSISTENT, grantedSize, function(filesystem) {

      // Do something with your new (larger) filesystem

    }, errorHandler);

  }, errorHandler);
Updating the Text Editor Application
Great, so now that you understand how to request a filesystem from the browser it’s time to get back to your text editor application.
Add the following code below your error handler in app.js.
// Request a FileSystem and set the filesystem variable.
function initFileSystem() {
  navigator.webkitPersistentStorage.requestQuota(1024 * 1024 * 5,
    function(grantedSize) {

      // Request a file system with the new size.
      window.requestFileSystem(window.PERSISTENT, grantedSize, function(fs) {

        // Set the filesystem variable.
        filesystem = fs;

        // Setup event listeners on the form.
        setupFormEventListener();

        // Update the file browser.
        listFiles();

      }, errorHandler);

    }, errorHandler);
}
The initFileSystem function you have defined here first requests that your app is given 5MB of persistent storage space. You then request the filesystem, passing in the amount of space that was granted by the browser. Inside the success callback of requestFileSystem you set the filesystem variable you created earlier using the filesystem object that is passed into the callback (fs).
You also issue calls to setupFormListener and listFiles. These functions don’t exist just yet but you will be creating them soon.
The final task for this section is to issue a call to your new initFileSystem function if the user’s browser supports the FileSystem API.
Add the following code to your app.js file.
// Start the app by requesting a FileSystem (if the browser supports the API)
if (window.requestFileSystem) {
  initFileSystem();
} else {
  alert('Sorry! Your browser doesn\'t support the FileSystem API');
}
Step 5: Saving Files
To create a new file you need to first get a FileEntry object that represents a file in the filesystem. You then create a FileWriter that will be used to write content to the file. We are going to cover both of these things in this section.
Creating Files
The getFile method can be used to obtain a FileEntry object for the file you wish to write to. This should be called on filesystem.root, where filesystem is the object returned in the requestFileSystem callback. The root property represents a DirectoryEntry for the root of your filesystem.
Note: We’re not going to be dealing with directories much in this blog post. Check out the snippets folder in the code resources for examples of how to create, modify and delete directories.
The getFile method has four parameters:
path– The path to the file that you want to use.options– An options object can contain flags that specify whether or not the file should be created if it does not exist already.successCallback– This callback will be passed aFileEntryobject.errorCallback– For handling errors.
Here is a simple example of how you might use getFile to create a new file in the filesystem.
filesystem.root.getFile('treehouse.txt', {create: true}, function(fileEntry) {
  // Do something with fileEntry.
}, errorHandler);
Setting the create option to true here tells the browser to create the file if it does not already exist.
Writing to Files
Once you have got a FileEntry that represents your file you can use it to create a FileWriter. This is what is responsible for writing bytes to your file.
You can create a FileWriter object by calling the createWriter method on your FileEntry. This method takes success and error callbacks as it’s parameters.
fileEntry.createWriter(successCallback, errorCallback);
Once you have your FileWriter you next need to create a Blob that will be written to the file. A Blob is simply an object that contains raw data.
To write your data to the file you pass the blob into the fileWriter.write method. The FileWriter will fire writeend and error events that you can attach event listeners to.
fileEntry.createWriter(function(fileWriter) {

  fileWriter.onwriteend = function(e) {
   // The write finished.
  };

  fileWriter.onerror = function(e) {
    // An error occurred.
  };

  var contentBlob = new Blob(['Hello Treehouse!'], {type: 'text/plain'});

  fileWriter.write(contentBlob);

}, errorHandler);
Now that you understand how to create, and write to, new files lets put all this together in the text editor application.
Updating the Text Editor Application
Copy the following code into your app.js file.
// Save a file in the FileSystem.
function saveFile(filename, content) {
  filesystem.root.getFile(filename, {create: true}, function(fileEntry) {

    fileEntry.createWriter(function(fileWriter) {

      fileWriter.onwriteend = function(e) {
        // Update the file browser.
        listFiles();

        // Clean out the form field.
        filenameInput.value = '';
        contentTextArea.value = '';

        // Show a saved message.
        messageBox.innerHTML = 'File saved!';
      };

      fileWriter.onerror = function(e) {
        console.log('Write error: ' + e.toString());
        alert('An error occurred and your file could not be saved!');
      };

      var contentBlob = new Blob([content], {type: 'text/plain'});

      fileWriter.write(contentBlob);

    }, errorHandler);

  }, errorHandler);
}
This saveFile function will use the getFile, createWriter and write methods you learned about earlier to save a file in the filesystem. If you call the saveFile function with a filename that already exists, the existing file will be overwritten.
You’ve attached an event listener to the writeend event that will update the file list; clean out the form fields; and display a ‘File saved!’ message to the user once the file has been saved. Similarly you have also attached an event listener to the error event which will display an error message to the user if something goes wrong.
Next up you need to add an event listener to the form that will fetch the data from the form fields and issue a call to your new saveFile function.
Add the following code to your app.js file.
// Add event listeners on the form.
function setupFormEventListener() {

  form.addEventListener('submit', function(e) {
    e.preventDefault();

    // Get the form data.
    var filename = filenameInput.value;
    var content = contentTextArea.value;

    // Save the file.
    saveFile(filename, content);
  });

}
Here you retrieve the data from the form using the filenameInput and contentTextArea variables you created earlier and then pass this data to the saveFile function.
Step 6: Creating the File Browser
Listing the files in the filesystem is where it starts to get a little bit tricky. You first need to create a DirectoryReader by calling the createReader method on the directory you wish to get the contents of. In your case this would be filesystem.root.
You can then call the readEntries method on your DirectoryReader to get a list of entries in the directory. The caveat here is that readEntries does not return all of the entries in a directory at once so you will need to keep calling it until no more entries are returned.
We’re going to dive straight into writing the code for the text editor here. I’ll walk you through the theory as we go.
First you need to create a listFiles function that will be called when the file browser needs to be updated.
Copy the following code into your app.js file.
function listFiles() {
  var dirReader = filesystem.root.createReader();
  var entries = [];

  var fetchEntries = function() {
    dirReader.readEntries(function(results) {
      if (!results.length) {
        displayEntries(entries.sort().reverse());
      } else {
        entries = entries.concat(results);
        fetchEntries();
      }
    }, errorHandler);
  };

  fetchEntries();
}
Here you first create a DirectoryReader by calling createReader on filesystem.root. Next you create a variable called entries that will hold all of the returned FileEntries in an array.
You then define another function within listFiles that is called fetchEntries. This fetchEntries function will be called over and over until no more entries are returned.
Within fetchEntries you call the dirReader.readEntries method to fetch a block of entries. If no results are returned you can call the displayEntries method which will handle displaying the files in the file browser. If results are returned you need to add these results to the entries array and call fetchEntries again.
To complete the file browser you need to create the displayEntries function.
Copy the following code into your app.js file above the listFiles function you just created.
function displayEntries(entries) {
  // Clear out the current file browser entries.
  fileList.innerHTML = '';

  entries.forEach(function(entry, i) {
    // Create an li element.
    var li = document.createElement('li');

    // Create a read link for the file.
    var link = document.createElement('a');
    link.innerHTML = entry.name;
    link.className = 'edit-file';
    li.appendChild(link);

    // Create a delete link for the file.
    var delLink = document.createElement('a');
    delLink.innerHTML = '[x]';
    delLink.className = 'delete-file';
    li.appendChild(delLink);

    // Add this li to the fileList.
    fileList.appendChild(li);

    // Setup an event listener that will load the file when the link
    // is clicked.
    link.addEventListener('click', function(e) {
      e.preventDefault();
      loadFile(entry.name);
    });

    // Setup an event listener that will delete the file when the delete link
    // is clicked.
    delLink.addEventListener('click', function(e) {
      e.preventDefault();
      deleteFile(entry.name);
    });
  });
}
Here you start by clearing out any content that might already be in the file list.
Next you loop through each of the files in the entries array. Each time you create a new <li> element and two links. The first link will be used to read the file, the second to delete it. You then add the two links to the <li> element and then add that <li> to the fileList.
Finally you setup an event listener for each of the links. The first will call loadFile when the user clicks on the filename link. The second will call deleteFile when the user clicks on the delete link. You will be creating the loadFile and deleteFile functions next.
Step 7: Loading Files
Next up you need to write the loadFile function. This will be responsible for reading the contents of a file in the filesystem and then populating the form with the data that has been retrieved.
Note: In this section you will be using the FileReader API. I’m not going to go into too much detail on this but if you’re curious check out this post.
To get the contents of the file you need to first retrieve a File object for your FileEntry. This is done using the file method. This method takes success and error callbacks.
fileEntry.file(successCallback, errorCallback);
Once you have retrieved your File object you can pass this to a FileReader that will read the raw data and give you text that you can use to update the form.
Lets code this up.
Copy the following code into your app.js file.
function loadFile(filename) {
  filesystem.root.getFile(filename, {}, function(fileEntry) {

    fileEntry.file(function(file) {
      var reader = new FileReader();

      reader.onload = function(e) {
        // Update the form fields.
        filenameInput.value = filename;
        contentTextArea.value = this.result;
      };

      reader.readAsText(file);
    }, errorHandler);

  }, errorHandler);
}
Within your loadFile function you first use the getFile method you learned about earlier to retrieve a FileEntry for the file. Notice that no options have been specified.
Once the FileEntry has been retrieved you use the file method to get a File object.
You then create a new FileReader and store this in a variable called reader. Next you attach an event listener to the load event for the FileReader that will be passed the text content from the file. Within this event listener you’ve added some code that will update the fields in the form. Finally you call the readAsText method on reader and pass in the File object that you retrieved earlier.
Step 8: Deleting Files
The final piece of code that you need to write for the text editor will handle deleting files.
To delete a file you must first retrieve the FileEntry object for the file you wish to delete. You can then call the remove method on the FileEntry, passing in success and error callbacks as you have done before.
fileEntry.remove(successCallback, errorCallback);
Add this deleteFile function to your app.js file.
function deleteFile(filename) {
  filesystem.root.getFile(filename, {create: false}, function(fileEntry) {

    fileEntry.remove(function(e) {
      // Update the file browser.
      listFiles();

      // Show a deleted message.
      messageBox.innerHTML = 'File deleted!';
    }, errorHandler);

  }, errorHandler);
}
Here you first retrieved the FileEntry object using getFile. Notice that create has been set to false here because you don’t want to create a new entry if it doesn’t already exist.
Once the FileEntry has been retrieved you call the remove method to delete it from the filesystem. The success callback will use the listFiles function to update the file browser and then present a File deleted! message to the user.
Step 9: You’re Done!
Congratulations! You have just built a working text editor using the FileSystem APIs.
The text editor application you have built.
See the Demo Download The Code View on CodePen
Try expanding your application by adding support for directories or renaming files. Be sure to let us know what you come up with in the comments below.
The FileSystem APIs have much more to offer than what we have covered in this blog post. I encourage you to visit some of the links listed at the bottom of this post to learn more about the various things that you can do with these APIs. I’ve also included some snippets in the code download that provide examples of how to use other aspects of the API.
A Note on Building Offline Web Applications
Before we finish up I just want to share a quick note on building web applications that work offline.
If you want to make something work offline, it has to be offline first.
Jake Archibald, Developer Advocate @ Google
Source: The Big Web Show: Episode #95
If you’re building a web app that you want to work offline you need to start by assuming that your app is offline to begin with. View the internet connection as an add-on that won’t always be available.
I know that this is counter to the usual way of doing things but it will really help you to make smarter decisions when designing your applications. Build strategies for storing and synchronizing data from the start, don’t try and bolt them on later.


Maybe I am just not seeing it, and I know this post is dated by now, but in the demo, I cannot find the file I created within the Chrome Dev frame. Do you know where it is/how to enable it these days?
Thank you for this informative post!
I think there is a bug in your code in the tutorial. You say to call toArray(results) in the else clause of fetchEntries. Isn’t toArray a jQuery method? Also noticed it wasn’t in your working downloadable js file. Just an observation. Great tutorial!
Oops, that should have been removed. I’ve updated the post.
Thanks for pointing it out 🙂
Consider adding syntax highlighting in the code blocks (i.e. requesting it from the site admin).
For testing purposes, Chrome folks can installed the Peephole extension. It gives you a file browser in the extension itself. Very handy. URL: https://chrome.google.com/webstore/detail/html5-filesystem-explorer/nhnjmpbdkieehidddbaeajffijockaea?hl=en-US
That looks great!
Thanks for sharing Raymond 🙂