


One of the funnest technologies to come to web browsers in the last couple years is the ability to access the webcam and microphone without the need for a third party plugin. When you combine these native media streams with the new CSS3 filters you have a recipe for awsomeness.
In this blog post you are going to learn how to access the device camera using getUserMedia and stream this input into a <video> element. To finish up you will play around with using CSS3 filters to add cool effects to the video.
Contents
Browser Support for getUserMedia

Before we start it’s worth taking a look at browser support. Support for getUserMedia has been around in desktop browsers for a little while now.
Google Chrome (stable) has supported getUserMedia since v24. However the API is currently still prefixed as webkitGetUserMedia.
Firefox has support for the API through mozGetUserMedia. You may need to enable media support though. To do this go to about:config and toggle the media.navigator.enabled option to true.
Opera supports the unprefixed getUserMedia function.
Unfortunately IE and Safari don’t currently support getUserMedia.
For more detailed information on browser support check out the compatibility table on caniuse.com
Setting Up The Demo
Lets dive in and create a demo so that you can see how to use getUserMedia.
First you need to create a HTML file for your markup. Create a new file called index.html and save it in a folder that is accessible from your local development server.
Note: You cannot use getUserMedia on web pages served using file:// URLs.
Copy the following code into your index.html file. This will setup a basic web page with a <video> element and a <div> that will be used for styling purposes.
<!DOCTYPE html>
<html lang="en">
<head>
  <meta charset="utf-8">
  <title>HTML5 Demo: getUserMedia (Treehouse Blog)</title>
  <link rel="stylesheet" href="style.css">
</head>
<body>
  <div id="video-container">
    <video id="camera-stream" width="500" autoplay></video>
  </div>
  <script src="script.js"></script>
</body>
</html>
Pro Tip: Adding a controls attribute to the video will allow you to pause the video stream and go fullscreen.
Now create a new stylesheet called style.css and save it in the same folder as your index.html file. Copy the following CSS code into your new stylesheet.
body {
  background: #F7F7F7;
  margin: 0;
  padding: 0;
}

#video-container {
  margin: 2em auto 0;
  width: 500px;
  padding: 2em;
  background: white;
  -webkit-box-shadow: 0 1px 10px #D9D9D9;
  -moz-box-shadow: 0 1px 10px #D9D9D9;
  -ms-box-shadow: 0 1px 10px #D9D9D9;
  -o-box-shadow: 0 1px 10px #D9D9D9;
  box-shadow: 0 1px 10px #D9D9D9;
}
Finally you need to setup a JavaScript file that will contain the code used to access the camera. Name this file script.js and save it in the same folder as your other assets. The code below will alias the vendor prefixed versions of getUserMedia so that you only need to call navigator.getUserMedia once rather than having to call of the vendor prefixed versions seperately in order to get your demo working across browsers.
window.onload = function() {

  // Normalize the various vendor prefixed versions of getUserMedia.
  navigator.getUserMedia = (navigator.getUserMedia ||
                            navigator.webkitGetUserMedia ||
                            navigator.mozGetUserMedia ||
                            navigator.msGetUserMedia);

}
Accessing The Camera
Now that you have all of your assets setup it’s time to take a look at getUserMedia in more detail.
The getUserMedia function takes three parameters:
constraints– This should be an object that specifies which media streams you would like to access. For example, to get both video and audio you would use:{ video: true, audio: true }successCallback– A function that will be called if the media stream is successfully loaded. The function will be passed aLocalMediaStreamobject.errorCallback(optional) – A function that will be called if the media stream cannot be loaded.
Copy the following code into your script.js file, just inside the last curly brace.
// Check that the browser supports getUserMedia.
// If it doesn't show an alert, otherwise continue.
if (navigator.getUserMedia) {
  // Request the camera.
  navigator.getUserMedia(
    // Constraints
    {
      video: true
    },

    // Success Callback
    function(localMediaStream) {

    },

    // Error Callback
    function(err) {
      // Log the error to the console.
      console.log('The following error occurred when trying to use getUserMedia: ' + err);
    }
  );

} else {
  alert('Sorry, your browser does not support getUserMedia');
}
This code first does a check to see if the getUserMedia function is available in the browser. If it’s not it will show an alert to the user.
Once it has been established that the browser supports getUserMedia we issue the function call, passing in a constraints object that specifies we want a video stream; a callback function; and an error handler that will log any errors to the console.

getUserMedia Permissions Dialog
When the function is called the user will be presented with a permissions dialog (like the one in the image above) giving them the ability to allow or deny access to the camera. This is a very important privacy feature which stops websites from being able to spy on users without their knowledge.
Hooking Up The Video Stream
The final thing to do in order to get your video stream working is to hook up the LocalMediaStream object to the <video> element in your HTML markup.
Note: The LocalMediaStream object is passed into the success callback through the localMediaStream parameter you specified in the previous section.
Add the following code to the success callback in your getUserMedia call.
// Get a reference to the video element on the page.
var vid = document.getElementById('camera-stream');

// Create an object URL for the video stream and use this
// to set the video source.
vid.src = window.URL.createObjectURL(localMediaStream);
Here you first get a reference to the <video> element on your web page. You then generate an object URL for the LocalMediaStream provided by getUserMedia and use this URL as the src for the video. You can use an object URL just like you would any other URL.
Now if you load up your demo page and accept the permissions dialog you should see the video feed from your camera being displayed on the page, as shown in the figure below.

Congratulations! You now know how to access the webcam without using any third-party plugins. It’s really not as hard as you might have thought.
You could stop here, but if you’re feeling a little adventurous, continue on to see how you can use CSS3 filters to add effects to the video stream.
Adding Effects with CSS3 Filters
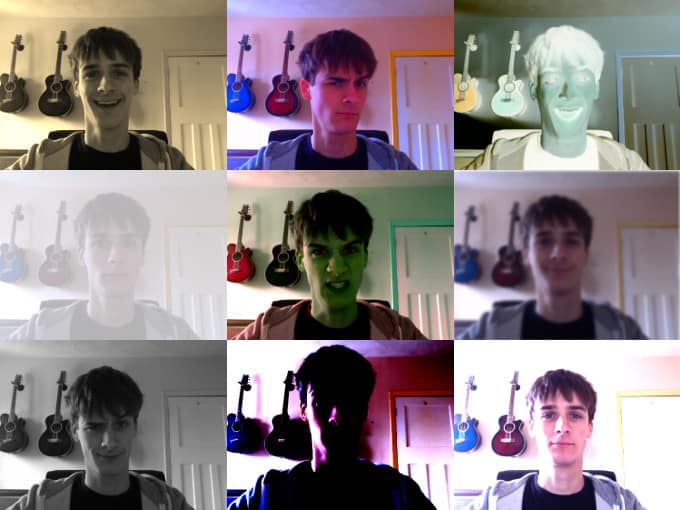
CSS3 Filter Effects
CSS3 Filters allow you to easily add effects like grayscale, blur and sepia to your video stream. This works by using the -webkit-filter CSS rule directly on the <video> element on your web page. It’s super easy so lets give it a go!
Add the following CSS code to your style.css file. This will add a sepia effect to the video stream.
#camera-stream {
  -webkit-filter: sepia(1);
}
Now if you reload the page you should the sepia effect on the video. Pretty nifty!
Here are some other CSS3 filters for you to play around with.
-webkit-filter: blur(3px);
-webkit-filter: grayscale(1);
-webkit-filter: sepia(1);
-webkit-filter: brightness(2.5);
-webkit-filter: contrast(5);
-webkit-filter: hue-rotate(125deg);
-webkit-filter: invert(1);
-webkit-filter: saturate(3);
-webkit-filter: opacity(0.3);
Summary
I hope you’ve had as much fun playing around with getUserMedia as I did when I was writing this article!
Being able to access device hardware like the webcam and microphone without the need for third-party plugins is a big step forward for the web. There are already a number of web applications that are taking advantage of this emerging technology and I’m excited to see what developers are going to do with it in the future.
How do you plan to use getUserMedia in your projects?