Matt West
writes on December 9, 2013
JSHint is a tool that can help you to write more reliable and consistent JavaScript code. The tool works by checking your code for a number of common errors. If you’ve ever spent half an hour trying to debug your code only to find that you missed a comma somewhere, you’ll understand how useful JSHint can be.
As well as catching errors in your code, JSHint can be used to enforce coding conventions and style guides. This is really useful if you work on a team as it helps to keep your codebase consistent and easily readable.
In this post you’re going to learn how to set up and use JSHint. You’ll be taking a look at some plugins that are available for popular text editors, as well as some example JSHint configurations.
Installing JSHint
JSHint is available through the node package manager (npm). If you don’t have npm installed, go to the node.js website and download a copy of node for your OS. This will install both node.js and npm.
Once you have npm installed, open up terminal and type:
npm install -g jshintThe -g flag means that jshint will be installed globally on your system. This allows you to access the executable from any directory.
Using JSHint on The Command Line
Now that you have JSHint installed let’s test a file. You can either download the demo file or test a file that you already have on your hard drive.
Open up terminal and navigate to the folder that contains your JavaScript file. Then run the following command to test the file:
jshint demo.jsIf you used the demo.js file you should see two errors as shown below.

JSHint Errors
If JSHint doesn’t find any problems with your code nothing will be output into the terminal window. Open up the demo.js file in your favorite text editor and add the two missing semi-colons. Running JSHint again should now return no errors.
Configuring JSHint
One of the best things about JSHint is that it can be configured to meet the needs of you or your team. This configuration can also be easily shared amongst everyone working on a project, ensuring that all the developers are working against the same conventions.
You can define your configuration in two ways. Either by adding special comments to your code or by storing your configuration in a .jshintrc file. I prefer to keep my configuration separate from the code whenever possible, so in this section we’re going to focus on setting up a .jshintrc file.
An added advantage of using a dedicated configuration file is that you can use the same configuration to check all of the JavaScript files in your project. For this to work the .jshintrc file should be placed at the root of your project.
Lets take a look at a simple example:
{
  "curly": true,
  "eqeqeq": true,
  "undef": true,
  "globals": {
    "jQuery": true
  }
}
A number of configuration options have been used here to specify coding conventions.
curlyenforces that all code blocks should be surrounded with curly braces.eqeqeqprohibits the use of==and!=, instead developers should use===and!===.undefspecifies that an error should be thrown if a variable has been used the was not declared.globalsallows you to specify global variables that are defined outside the file being tested (document,window,jQuery…). The boolean value specifies if the variable is writeable. Setting the value tofalse(default) means the variable is read-only. Theglobalsoption should be used when theundefoption is set totrue.
You can find a full list of configuration options in the documentation.
Note: Notice that the configuration options are specified using JSON. This is a requirement for all .jshintrc files.
If you’re curious, here are some links to JSHint configurations for popular projects:
Plugins for Popular Text Editors
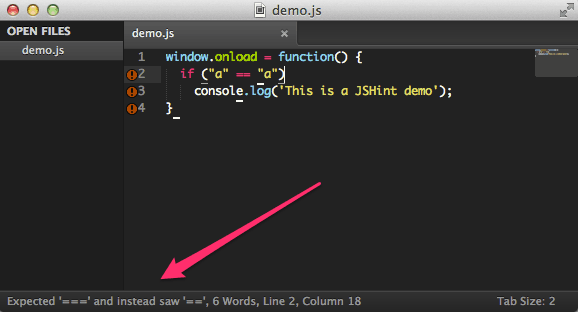
The SublimeLinter JSHint plugin for Sublime Text
Running JSHint from the command line can become a bit tedious. Ideally you want to get real-time feedback about any errors as you write your code. There are a whole bunch of plugins available that can bring the goodness of JSHint directly into your favorite text editor. I’ve listed some of the most popular below.
- SublimeText: SublimeLinter
- Vim: jshint2.vim
- Textmate: JSHint.tmbundle
- Visual Studio: SharpLinter
- Brackets / Edge Code: Brackets JSHint
- Notepad++: jslintnpp
- gEdit: gEdit JSHint
Refer to the documentation for each of these plugins for install and configuration instructions.
Bonus: There’s a JSHint plugin available for grunt too!
Final Thoughts
JSHint has become a crucial tool in my development process. It’s saved me so much time by pointing out errors as I make them. I’ve also found that being able to enforce styling conventions has helped me to write much cleaner code.
I hope that this post has given you an insight into how JSHint can fit into your own development process. Take a minute to set up and configure this simple tool and you will never be caught out by trivial errors again.


How can I generate this .jshintrc files ? Is it a text file or javascript file ?
Drupal 8 is a popular project which has a jshint config file as well 🙂 http://drupalcode.org/project/drupal.git/blob/refs/heads/8.x:/.jshintrc
I really hope contrib will make use of it so we can raise the quality of Drupal JS for everyone 🙂
JSHint is awesome! And in combination with Node.js, they’re an essential pair for anyone building web applications.
I developed my own NPM package to assist with automating JSHint (and other linters) — LintRoller (http://arthurakay.github.io/LintRoller/).
Thanks for sharing Arthur. LintRoller looks awesome 🙂