Treehouse
writes on October 5, 2015
In this post, I’ll describe my approach to texture mapping and outline the asset workflow that I use to go from a plain 3D model to a prop that’s ready for a game. If you’re new to making video games, you will gain an understanding of some of the major concepts involved in texturing art assets. And if you have some experience already, you might pick up a few tips and tricks.
This is the second post in a two part series; the previous post on 3D modeling describes how I modeled this old radio.
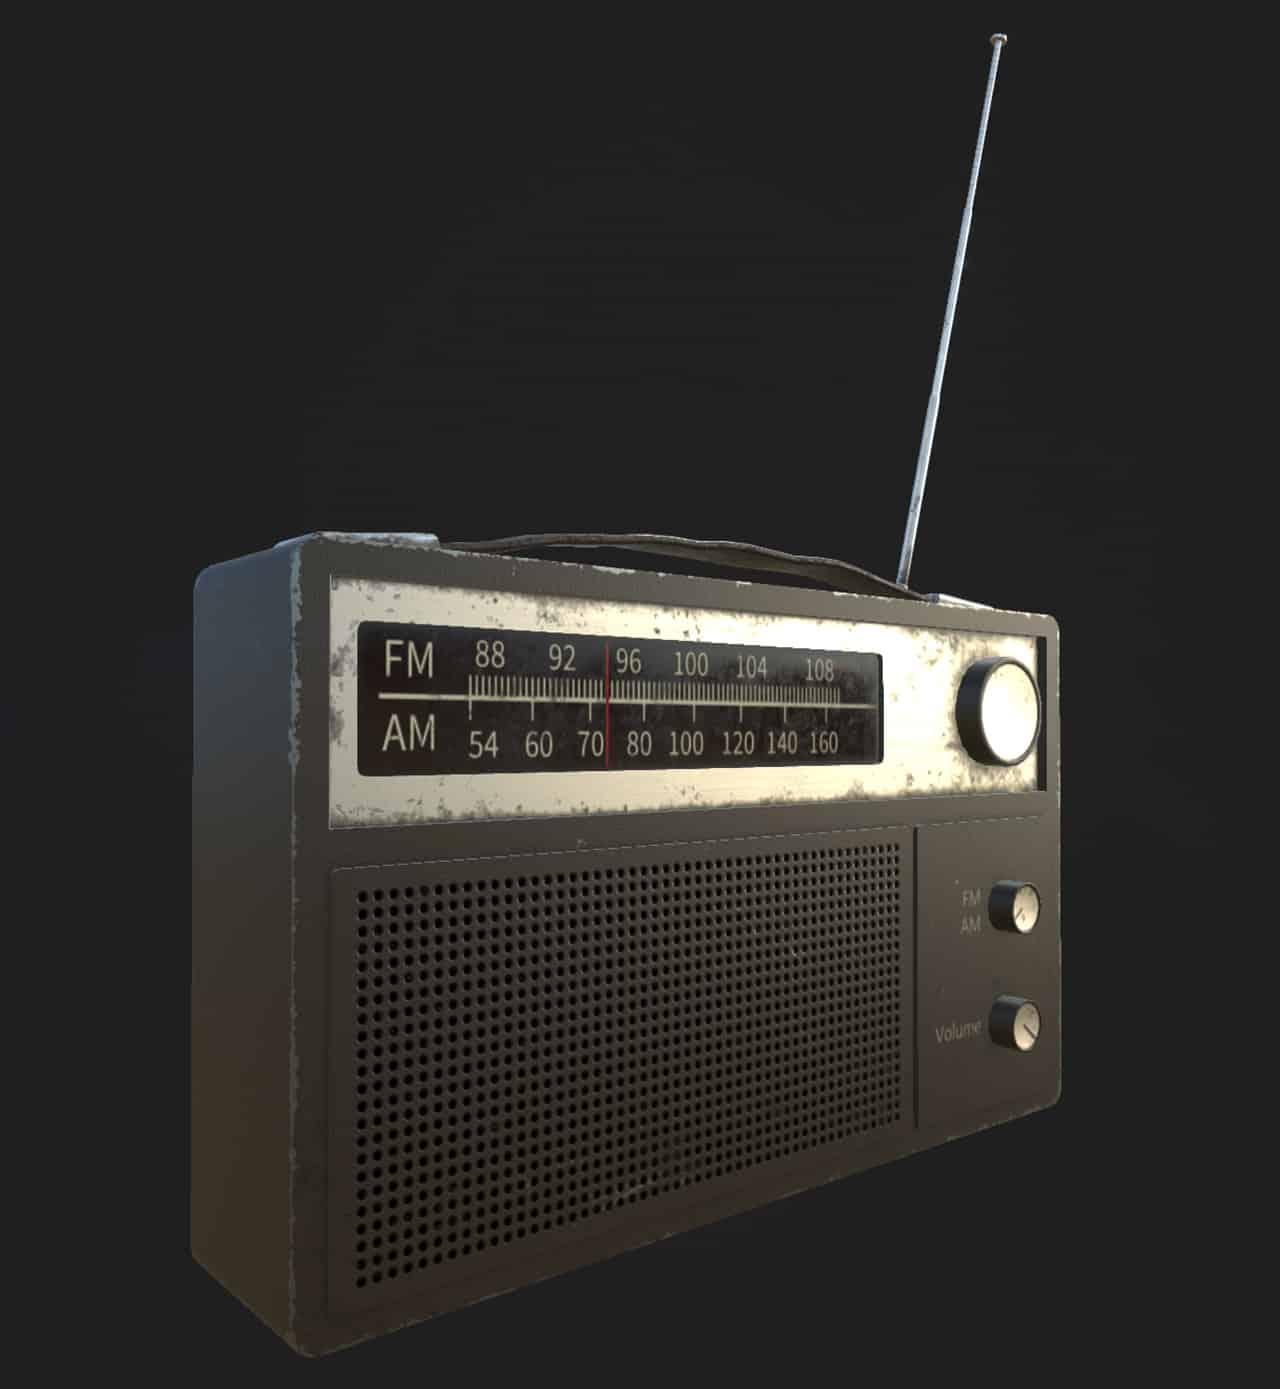
This old radio game asset was modeled in Maya LT and textured in Substance Designer.
Geometry versus Textures
Even when I’m modeling, I’m thinking about textures, because I’m deciding which parts should be modeled geometry and which parts can be represented with a texture.
For example, the final radio asset has a grid of small holes for the speaker. Even if these holes were just squares and not circular, modeling them in Maya would add a tremendous amount of polygons (which can slow down the game). In animated films it’s common to model these types of things, but in a game, the player will never be so close up to this model that they’ll see this level of detail. Here’s a shot of the radio model in Maya from the previous post:
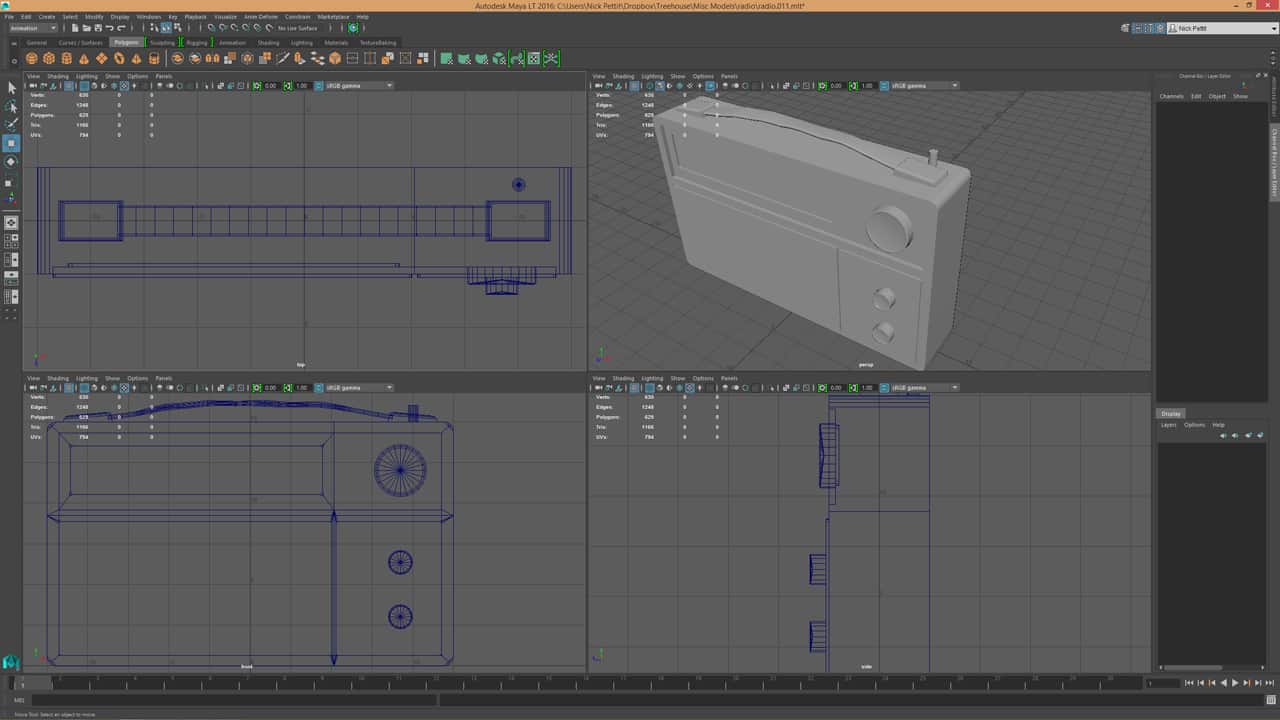
In the 3D model, the speaker panel is just a flat plane. Instead of using geometry for the holes, much of the depth can be implied with a normal map, especially since the holes are relatively flush with the plane that they’re on. When creating a model like this, it’s more important to create a well defined silhouette and fill in the middle with texture.
Procedural Texturing
Every game asset can tell an unwritten story, and much of that storytelling comes from the wear and dirt in each texture map. Before I start texturing, I think about two things:
- Out of what materials is this object made?
- Where should the dirt and wear collect?
When I’m in the research phase of an asset, I try to find ways to include a variety of materials (i.e. metal, plastic, wood, leather, etc). Including more materials offers more opportunities for contrast and different weathering patterns. A leather material will crack and warp, while a painted metal will chip away. Unless an object is meant to be a perfect alien spaceship or the Hubble Telescope, some amount of weathering is going to be present; nothing is perfect.
When I first started making game assets years ago, I textured them in Photoshop. Almost every 3D artist has done this at some point, and if you don’t know any other way, then it might seem like the best approach. However, instead of creating textures with raw bitmap data or photographs, I like to texture assets procedurally in Adobe Substance Designer.
A procedural texture map is a mathematically generated image. In Substance Designer, you might start with some noise or a pattern. Then, by manipulating that pattern through color shifting, blurs, warps, and other modifications, it’s possible to create new imagery that looks like materials you might find in the real world.
The reason I use procedural texture maps instead of bitmap data is because it’s much more flexible. When you use photographs and generate bitmap data, you’re generally forced to make complicated edits that are immutable. When working procedurally, changes can be made at any stage of the procedural pipeline. Substance Designer uses a node-based workflow, so it’s easy to modify a graph and change the nodes at the beginning of the chain without digging through layers or a history of edits like in Photoshop. It’s completely non-destructive.
Procedural texturing starts to become really powerful when you realize that it’s a tool for creating tools. For example, if I make a nice looking hardwood floor material, now I have that in my personal library and I can reuse that any time I need to make hardwood floors. If I need to make a new hardwood floor material out of a different type of wood or with a different weathering pattern, it’s easy to modify those parts of the procedural graph.
Applying Materials with Masks
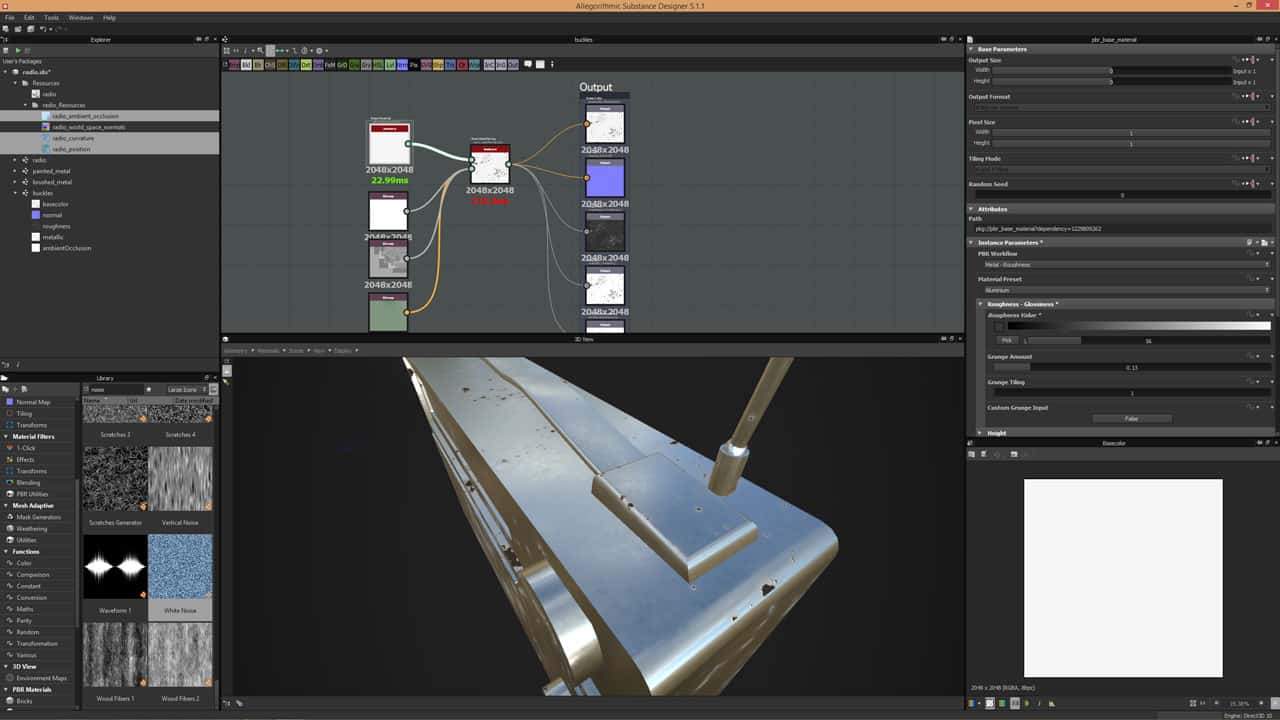
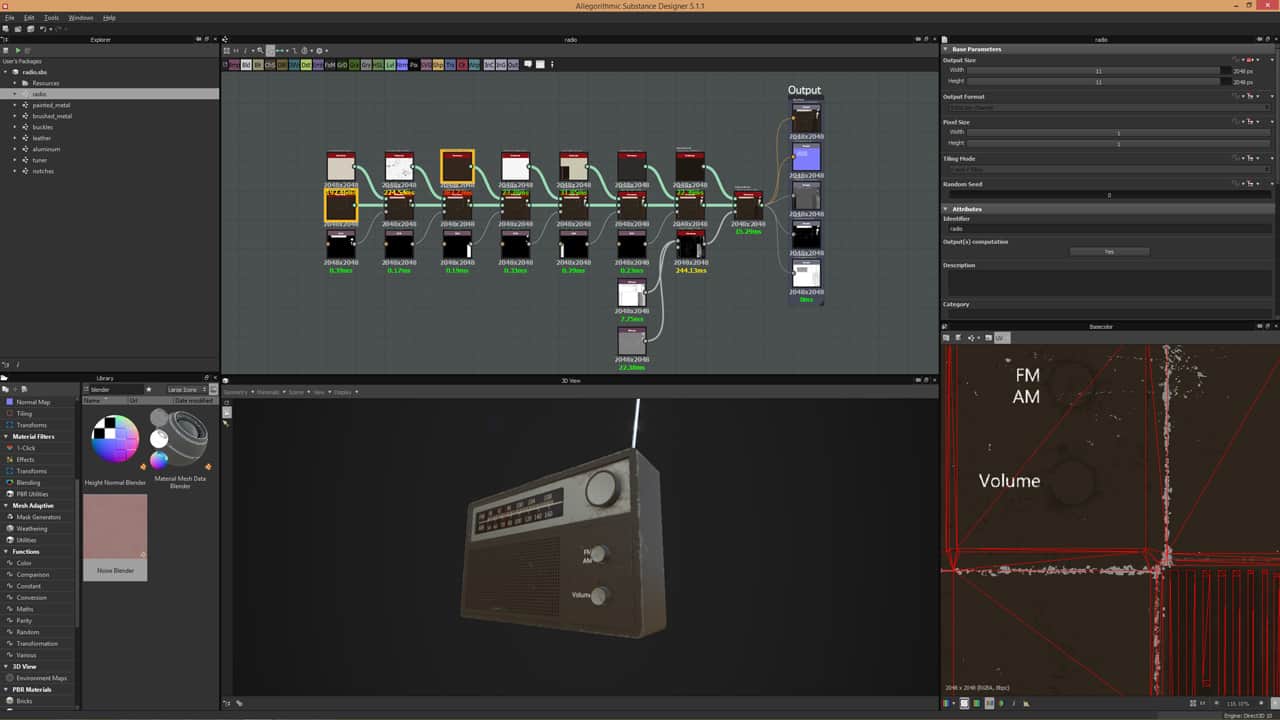
When I texture an asset with procedural materials, I create one material at a time in Substance Designer. For example, in the screenshot from the previous section, I’m working on the aluminium buckles that attach the leather handle to the body of the radio. It can be a bit strange when working on one material at a time like this, because the entire asset will use the same material all at once. However, it’s important to stay focused and try to visualize where the material will be applied.
Once I’m done creating each material, I bring them all together in a “master graph” that applies them all to the 3D model. In the master graph, I apply one material at a time by masking it to the part of the model where it belongs. Often times, I’ll simply draw an SVG mask over the UV map to apply the material to the proper area. Here’s a screenshot of what that looks like in Substance Designer:
I like this workflow because each material is in its own separate and logical group. I can break a model up into each uniform material, such as the leather handle, or the metal antenna. Each individual graph can only get so messy because it’s single responsibility and doesn’t try to be efficient by sharing resources or techniques with other graphs.
Once each material has been applied to a model, I will typically apply a final “dirt layer” at the end. Applying a uniform dirt to all the materials helps them to gel together in the final piece.
Import into the Game Engine
Both Unity and Unreal support Substance files directly in the game engine. However, I actually don’t use Substances directly inside of Unity. Instead, I save the final output texture maps from the graphs I create and then apply those to materials in Unity. The reason for this is because Substances come with a performance cost when they are procedurally generated in a game. While this can be advantageous in situations where a texture needs to change – for example, a different color or pattern of spots on a dinosaur – it’s not typical. In most situations, I’ll only use a Substance file if I’m going to really take advantage of its procedural properties.
After that, my process is fairly straightforward. Inside Unity, I’ll bring in an FBX file exported from Maya LT by simply dragging it from my file browser and dropping it into Unity’s Project window. Once the file has imported, I’ll set the scale and remove any default materials. Then, I do the same for the texture maps that I’ve exported from Substance Designer and use those files to create a new material that I then apply to the model.
Conclusion
I hope you were able to learn from this overview of my texturing process. If you have any questions or if you’d like to know more detail about any particular concept I mentioned, feel free to let me know in the comments!
Hi Nick,
I like your article about the procedural texturing. I am new to gaming. Can you tell me.
I know for a game lots of question arise for technical stuff like platform, style, detailing but lets take realistic PC first person shooter game like battlefield.
On that context, For a game asset, what maps are generally used other than color, normal/bump and AO map.
And for a Game character what maps are used to make it look realistic apart from color, normal/bump and AO(not sure if its used on character). Do they use SSS shader or skin maps with color, epidermal, subdermal layer , also having normal and displacement in games for realistic skin or this approach is just for VFX characters only.
I appreciate your guidance.
Thank you.
I know you already have a game asset workflow tutorial using Maya LT but I would love to see one using Modo and possibly Substance Designer.
Hi, nice article… But is there a way to accelerate the process?… I mean, e.g… doing multiple assets for the environment, I realize it takes a tremendous amount of time doing the high, then the low(retopology), then the uvs, then the baking/texturing… I don’t know if every asset in the scene should have normal maps/AO or just a few… Would be really nice if we could just worry about modeling the asset itself without the hi res one and somehow be able to achieve certain details like rounded edges in hard surfaces which could be an automatized task (like baking the rounded edge shader in MODO, which btw I still can’t be able to completely understand)
Hi Fex,
There’s lots of different workflows, and this is just one of them. For characters and other organic models, a high-to-low-poly bake is often the way to go. However, a lot of hard surface modeling can just be done with traditional box modeling without a high poly version.
For texturing, I use Allegorithmic Substance Designer, which can procedurally generate normal maps. In Substance Designer, you can also do high-to-low-poly bakes for normal, AO, etc. Often times, I’ll even generate AO information just from the low poly model because it’s plenty detailed enough.
Not every object in the scene needs every map. If a map isn’t adding any significant detail, it’s fine to skip it to speed up the workflow, save on memory, and improve performance. While I didn’t really discuss performance in this article, every map has a cost, so it’s important to use them wisely.
Does this mean Treehouse is gonna start teaching modeling and texturing? 😀
We’ve already started! 🙂 There’s a course on Maya LT already with more to come. You can check out new game related courses in our Game Development topic here: https://teamtreehouse.com/library/topic:game-development
Thanks for this — very helpful! One question — how did you generate your normals on the speaker dots? Did you do that in a different program like CrazyBump, or actually in SD?
Thanks!
Hi Allen,
I generated the normals in Substance Designer – it’s all procedural.
thanks